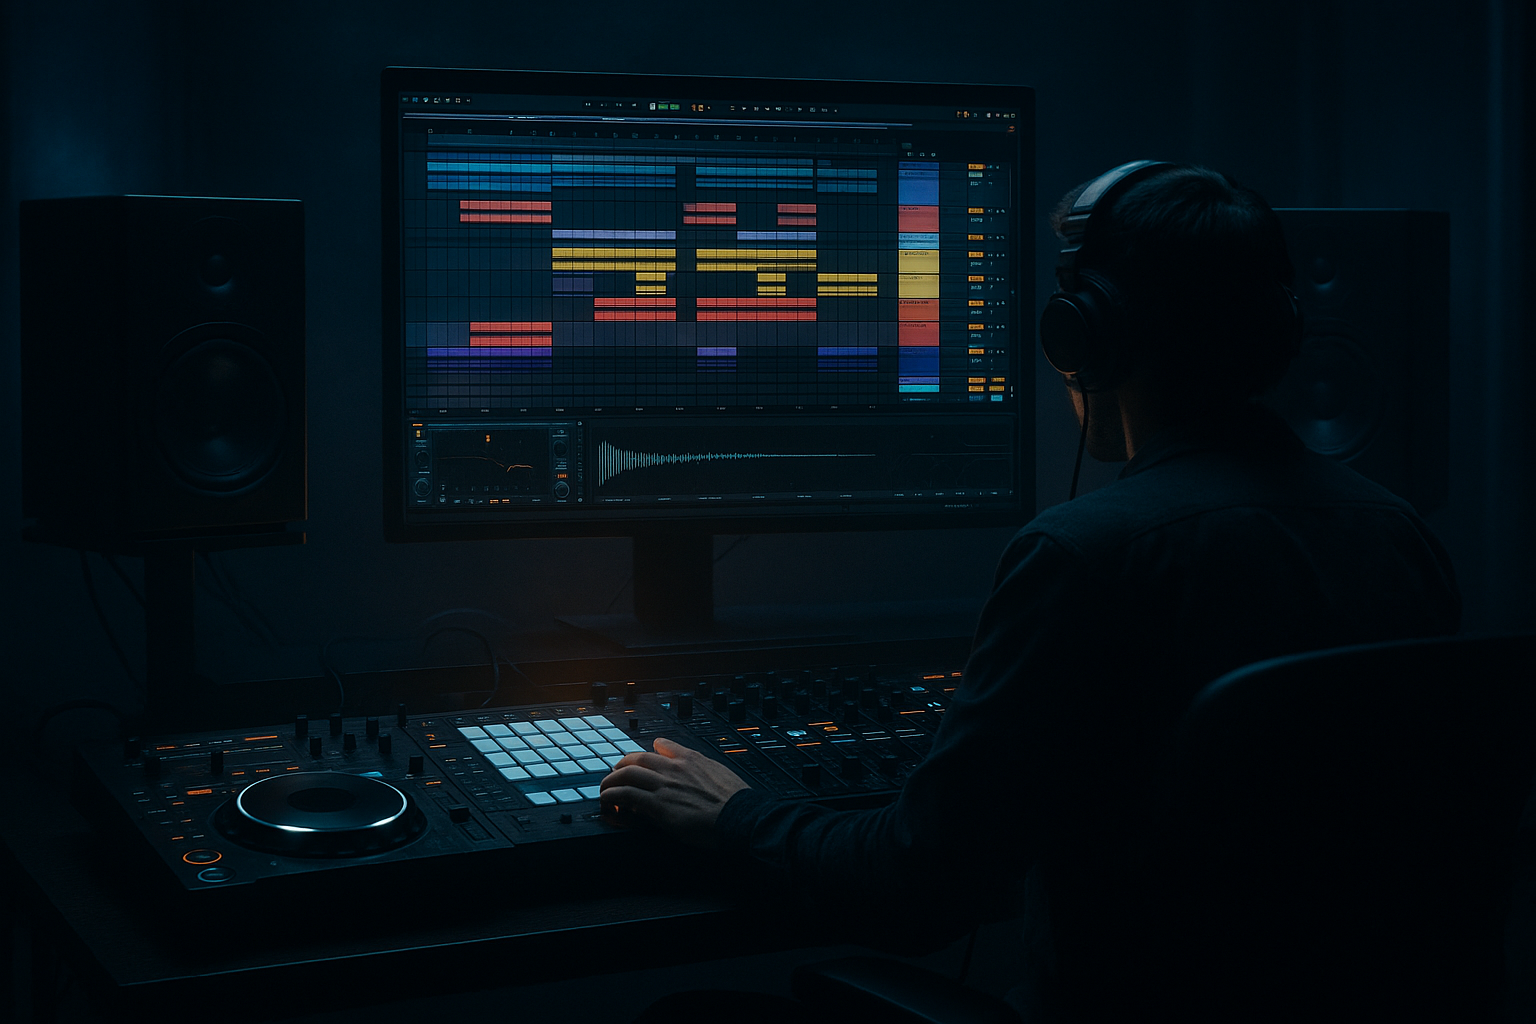
Main tutorial
Lesson Overview
A rewind moment is one of the most effective tension devices in jungle and oldskool DnB, but it only works when it feels earned and DJ-friendly. In this lesson, you’ll build a rewind-style transition in Ableton Live 12 that lands like a proper selector move: it stops the room, resets the energy, and still keeps the track mixable.
The goal is not just “reverse the drop.” We’re building a structured arrangement moment that can live in a real DnB tune: a clean pre-drop phrase, a controlled stop, a rewind throwback, and a return into the groove with enough space for a DJ to mix. This matters because in drum & bass, especially jungle and darker rollers, your transitions have to serve both the dancefloor and the booth. Too chaotic and the mix falls apart. Too polished and you lose the raw, local-scene energy that makes rewind sections hit.
You’ll use Ableton Live 12 stock tools to create the rewind feel with:
- tight drum edits and break punctuation
- reverse throws and tape-stop style motion
- controlled atmosphere and impact design
- DJ-friendly intro/outro phrasing
- bassline subtraction so the rewind reads clearly without mud
- oldskool jungle-inspired tracks with chopped breaks and call-and-response bass
- roller tracks that need a switch-up before the second drop
- darker neuro-adjacent DnB where the rewind is used as a pressure-release moment
- arrangement work where you want a selector-style “run it back” without breaking the grid
- a 1–2 bar stop where drums and bass collapse into a controlled vacuum
- a rewind-like reverse throw using reversed break tails, cymbal swells, and filtered noise
- a tape-stop style moment that briefly bends the whole mix downward
- a return into the groove with a strong downbeat and clear sub re-entry
- optional call-back of a classic break chop or stab to make the moment feel oldskool
- Bars 1–8: stripped intro with break and sub tease
- Bars 9–16: full groove
- Bars 17–24: drop variation with extra break edits
- Bar 25: rewind moment — kick, snare, and bass suddenly pull back
- Bar 26: reversed wash and vocal stab
- Bar 27: hard reset and re-entry into the hook or second drop
- after the first drop as a switch-up into bar 17 or 33
- right before the second drop
- near the outro if you want a crowd-reaction moment before a mix-out
- 8 bars intro
- 16 bars main groove
- 8 bars variation
- 1 bar rewind
- 8 bars re-entry or second drop
- mute the bassline on beat 4 or halfway through the bar
- remove the kick for the last 1/4 or 1/2 bar
- leave only a snare tail, break fragment, or hat texture
- a snare on beat 4 with a short delay throw
- a break tail with transient cut
- a short vocal stab or horn shot for oldskool energy
- break fills
- snare ghosts
- cymbal hits
- short FX or stab
- one bass note tail if it’s clean enough
- create a new audio track set to Resampling
- arm it and record the stop/reverse moment in real time
- then edit the recorded audio into a tight reverse throw
- Complex Pro for tonal elements
- Beats mode for break fragments if you want the transient shape to stay punchy
- Auto Filter resonance around 0.70–1.20 for a sharper whoosh
- Reverb dry/wet around 20–35% with a shorter decay for a grimey space
- Echo feedback around 15–30% with a high-pass above 250 Hz to keep the low-end clean
- Transpose down by -3 to -12 semitones over a very short time on a resampled bus
- or use Frequency Shifter on the rewind FX return for a metallic pitch drift
- Downsample from normal to around 8–12 bits
- Frequency reduction only slightly, enough to rough up the tail, not destroy it
- reverse FX swell
- brief tape-stop pitch fall
- sudden silence or near-silence
- hard re-entry on the downbeat
- put EQ Eight first and high-pass around 120–180 Hz
- add a narrow cut if the area around 300–500 Hz gets boxy
- gently boost 6–9 kHz if the reverse needs more shimmer
- add Utility and automate Width if needed, but keep the sub mono and centered
- automate a small dip in level, around -2 to -4 dB, just before the rewind
- keep the snare transients intact so the listener still knows where the bar line is
- use Glue Compressor with very mild settings on the drum bus only if the break feels too spiky; aim for 1–2 dB of gain reduction, not more
- a clear count-in or phrase marker before the rewind
- at least one clean bar of groove before the next major section
- no unnecessary long FX tail that blocks the next drum downbeat
- 2 bars of reduced drums before the rewind
- 1 bar of rewind FX
- 1 bar of reset or near-silence
- 4 or 8 bars of re-entry with stripped drums before full bass returns
- duplicate a 1/2-bar or 1-bar motif
- reverse the audio clip for the rewind phrase
- then bring back the original version on the re-entry
- automate Auto Pan very subtly on a texture layer for motion, around 0.10–0.30 Hz with low Amount if you want a drifting undercurrent
- rave stab stinger before the stop
- chopped vocal “hey” or “come on” style sample
- reversed amen snare with a cymbal hit at the tail
- low passed synth swell answered by a clean snare crack
- automate drum bus volume down slightly before the stop
- automate a low-pass filter on the bass or master FX return
- automate reverb send up only during the reverse throw
- automate a short burst of Echo feedback, then kill it before the downbeat
- sub clipping during the stop
- reverb masking the first kick of the re-entry
- too much low-mid buildup from reversed drums
- FX tails that keep the section from sounding DJ-friendly
- Making the rewind too long
- Leaving sub running through the stop
- Overfilling the FX layer
- Losing the bar line
- Too much reverb wash
- Ignoring mix balance
- Use a short distorted reese stab right after the rewind reset, then filter it down fast. That creates a brutal sense of release without muddying the sub.
- Layer a quiet vinyl crackle or room tone under the reverse section for oldskool atmosphere, but high-pass it above 200 Hz so it stays invisible in the low-end.
- On the rewind return, add Saturator with Soft Clip enabled and drive it lightly for 2–5 dB of extra harmonic density on the FX bus.
- For darker rollers, automate Frequency Shifter by tiny amounts, like 0.5–3.0 Hz, on the reverse tail to create a sick, unstable tension.
- If the track is neuro-leaning, keep the rewind clean and mechanical: fewer samples, sharper stop, and a more precise return. Neuro hates foggy transitions.
- Resample the rewind bus and then cut the best 1-bar version. Commit early. Often the bounced version feels more authentic than a stack of live devices.
- Put a silent or near-silent gap right before the re-entry. That microscopic void makes the kick feel huge.
- Use Ghost notes in the break right before the rewind to preserve groove memory. The dancefloor should feel the pattern disappear and then come back, not simply stop.
This is especially useful in:
Why this works in DnB: the genre thrives on contrast. A rewind moment creates an extreme contrast between forward momentum and sudden reversal, which makes the next drop feel heavier. In a 170–174 BPM context, even a half-bar of well-designed stop/start energy can feel massive if your drums and FX are locked in.
What You Will Build
You’ll build a DJ-friendly rewind section that can sit around the end of an 8-bar phrase or at the start of a second drop.
The result will be:
Musically, imagine this in a jungle track:
The aim is a transition that feels like a real DJ would shout “run it back” over it 😈 while still being arranged cleanly enough that another DJ can mix out of it.
Step-by-Step Walkthrough
1. Build the phrase structure first, not the effect
Open your Arrangement View and decide where the rewind belongs. For advanced DnB, this usually works best at the end of a 16-bar or 32-bar phrase, most often:
In a jungle/oldskool context, aim for a structure like:
Keep the phrase DJ-friendly by preserving clear 8/16-bar symmetry. The rewind should feel like a designed exception, not random editing. Drop a Locator at the rewind point and another at the reset point so you can quickly audition different placements.
2. Create the rewind anchor with a drum mute and bass cut
On the last bar before the rewind, strip the mix down to the essentials:
If you’re working with a breakbeat, duplicate the break to a separate audio track and slice the last bar into smaller pieces. Use Simpler in Slice mode or manual chopping with fades. For the rewind anchor, the most effective hits are:
Apply Auto Filter on the drum bus and automate a fast low-pass sweep from around 16 kHz down to 2–4 kHz over the final half-bar. This gives the impression of the track pulling backward before it stops.
Why this works in DnB: the ear tracks the high-frequency motion and transient rhythm more than the whole spectrum. If you remove low-end first, the rewind reads cleaner and the sub doesn’t smear the transition.
3. Design the rewind sound with reversed audio and resampled tails
Now create the actual rewind texture. Duplicate a 1-bar section containing:
Reverse these clips in Arrangement View and align them so the energy swells toward the rewind point. Use fades aggressively to avoid clicks.
For the cleanest result, resample the section:
This gives you a single, controllable audio event instead of managing many clips. If the reverse sounds too busy, use Warp and try:
Useful parameter moves:
4. Use a tape-stop style pitch fall with stock devices or clip automation
A rewind hits harder when the pitch momentarily collapses. In Live, you can create this with automation rather than pretending it’s a literal deck stop.
Option A: automate the master or drum bus pitch movement with Clip Envelopes or device tuning elements on key sampled hits. For audio clips, a practical workaround is to automate:
Option B: place Redux before the reverb on the rewind return and automate it very lightly for a crumpled digital tail. Keep it subtle:
Option C: use Pitch Loop 89 on a return track if you want a classic bending-stop effect. Keep the Dry/Wet around 10–25% for a disciplined blend.
For the most convincing result, combine:
That combination is what sells the rewind language in a club context.
5. Carve space so the rewind feels massive, not muddy
A rewind moment can easily become a blur if the low-end and reverb tails overlap too much. Build a dedicated FX return or group for the rewind and treat it like a miniature arrangement section.
On the rewind bus:
On the main drum bus:
If your bassline is a reese or a distorted sub layer, automate a low-pass or a full mute before the rewind. In DnB, the rewind sounds bigger when the bass disappears first and returns with intention. Avoid leaving sub ringing through the stop unless that’s a deliberate dubwise effect.
6. Add DJ-friendly structure so the section still mixes cleanly
This is where the advanced arrangement thinking comes in. A rewind moment should still leave the track easy to cue and mix.
Build your DJ-friendly structure by keeping:
For a club-ready layout, try this:
If you want the track to be friendly to DJs mixing with another tune, make sure the rewind section has a predictable downbeat landing. The best rewind sections are dramatic but still countable. A DJ should be able to phrase-match into or out of it without guessing.
A good musical example: in an oldskool jungle track at 172 BPM, let the second drop cut out after a 16-bar amen section, throw the break tails backwards for one bar, then bring the classic break back in with a filtered bass pickup. That gives you the “rewind + reload” culture without losing arrangement discipline.
7. Add call-and-response elements to make the rewind feel intentional
A rewind moment becomes more memorable when it references a motif from earlier in the track. Use a short stab, vocal chop, Reese hit, or break accent that appears before and after the rewind.
Try this in Ableton:
For jungle and oldskool flavors, common motif ideas include:
This call-and-response helps the rewind feel like a musical event, not just an engineering trick. It also helps the listener remember the hook after the drop comes back in.
8. Finalize the transition with automation passes and mix checks
Do a final automation pass over the rewind section:
Then check the transition in mono using Utility on the master or monitor chain. The important thing is not stereo width; it’s whether the downbeat after the rewind still punches. The sub should hit cleanly at center, and the break transient should land with enough force to restart the energy.
Listen for:
If needed, shorten the reverse by 1/4 bar. In DnB, a cleaner short rewind is often heavier than a long cinematic one.
Common Mistakes
Fix: keep it to 1 bar or less in most club arrangements. Longer can work, but only if the structure still feels countable.
Fix: mute or filter bass before the rewind. Let the sub return clearly on the next phrase.
Fix: choose one main reverse sound, one tape-stop motion, and one atmosphere. Too many layers blur the impact.
Fix: keep a snare, hat, or transient marker so the DJ and the listener still know where “1” is.
Fix: high-pass the rewind return and shorten the decay. You want tension, not a washed-out breakdown.
Fix: check the first beat after the rewind at low volume and in mono. If it doesn’t hit there, it won’t hit in the room.
Pro Tips for Darker / Heavier DnB
Mini Practice Exercise
Set a 15-minute timer and build a rewind moment for an 8-bar jungle or DnB loop.
1. Pick a phrase where the rewind could land at the end of bars 8 or 16.
2. Mute the bass for the final half-bar and leave only a snare or break tail.
3. Duplicate a 1-bar section and reverse it.
4. Add Auto Filter to the reverse bus and automate a sweep from bright to dark.
5. Add one pitch-drop moment using Frequency Shifter, Pitch Loop 89, or a bounced resampled clip.
6. Reintroduce the drums and bass on a clean downbeat.
7. A/B the section in mono and at low volume.
Goal: get a rewind that feels like a real crowd moment, not just an FX trick. Export a quick bounce or resample and listen back immediately. If the reset hits harder than the build, you’ve done it right.
Recap
The strongest rewind moments in DnB are built from structure first, FX second. Keep the phrase countable, cut the bass cleanly, design a short reverse throw, and land back on a solid downbeat. Use Ableton stock devices like Auto Filter, Echo, Reverb, Saturator, Frequency Shifter, Utility, Glue Compressor, and Resampling to make the transition feel authentic.
If the section stays DJ-friendly, reads clearly in the low end, and brings back the groove with attitude, you’ve got a rewind that works for jungle, oldskool, rollers, and darker bass music alike.

