Main tutorial
Lesson Overview
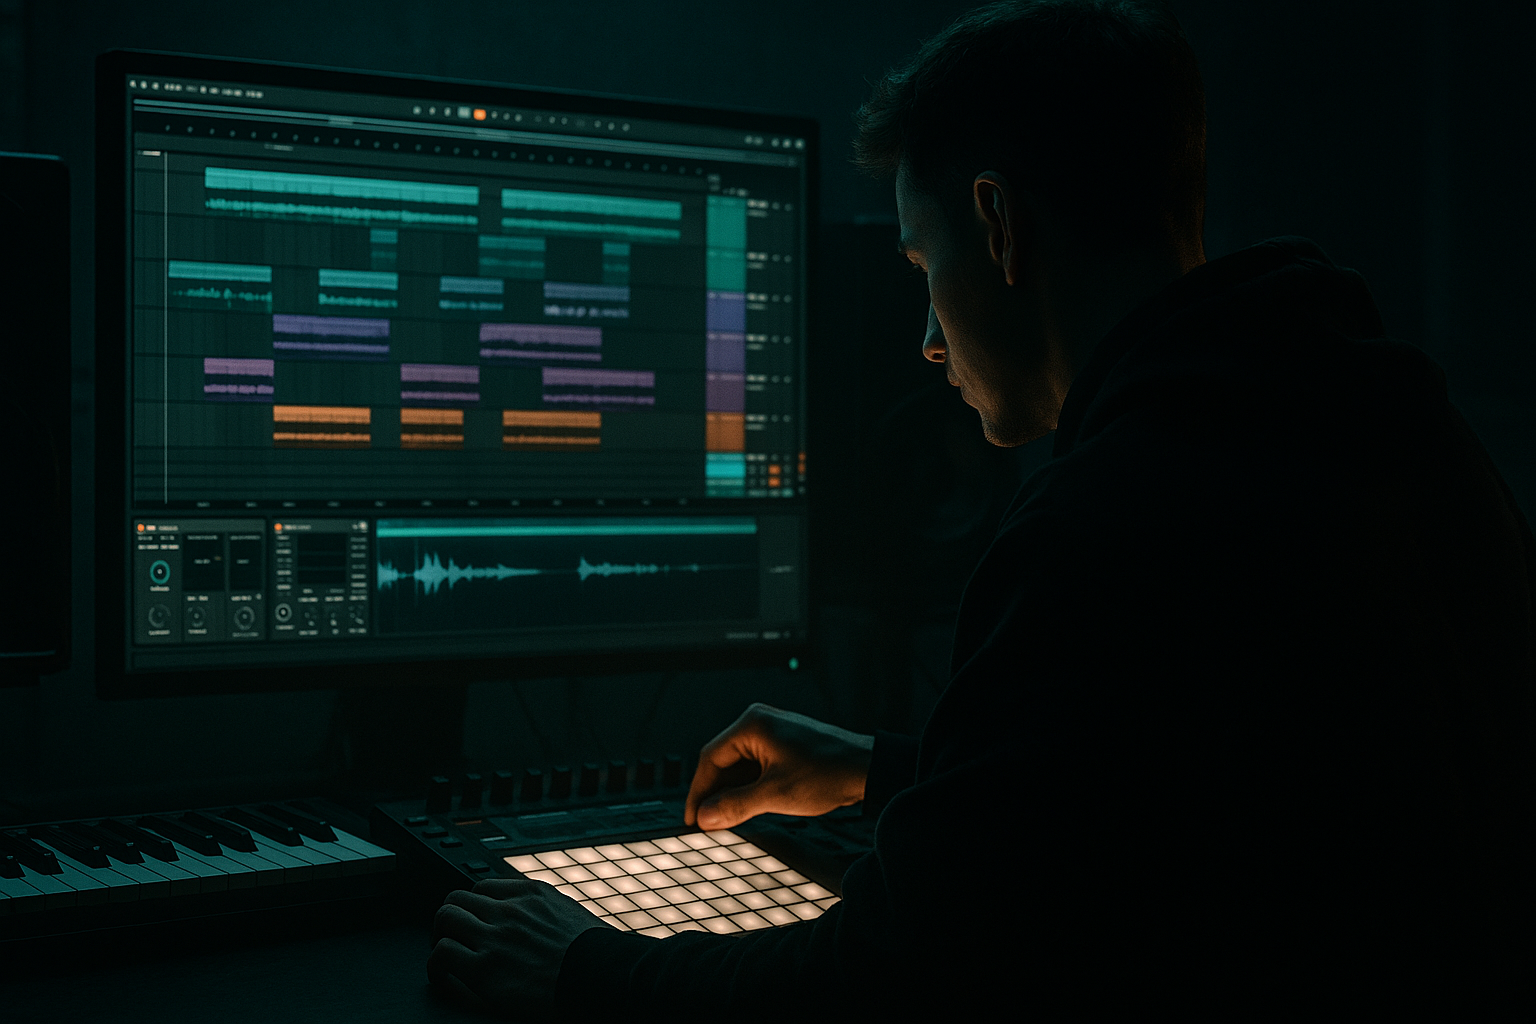
In this lesson, you’re building a Break Lab edit: a jungle bass wobble stack from scratch in Ableton Live 12 — the kind of bass movement that sits under chopped breaks, drives a roller groove, and still leaves space for the drums to breathe. The goal is not just “make a wobble bass,” but to create a layered DnB bass stack that feels like a real record-ready section: sub foundation, midrange reese motion, distorted character, and controlled stereo width.
This matters in DnB because the bass and drums have to function like a single machine. In jungle and darker rollers, the bass often does three jobs at once:
- anchors the low-end with a clean sub
- adds movement with a mid wobble or reese layer
- creates tension and call-and-response with the break edits
- a short 8-bar bass phrase
- automation for filter, movement, and sends
- drum-side interplay with a chopped break
- mix-safe routing with low-end discipline
- a final bounce-ready bass bus that leaves mastering headroom
- Making all three bass layers too loud
- Using too much unison/width on the low end
- Over-wobbling every bar
- Letting the bass fight the break
- Driving saturation without EQ cleanup
- Ignoring arrangement context
- Over-compressing the bass bus
- Use the second bar as the “answer” bar
- Layer a very quiet noise texture above the mid bass
- Automate filter movement in small ranges
- Print and resample the bass early
- Keep sub notes shorter than you think
- Use call-and-response with the break
- Check the stack at low volume
- a mono sub for weight
- a moving mid layer for wobble and identity
- a grit layer for edge and translation
- automation and resampling to turn sound design into arrangement
- mix discipline so the stack stays powerful and mastering-friendly
If the stack is built properly, you get that heavy, modular “Break Lab” energy where the groove can mutate across 8 or 16 bars without losing impact. This is also a mastering-aware workflow: the choices you make now affect headroom, mono compatibility, and how hard the track can be pushed later.
---
What You Will Build
By the end, you’ll have a 3-layer jungle bass stack in Ableton Live 12:
1. Sub layer
A mono, clean sine-based foundation carrying the low end around 40–60 Hz.
2. Mid wobble / reese layer
A detuned, movement-heavy bass patch with controlled filtering and LFO modulation, giving the track that classic jungle/rollers push.
3. Grit / texture layer
A resampled or driven layer with saturation, filtering, and transient bite to help the bass read on smaller systems and cut through break-heavy arrangements.
You’ll also build:
Musically, think of it as a dark 170 BPM drop section where the break is doing constant syncopated movement and the bass answers in two-bar phrases, with a wobble that opens up on bar 2 and slams back in on bar 4. That’s the sweet spot for jungle edits, rollers, and neuro-leaning DnB: motion without clutter.
---
Step-by-Step Walkthrough
1. Set up the session like a proper DnB writing template
Start at 170 BPM. Set the project to a clean arrangement workflow with:
- one drum group for your break edits
- one bass group containing sub, mid, and grit layers
- one return track for reverb/delay throws if needed
- a reference track if you have one nearby
Load a chopped break onto an audio track. A classic 2-bar break loop works best for this exercise. If you’re editing from a full break, slice it at transient markers and create a tighter loop with ghost hits and fills.
Why this works in DnB: the bass stack needs to respond to the drum phrasing. In jungle, a bass wobble that ignores the break often feels generic. When you build around the break, the bass becomes part of the rhythm section rather than sitting on top of it.
Keep your master channel conservative: aim for -6 dB of headroom while writing. This is especially important for mastering later because heavy low-end layering can eat headroom fast.
2. Build the sub layer first with Operator
Create a new MIDI track and load Operator. Use it as a dedicated sub.
Suggested starting settings:
- Oscillator A: Sine
- Fixed or standard mode, with a clean sine tone
- Envelope: fast attack, short decay, sustain full, release short
- Filter: off or very gentle low-pass if needed
- Warp/extra modulation: none
Program a simple bassline that follows the break phrase. In jungle, the sub often works best as short, intentional notes rather than long drones:
- 1-bar or 2-bar phrases
- notes around root + fifth + octave for movement
- leave space where the break answers
For MIDI, start with note lengths around 1/8 to 1/4, then shorten some notes so the bass punches instead of smearing. If the break has a snare on 2 and 4, leave a pocket around those hits so the groove stays open.
Add Utility after Operator and set the bass track to mono if needed. Keep the sub centered.
3. Design the wobble mid layer with Wavetable or Analog
Duplicate the MIDI clip to a new track and load Wavetable. This is your movement layer.
A good DnB reese-style start:
- Two oscillators with saw or slightly different waveforms
- Detune modestly, not extreme
- Unison: keep low or moderate to avoid low-end blur
- Filter: low-pass with resonance kept controlled
- Envelope amount moderate for bite
Suggested parameter range:
- Filter cutoff: start around 150–400 Hz, then automate upward for tension
- Resonance: 10–25%
- Unison voices: 2–4 for width, but don’t overdo it
- Detune: subtle, just enough to create internal movement
Add an Auto Filter after Wavetable for wobble control. Use an LFO or manual automation to create rhythmic movement:
- set low-pass or band-pass
- use a synced rate such as 1/4, 1/8, or dotted 1/8
- automate the cutoff so the bass opens on the off-beats or at phrase endings
If you want a more jungle-leaning wobble, make it less “EDM sweeps” and more groove-led movement. That means small filter changes, not giant obvious risers.
4. Create the grit layer with resampling or saturation
Duplicate the mid layer and make a third track for grit. This layer should not carry the full bass weight; it should add harmonics, bite, and audible motion.
Use one of these stock Ableton paths:
- Redux for digital edge
- Saturator for controlled warmth and drive
- Overdrive for focused mid push
- Erosion for noisy texture in the upper mids
A solid starting chain:
- Saturator: Drive 3–8 dB
- EQ Eight: high-pass around 120–180 Hz
- Redux: slight downsampling or bit reduction if you want a nastier edge
- Auto Filter: automate for movement
The goal is to make the bass audible on smaller speakers without turning it into fuzzy mush. In darker DnB, this layer can supply the “teeth” that help the bass feel aggressive when the break is busy.
You can also resample a 4-bar loop of the bass stack and then chop the recorded audio into rhythmic fragments. This is a very DnB workflow: write synth layers, print them, then edit them like a break.
5. Route all bass layers to a Bass Group and shape them together
Group the sub, mid, and grit tracks into a Bass Group. Put mix-shaping devices on the group rather than over-processing each track individually.
Recommended Bass Group chain:
- EQ Eight
Cut unnecessary sub-rumble below 25–30 Hz. If the mid layer is muddy, make a gentle cut around 180–300 Hz.
- Glue Compressor
Use lightly to keep the stack cohesive. Try 1–2 dB of gain reduction with a slowish attack and release tuned to the groove.
- Utility
Use to check mono compatibility and adjust width if necessary.
- Optional Saturator
Very light drive if the stack feels too polite.
Keep the sub layer independent enough that the group processing doesn’t distort it too much. If the low end starts pumping or folding, back off the group compression and treat the sub more cleanly.
Why this works in DnB: drum and bass mixes rely on low-end hierarchy. Clean sub + animated mids = power without loss of punch. The bass group lets you glue the sound while keeping the sub disciplined.
6. Write the wobble phrase around the break edit
Now make the bass interact with the drums. Use a two-bar call-and-response pattern.
A practical arrangement example:
- Bar 1: bass hits on the “and” of 1 and the “and” of 3, leaving the snare exposed
- Bar 2: bass opens up with a longer note into the next downbeat
- repeat with a variation every 4 bars
- use one bar of fill or break variation every 8 bars
Use MIDI note lengths and velocity variation to create groove:
- short notes for stabby sections
- slightly longer notes to stretch tension
- lower velocities on filler notes
- stronger velocities on phrase starts
If the break is very active, simplify the bass rhythm. If the break is sparse, let the bass carry more syncopation. The balance between the two is what makes the edit feel “alive” rather than crowded.
7. Automate movement like a proper DnB drop section
Now bring the stack to life with automation. In Ableton, automate:
- Auto Filter cutoff
- filter resonance
- saturation drive
- send levels to delay/reverb for transitions
- Utility width on the grit layer
- crossfader-style arrangement moves if you’re performing the section
Concrete automation ideas:
- Open the mid filter slightly over 2 bars into a drop
- Increase Saturator drive by 1–2 dB on the last half of bar 4 for a mini-fill
- Narrow the grit layer in the drop, then widen it briefly on the transition
- Automate a short delay throw on the final note before a switch-up
Keep automation subtle enough that the bass still feels like a machine, not a random effect demo. In darker DnB, tension often comes from small parameter shifts rather than huge obvious sweeps.
8. Shape the drum/bass relationship with bus discipline
On the drum group, use Glue Compressor or Drum Buss carefully to tighten the break. The point is not to squash the break; it’s to make the transient story clearer so the bass can sit in the gaps.
Good starting ideas:
- Drum Buss Drive: light, just enough for edge
- Transients: preserve the snap of snares and hats
- EQ Eight on the drum bus: clean up excessive low-end rumble
If the bass and break compete, use sidechain compression sparingly on the bass group keyed from the kick or the break’s main transient channel. In jungle, heavy sidechain can kill momentum, so aim for a gentle dip rather than an obvious pump.
Try:
- attack: fast
- release: timed to the groove
- gain reduction: subtle, around 1–3 dB
The mix should still feel like the bass is pushing forward, not ducking away every time the drum hits.
9. Print a resample and audition it like an arrangement tool
Once the stack is working, create a new audio track and resample the Bass Group. Record 4–8 bars of the phrase.
Then:
- chop the audio into smaller phrases
- reverse one hit for tension
- mute the sub on a fill to create impact contrast
- slice a short bass stab and place it before a drop
This is huge for DnB arrangement because printed audio gives you more control over micro-edits. A resampled wobble stack can become:
- a fill
- a turnaround
- a breakdown motif
- a DJ-friendly drop variation
This is especially useful in a Break Lab edit, where the bass and break can be treated as material to cut, rearrange, and mutate across sections.
10. Do a mastering-aware final check
Before calling it done, check the bass stack in the context of a full section.
Check:
- mono compatibility using Utility on the master or bass group
- low-end balance against the break
- harshness around 2–5 kHz
- sub consistency on different note lengths
- headroom on the master
A practical final chain on the master during writing can be minimal or even empty. If you use anything, keep it light and temporary. The point is not to “master” the track here, but to make mastering easier later by avoiding low-end buildup, uncontrolled width, and clipped transients.
If the track feels too crowded, reduce the grit layer before touching the sub. In DnB, the sub is sacred; the upper layers should do the expressive work.
---
Common Mistakes
- Fix: let the sub carry the weight and push the mid/grit layers lower than you think.
- Fix: keep the sub mono and let only the mid and grit layers have controlled width.
- Fix: use rhythmic contrast. Save big movement for phrase endings and switch-ups.
- Fix: simplify either the drum edit or the bass rhythm. DnB needs space between the hits.
- Fix: high-pass the grit layer and remove muddy low-mid buildup after distortion.
- Fix: test the bass in a 4-bar and 8-bar phrase, not just solo. Jungle bass is about how it resets and evolves.
- Fix: if the groove loses punch, reduce compression and shape tone with EQ and automation instead.
---
Pro Tips for Darker / Heavier DnB
Dark rollers often feel heavier when bar 1 is restrained and bar 2 opens up. That contrast makes the drop feel intentional.
A little Erosion or filtered white noise can add menace without making the bass louder.
A 10–15% cutoff movement can feel more professional than huge sweeps.
Once it works, bounce it. Audio editing gives you that chopped, underground, break-edit feel.
Shorter notes often hit harder in jungle because they leave room for the break transient and avoid low-end overlap.
Let the bass leave gaps where the snare or ghost notes land. That’s where the groove gets dangerous.
If the bass still speaks quietly, your harmonics and balance are working. If it disappears, the mids need more structure.
---
Mini Practice Exercise
Spend 10–20 minutes building a 4-bar jungle bass loop using this exact method:
1. Set the project to 170 BPM.
2. Write a simple break edit loop with one main break and a few ghost hits.
3. Build:
- one Operator sub
- one Wavetable mid wobble
- one Saturator/Redux grit layer
4. Program a bassline that leaves space on the main snare hits.
5. Automate the mid filter so bar 2 opens more than bar 1.
6. Resample the full bass group for 4 bars.
7. Chop one audio hit and place it as a transition fill at the end of bar 4.
8. Do a mono check and reduce anything that blurs the low end.
Goal: by the end, you should have a loop that feels like a usable drop sketch, not just a sound design experiment. If you can make the bass and break feel locked together in 4 bars, you’re on the right track.
---
Recap
The core of this lesson is simple: build the bass like a stacked DnB system, not a single preset. Use:
If the bass supports the break, leaves space for the snare, and evolves across phrases, it will feel like a proper jungle/DnB record — not just a loop.

