Main tutorial
Lesson Overview
A rewind-worthy drop in Drum & Bass is not just “a loud 8-bar loop.” It’s a switch-up: a sudden change in drum phrasing, bass rhythm, or energy that makes the listener feel like the track just kicked into a new scene 🔥
In jungle, rollers, neuro, and darker DnB, switch-ups are essential because they create contrast. You might have:
- a tight, driving first drop
- then a half-time or breakbeat variation
- then a bar of silence, a fill, or a bass call-and-response
- then a second drop that feels more dangerous than the first
- a clean first 8 bars with a rolling drum/bass pattern
- a switch-up in bars 9–12 using break edits, bass stops, or note changes
- a return or escalation in bars 13–16 that feels like a second wave
- a short fill or impact that makes the drop feel rewind-worthy
- a simple DJ-friendly structure that could sit after a breakdown or intro
- Bars 1–8: a standard half-time or rolling jungle-influenced drop with steady sub and drum movement
- Bars 9–12: a switch to chopped breaks, bass gaps, or a more syncopated reese phrase
- Bars 13–16: the groove returns harder, with extra crash, fill, or bass variation
- Kick / Drum Rack
- Breakbeat loop or chopped break track
- Sub bass
- Mid bass or reese
- FX / impacts
- Optional atmosphere or noise track
- Bars 1–4: main groove introduction
- Bars 5–8: groove reinforcement
- Bars 9–12: switch-up
- Bars 13–16: return / payoff
- a kick on the downbeat or as part of a drum loop
- a snare on beat 2 and 4 feel, or the classic DnB backbeat placement depending on your drum pattern
- a sub bass that supports the root notes
- a mid bass or reese that plays short, controlled notes
- Drum Rack with individual one-shots
- a break sample chopped in Simpler
- or a loop split into pieces for easier editing
- Drum Rack for organizing kicks, snares, hats, and break slices
- Simpler in Slice mode for chopping a break
- EQ Eight to clean low-end conflict
- Compressor for subtle glue on the drum bus
- On your break slices in Simpler, keep Warp on and adjust transients so the groove stays tight
- On the drum bus, use Compressor with a gentle ratio around 2:1 to 3:1 and only a few dB of gain reduction
- Use EQ Eight to roll off unnecessary low end from break tops if they clash with the sub
- leave small gaps every 2 bars so there is room for the switch-up later
- don’t fill every bar with fills yet; save that energy
- Operator for a clean sub and simple tone
- Wavetable for a more aggressive reese or mid bass
- Simpler if you want a resampled bass hit
- make a pure sine or triangle sub in Operator
- layer a mid bass in Wavetable or a resampled audio clip
- keep the sub mono and centered
- Operator sub: sine wave, no unneeded unison, short notes with clean note lengths
- Wavetable mid: a detuned saw-based patch with filter movement, but keep it controlled
- add Saturator lightly for harmonics so the bass reads on small speakers
- Saturator Drive: around 2–6 dB
- Wavetable filter cutoff: start around 200–800 Hz for darker movement, then automate slightly
- Utility: set bass sub track to Bass Mono behavior manually by keeping stereo width narrow and checking in mono
- use short call-and-response notes, not constant buzzing
- leave the final beat or half-beat before the switch-up slightly empty
- switch from straight rolling hats to chopped break slices
- add a snare fill or ghost note pattern
- remove the kick for half a bar
- introduce a reversed break or fill leading into the next phrase
- slice it to new MIDI notes
- copy the existing pattern
- then delete or move a few slices so the groove feels rewritten
- Bars 1–8: consistent groove
- Bar 9: remove a kick or bass hit
- Bar 10: add a break fill
- Bar 11: bring back snare intensity
- Bar 12: use a short drum roll or reverse hit into the return
- Simpler for chopped jungle edits
- Note Length or manual MIDI editing for cleaner drum hits
- Groove Pool if your break needs a more human swing
- If the break feels too stiff, add a groove with 55–60% strength and test carefully
- If the snare feels weak, layer a second snare and use Transient shaping by clip envelope or volume editing rather than over-compressing
- mute the sub for a beat before the return
- change the note pattern so it lands on different off-beats
- switch from long notes to short stabs
- answer the first bass phrase with a higher or more distorted version
- Bars 1–8: bass hits on a repeating 2-bar rhythm
- Bars 9–10: bass drops out on the last half of bar 9
- Bars 11–12: a new rhythmic answer comes in with a little more distortion
- Filter cutoff on Wavetable
- Saturator drive
- Auto Filter resonance for tension
- Utility gain for quick dropouts
- filter movement from low-mid closed to slightly more open, not full brightness
- gain dips of -3 to -6 dB for tension moments before the return
- short mutes on the bass for one 1/8 or 1/4 note can create huge impact
- if the mid bass switches up, the sub should stay clear and simple
- don’t let the sub and reese fight each other on the same rhythmic moments
- a 1/4 beat silence
- a single snare fill
- a reverse crash
- or a bass stop with only the tail of the reverb continuing
- automate the track volume down briefly
- mute the bass clip for a tiny gap
- use Reverb or Echo on an FX return, then automate the send up on the fill
- Auto Filter on a noise sweep
- Reverb with short decay for a splash
- Echo for a controlled repeat into the return
- Utility to automate a quick volume dip if needed
- put the silence right before the strongest drum hit of the second half
- if you’re making darker neuro or rollers, the gap can be very short and brutal
- if you’re making jungle, the gap can feel like a classic “pull-up” moment
- bring back the original groove with an extra top layer
- add a second snare ghost note
- open the filter slightly more
- add a crash + downlifter + bass stab on the first beat of the return
- duplicate your main drum rack pattern
- add one extra percussion hit on the last beat of bar 13 or bar 15
- automate EQ Eight or Auto Filter on the bass so the return feels brighter or more aggressive
- layer a short impact sample on beat 1 of bar 13
- the first half of the drop teaches the groove
- the switch-up shocks the listener
- the return confirms the groove with added weight
- solo the sub and kick together
- make sure they are not both peaking at the same time too often
- keep the sub centered with Utility
- use EQ Eight to remove unnecessary low-mid buildup from the bass layer
- the sub should feel powerful, not fuzzy
- the kick should cut through without stealing all the space
- the break should not overpower the low end with rumble
- group drums together and bass together
- listen to the drop in mono occasionally
- if the switch-up feels weaker in mono, simplify the mid bass or widen less aggressively
- Too many ideas at once
- No contrast between sections
- Overfilled drum edits
- Bass is always playing
- Sub is too wide or too distorted
- Switch-up makes the track lose momentum
- No return payoff
- Use a restrained reese: detune lightly and keep the low end clean. The weight should come from rhythm and harmonics, not just loudness.
- Automate distortion on the mid layer only: keep the sub stable while the mid bass gets dirtier in the switch-up.
- Use break edits as tension tools: a chopped Amen-style phrase or drum fill can make a drop feel alive without cluttering the full mix.
- Add ghost notes sparingly: tiny snare or hat ghosts can make the groove feel more underground and less robotic.
- Create call-and-response with bass: one phrase answers the other, especially effective in rollers and neuro-influenced DnB.
- Darken the switch-up with filtering: a slightly closed filter before the return can make the payoff feel heavier when it opens.
- Use short ambience, not wash: a tiny room reverb or echo tail can add depth without smearing the drums.
- Think in DJ phrasing: a switch-up that lands cleanly on 8, 16, or 32-bar points is easier for DJs to mix and more likely to get rewound.
- Use only stock Ableton devices.
- Keep the sub mono.
- Do not add more than one new sound after the first 8 bars unless you remove something else.
- At the end, listen twice:
- start with a simple 8-bar groove
- change the drum language in the next section
- rewrite the bass phrase so it feels like a new answer
- use one silence or fill to sharpen the transition
- return with a stronger second wave, not just the same loop
- keep the sub mono and the low end clear
This lesson is about designing that moment inside Ableton Live 12 using stock devices and beginner-friendly composition moves. You’ll learn how to build a switch-up that works in a real DnB arrangement, not just as a loop. The focus is on structure, rhythm, and arrangement decisions that make people want to rewind the tune.
Why this matters: in DnB, DJs and listeners respond hard to tracks with a clear “first impact / second impact” shape. A switch-up gives your drop a signature moment without needing overly complex sound design. Even simple drums and bass can hit like a weapon if the arrangement is smart.
---
What You Will Build
You will build a 16-bar drop section for a DnB track that includes:
Musically, this could sound like:
By the end, you’ll have the core logic for making a drop feel like it has more than one punch.
---
Step-by-Step Walkthrough
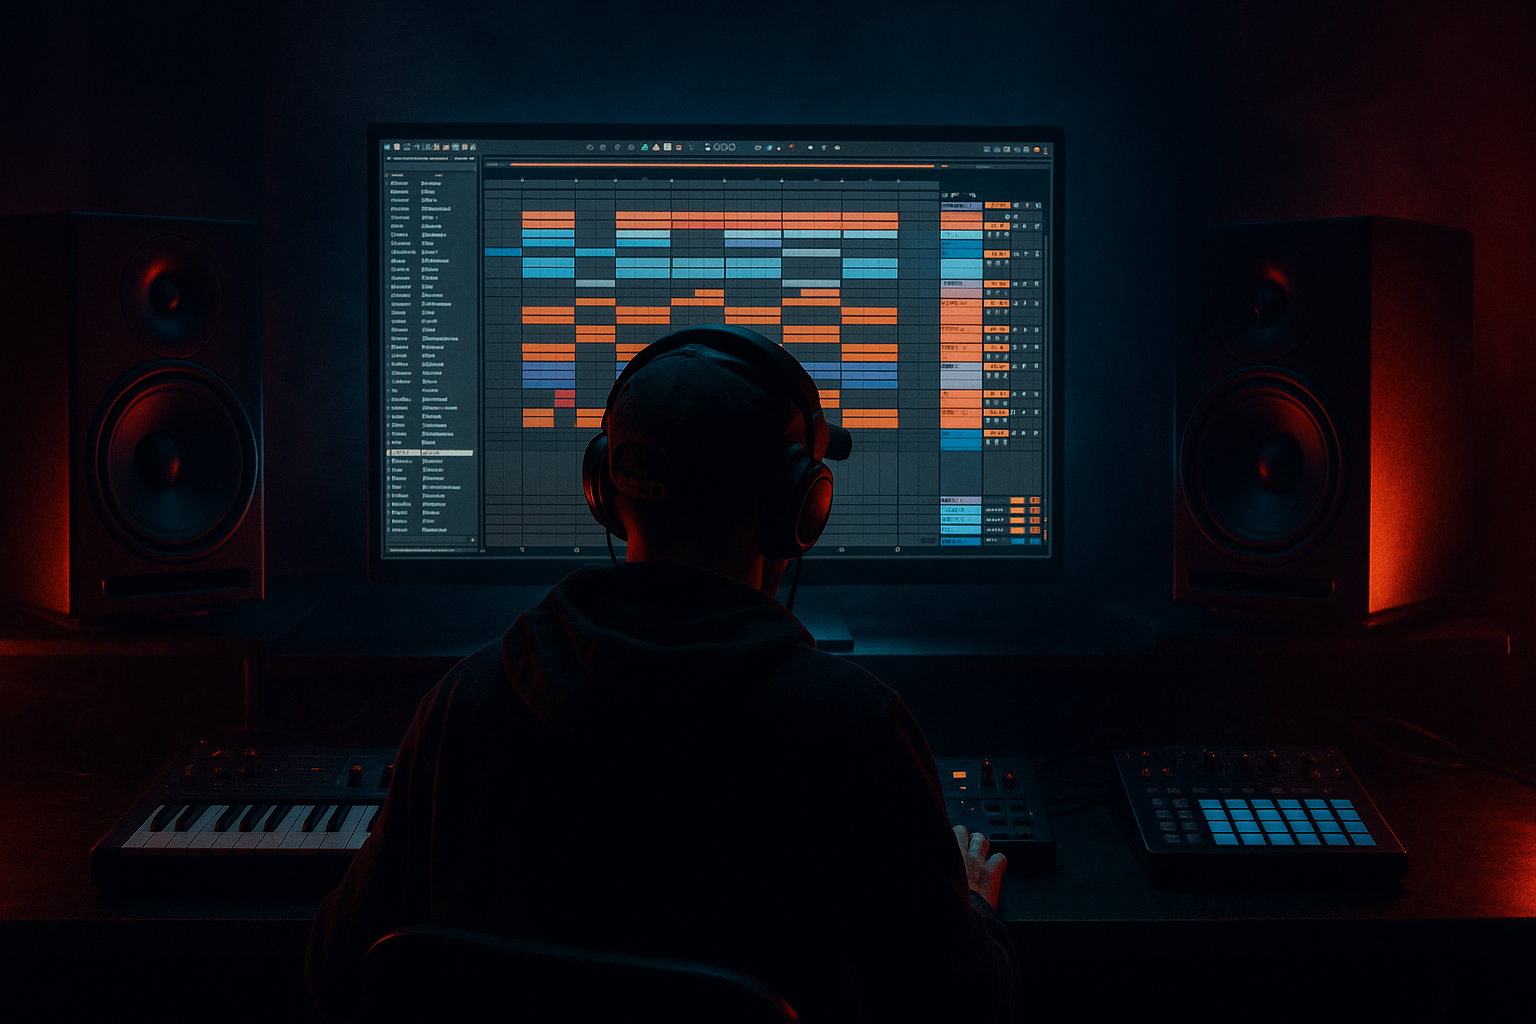
1) Start with a simple 16-bar drop layout in Arrangement View
Open a blank Live Set and switch to Arrangement View. Set your project around 174 BPM for classic DnB, or 170–176 BPM depending on your style.
Create these tracks:
Lay out a 16-bar clip section so you can think like an arranger, not just a loop maker.
A beginner-friendly DnB drop structure:
Why this works in DnB: most rewind moments happen when the track establishes a rule, then breaks it. A clearly organized 16-bar phrase helps that contrast read instantly.
2) Build the first 8 bars with a basic drum-and-bass groove
Keep the first section simple and strong. You do not need a full jungle edit right away.
Use:
For drums, you can use:
Beginner-friendly Ableton devices:
Parameter suggestions:
Arrangement idea:
3) Design the bass so it leaves space for the drum edit
Your switch-up will only hit if the bass has a clear rhythm first.
Create a bass line using either:
For a beginner DnB bass foundation:
Good starting settings:
Suggested settings:
Composition tip:
4) Create the switch-up rhythm by changing the drum language
Now for the actual switch-up. The easiest beginner move is not “more drums,” but different drums.
In bars 9–12, change one or more of these:
If using a break in Simpler:
Try this approach:
Useful stock devices:
Parameter ideas:
Why this works in DnB: the listener locks onto the groove fast. If you change the drum phrasing in a believable way, the brain hears it as a meaningful event, not random noise.
5) Rewrite the bass phrase so the switch-up feels like a new scene
A rewind-worthy drop usually changes the bass behavior, not just the drums.
In bars 9–12, try one of these beginner-friendly bass switch-ups:
A simple and effective DnB move:
You can automate:
Beginner-friendly automation ranges:
Keep the sub disciplined:
6) Add one deliberate silence or near-silence before the payoff
This is one of the strongest rewind tricks in DnB.
Before bars 13–16, create a tiny moment where the energy drops out:
In Ableton:
Suggested FX chain:
Arrangement idea:
7) Return with a stronger second wave, not the same loop
The final 4 bars should feel like the drop has evolved.
Options:
Try this in Ableton:
Common return pattern:
This is where the track becomes memorable. If the second half feels like the first half but more confident, listeners remember it better and DJs trust it more.
8) Check the low end and make sure the drop still hits clean
Even a great switch-up fails if the low-end turns to mud.
Do a quick mix check:
Simple checks:
Useful workflow:
---
Common Mistakes
Fix: keep the first drop simple, then change only 1–2 major things in the switch-up.
Fix: if bars 1–8 and 9–16 feel identical, change the drum pattern, bass rhythm, or energy level clearly.
Fix: jungle edits are cool, but too many slices blur the groove. Leave air between hits.
Fix: remove one bass phrase or one beat before the switch. Space creates impact.
Fix: keep sub mono, use distortion mostly on the mid layer, and check with Utility.
Fix: don’t drop energy completely unless it’s intentional. The switch should surprise, not collapse.
Fix: after the switch-up, bring back the groove with a small upgrade, like a crash, extra hat, or stronger bass accent.
---
Pro Tips for Darker / Heavier DnB
---
Mini Practice Exercise
Set a timer for 15 minutes and make a rewind-worthy switch-up in Ableton Live 12.
Your task:
1. Create a 16-bar DnB drop at 174 BPM.
2. Build bars 1–8 with a simple drum groove and one bass phrase.
3. Change only two elements in bars 9–12:
- one drum change
- one bass change
4. Add one tiny silence, fill, or reverse hit before bar 13.
5. Bring the groove back for bars 13–16 with one extra layer or accent.
Rules:
- once in stereo
- once in mono
Success check:
If the second half feels like a new scene but still sounds like the same track, you nailed it.
---
Recap
A rewind-worthy DnB switch-up is built from contrast, space, and rhythm change.
Key points:
If you can make the listener feel, “Wait, what just happened?” right before the drop returns, you’re on the right track. That’s the energy that makes jungle switches and DnB rewinds work.

