Main tutorial
```markdown
Groove Pool Introduction for Faster Workflow (DnB in Ableton Live) 🥁⚡
1. Lesson overview
Ableton’s Groove Pool is one of the fastest ways to make sterile MIDI/audio feel like real drum & bass: tighter swing, better pocket, more movement—without manually nudging notes all day.
In this lesson you’ll learn how to:
- Load and manage grooves (MPC, swing, shuffle, extracted grooves)
- Apply them to drums, bass, and breaks with control (Timing/Velocity/Random/Base)
- Build a rolling DnB beat quickly and keep it consistent across the track
- A punchy kick/snare pattern
- Tight hats and ghost notes with swing
- A break layer (classic jungle feel)
- A bass rhythm that locks to the drum pocket
- One “global groove” you can reuse across your project for speed
- Add low-velocity snares just before the main snare hits (typical “push”):
- Set ghost velocities around 20–45.
- Timing
- Velocity
- Random
- Base
- Quantize
- Global Amount
- Timing: start at 35–55%
- Velocity: 10–25% (gives natural hit variation)
- Random: 2–8% (subtle humanization)
- Base: 1/16 (good for hats and DnB micro-movement)
- Hats: do they bounce?
- Ghost snares: do they push into the backbeat?
- Does the kick still feel solid?
- KICK clip: Timing 0–10%, Velocity 0%
- SNARE clip: Timing 10–20%, Velocity 5–10%
- HATS clip: Timing 45–65%, Velocity 15–30%, Random 5–10%
- Groove won’t “know” what’s a ghost note unless your velocities already imply it.
- Make ghosts quiet before grooving.
- Select the BREAK audio clip → choose the same groove in Groove chooser.
- Groove Pool settings for break:
- High-pass the break (EQ Eight) around 150–250 Hz so it adds movement without muddying kick/bass.
- Apply this extracted groove to:
- Timing: 20–45%
- Random: 2–6%
- Base: 1/16 (or 1/8 if it gets too jittery)
- Use the same groove as your hats or the extracted break groove
- Keep it subtle:
- You want to edit notes afterward and keep the feel
- You’re sending MIDI to another system
- You want different grooves per section and don’t want confusion
- Bars 1–4: Hats + break (filtered), no full kick
- Bars 5–8: Full drums + bass enters
- Bars 9–12: Add extra shuffle hat pattern or ride layer (same groove)
- Bars 13–16: Small variation (remove kick for 1 bar, add fill, or swap break slice)
- Utility: mono your sub bass below ~120 Hz (use Bass Mono if available)
- EQ Eight: carve break layer / tame harsh hats (6–10 kHz if needed)
- Drum Buss: tighten drum rack (Drive 5–15%, Boom low, Transients tastefully)
- Glue Compressor: light bus glue (1–2 dB GR)
- Use extracted groove from a gritty break (think: crunchy, swung loop) and apply it lightly to your bass. That “drag” can feel sinister.
- Make hats roll with groove, then distort them:
- Ghost notes + groove = menace
- Keep sub stable, groove the mid-bass
- Groove for tension, then straighten for impact
- Groove Pool is your speed tool for DnB feel: load grooves, tweak Timing/Velocity/Random/Base, and apply consistently across elements. 🛠️
- Start grid-tight, then groove intentionally—especially hats, ghosts, and break layers.
- Extract Groove from breaks to unify programmed drums and bass with authentic jungle timing.
- Keep kick/snare stable, and commit grooves only when you’re sure.
This is beginner-friendly, but we’ll keep it rooted in jungle / rolling DnB workflows. 🎛️
---
2. What you will build
A 16-bar rolling drum & bass groove with:
---
3. Step-by-step walkthrough
Step 0 — Set up the project (fast DnB defaults)
1. Set tempo to 174 BPM (classic DnB zone).
2. Create tracks:
- MIDI Track: DRUMS (Rack)
- Audio Track: BREAK
- MIDI Track: BASS
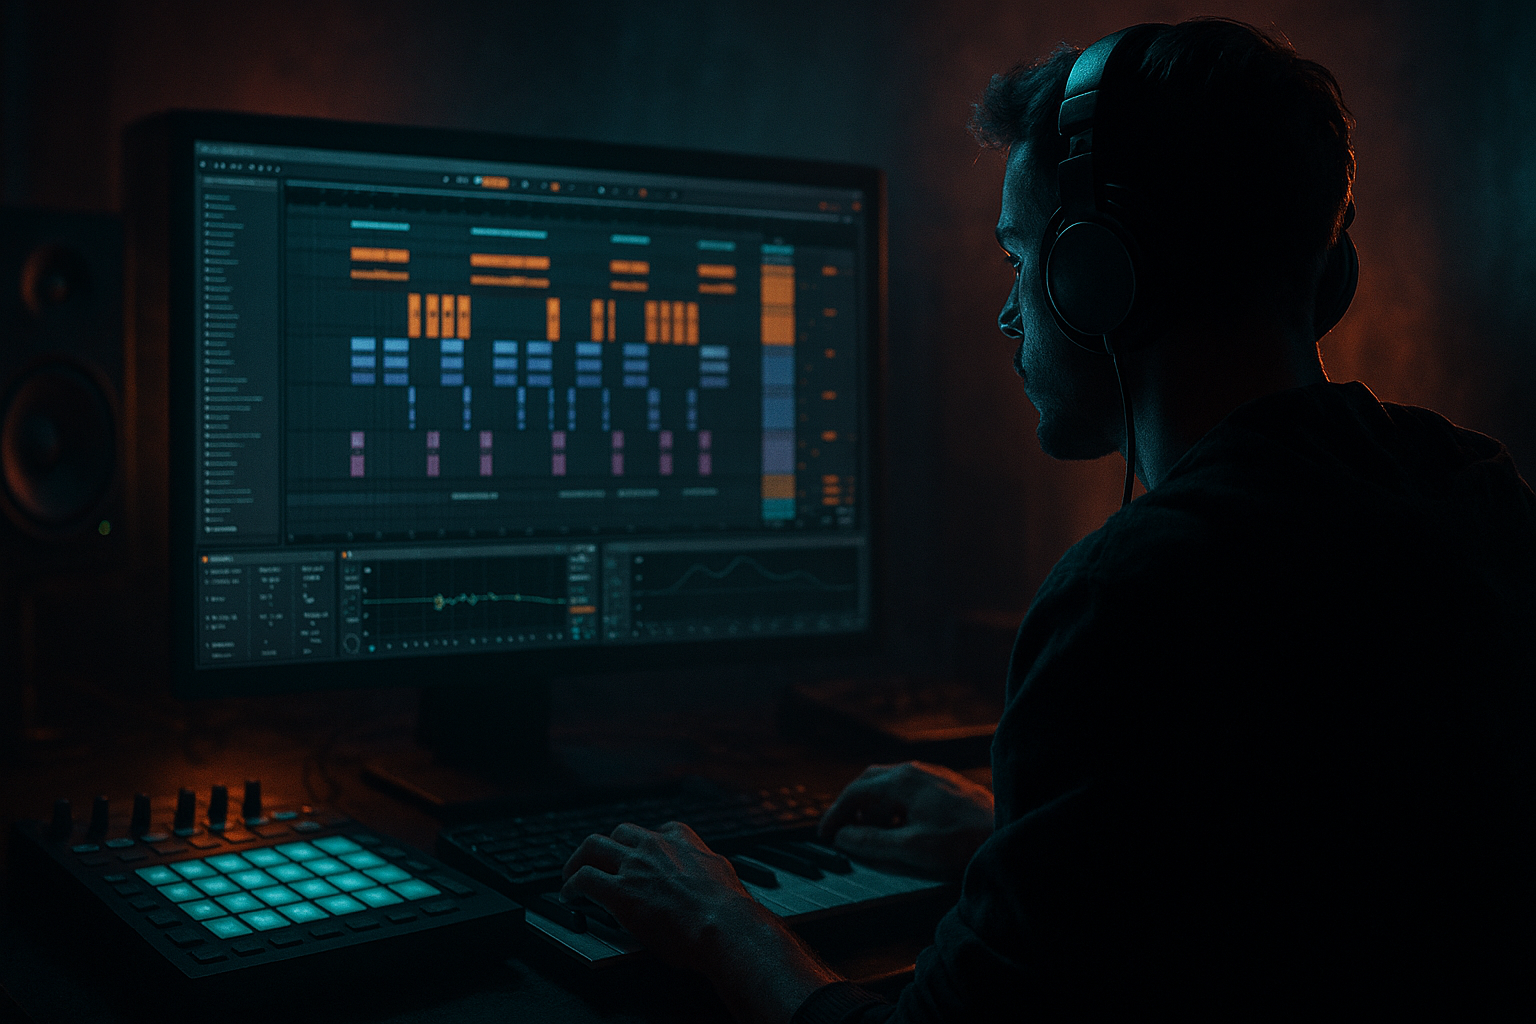
3. Turn on the Groove Pool:
- Press Shift + Cmd + G (Mac) / Shift + Ctrl + G (Win)
- Or click the little wave icon at the bottom-left area.
Workflow tip: Dock Groove Pool visible while you work. It’s a “set and forget” pocket engine.
---
Step 1 — Build a clean, grid-tight drum pattern first
We’ll groove it after so you can clearly hear what the groove changes.
#### A) Drum Rack skeleton (1 bar loop)
On your DRUMS MIDI track:
1. Load Drum Rack (stock) and drop in a few samples (or use a kit):
- Kick on C1
- Snare on D1
- Closed hat on F#1
- Open hat on A#1
2. Program a 1-bar pattern:
- Kick: 1.1 and 1.3 (simple 2-step feel)
- Snare: 1.2 and 1.4 (DnB backbeat)
- Closed hats: 1/8 notes across the bar
Duplicate it to 4 bars so groove differences are more obvious.
#### B) Add classic DnB ghost notes (snare)
- Example: Place a ghost snare at 1.1.3 and 1.3.3 (or slightly before beats 2 and 4).
> Keep everything perfectly quantized for now.
---
Step 2 — Load a groove from Ableton’s library 🧰
1. Open the Browser → Grooves.
2. Start with something reliable:
- Swing 16 grooves are great for DnB hats/ghosts.
- Try: Swing 16-55 or Swing 16-60 (names vary slightly by Live version).
3. Drag the groove into the Groove Pool.
You’ll now see groove parameters like:
---
Step 3 — Apply groove to your DRUMS clip (the fast way)
1. Click your DRUMS MIDI clip.
2. In the Clip View, find the Groove chooser (usually near Launch settings).
3. Select your loaded groove (e.g., Swing 16-60).
Now set groove parameters inside the Groove Pool (not in the clip):
Hit play and listen specifically to:
DnB rule of thumb: Let groove shape hats and ghosts, but keep kick/snare authority.
---
Step 4 — Control what the groove affects (important!)
Groove applies across the whole clip, but you can design your MIDI to respond well:
#### Option A: Split your drums into separate clips/tracks (recommended)
For faster control:
1. Duplicate your DRUMS track into:
- KICK
- SNARE
- HATS/SHUFFLE
2. Apply more groove to hats and ghosts, less to kick.
Example settings:
This keeps DnB punch intact while the top end rolls. 🔥
#### Option B: Keep Drum Rack but adjust velocities manually
---
Step 5 — Add a BREAK layer and groove it differently (jungle flavor) 🧨
1. Drop a break (Amen-style or any break loop) onto the BREAK audio track.
2. Warp it:
- Set Warp = On
- Warp mode: Beats (good for drums)
- Preserve: Transient
- Or try Complex Pro if it’s mangling too hard (but Beats is often punchier).
#### Apply groove to the break clip
- Timing: 20–40%
- Random: 0–5%
- Velocity: (doesn’t affect audio like MIDI, so ignore)
Why lower timing? Breaks already have embedded feel; heavy timing can make them flam against your programmed drums.
Layering idea:
---
Step 6 — Extract groove from a break (the secret weapon) 🔍
This is huge for DnB workflow: you can steal the groove of a break and apply it to MIDI hats/bass.
1. Right-click the BREAK clip (or clip header).
2. Choose Extract Groove.
3. A new groove appears in the Groove Pool (named after the clip).
Now:
- Hats clip
- Ghost snares
- Even bass MIDI (subtle!)
Suggested extracted groove settings:
This instantly “glues” your programmed kit to the break’s natural pocket.
---
Step 7 — Groove your bass rhythm so it locks with drums 🎚️
On the BASS MIDI track:
1. Add a simple DnB bass instrument using stock devices:
- Instrument: Wavetable (or Operator)
- Chain example (simple & effective):
- Wavetable (basic saw/square or sine+harmonics)
- Saturator (Soft Clip on, Drive 2–6 dB)
- Auto Filter (LP24, subtle movement if desired)
- Compressor (optional, for control)
2. Program a 1–2 bar bass riff with space around the snare hits.
Now apply groove:
- Timing: 10–25%
- Random: 0–4%
- Velocity: depends on your instrument (often 0–10%)
DnB pocket tip: Bass that grooves slightly behind hats but stays stable against snare feels heavy and rolling.
---
Step 8 — Commit the groove (when you’re happy) ✅
If you want to “print” the groove timing into MIDI:
1. Select the MIDI clip
2. In Groove Pool, click Commit (or in some versions: right-click groove → Commit)
Use commit when:
Avoid committing too early—keep it flexible until your drums/break/bass all sit together.
---
Step 9 — Arrangement idea (8–16 bars) for rolling DnB 🧱
Build energy quickly using groove consistency:
Stock devices to support the groove:
---
4. Common mistakes
1. Too much Timing (over 70%)
Makes kicks feel late and snares flam. Groove should roll, not fall apart.
2. Grooving everything equally
Kick/snare need stability. Groove hats/ghosts more than fundamentals.
3. Grooving a break heavily without checking phase/flam
Breaks already have timing—subtle groove is usually enough.
4. Committing early
You’ll change your mind once bass and break are layered. Keep it adjustable.
5. Random set too high
Random >10–15% can make DnB hats sound sloppy instead of shuffled.
---
5. Pro tips for darker/heavier DnB 🌑🔩
- Hat chain idea: EQ Eight → Saturator (soft clip) → Auto Filter (HP)
- Add extra ghost snares at very low velocity and let groove push them around the grid.
- Split bass into:
- SUB (no groove or minimal)
- MID (grooved slightly, more movement)
- In a drop, reduce groove Timing slightly (e.g., from 55% down to 40%) to make it hit harder while still rolling.
---
6. Mini practice exercise (10 minutes) ⏱️
1. Make a 2-bar drum loop: kick/snare + 1/8 hats + 2 ghost snares.
2. Load Swing 16-60 into Groove Pool.
3. Apply it to hats only:
- Timing 60%, Velocity 20%, Random 6%, Base 1/16
4. Add a break loop and Extract Groove from it.
5. Swap your hat groove to the extracted groove and compare:
- Which feels more “jungle”? Which feels more “clean roller”?
6. Apply extracted groove to bass at 15% timing and see if it locks better.
Goal: Train your ear to hear pocket changes fast.
---
7. Recap
If you want, tell me what subgenre you’re aiming for (roller, dancefloor, neuro, jungle) and I’ll suggest 2–3 groove setups and matching drum/bass clip patterns.
```

