Main tutorial
Lesson Overview
This lesson is about building amen variation with crunchy sampler texture in Ableton Live 12 for advanced DnB edit work. The goal is to take one amen loop or break fragment and turn it into a living, evolving drum edit that sounds intentional, hard, and arranged for a real track — not just looped. In DnB, especially jungle, rollers, darker halftime-inflected sections, and neuro-adjacent edits, the difference between “busy break” and “pro-level edit” is usually variation, transient control, and texture management.
You’ll learn how to slice an amen into playable pieces, then resample it through Ableton’s stock devices to create grit, crunch, and character while preserving the groove. This sits right in the Edit phase of DnB production: after the raw drum programming idea exists, but before final mix polish. It’s the stage where you make the drums feel like they’re breathing with the arrangement — switching, answering the bassline, and hitting those 16- or 32-bar phrase changes that keep a club floor locked in.
Why it matters: DnB drums often live or die by movement without clutter. A static amen loop can feel dated fast, but over-processing it can kill the swing. The method here keeps the break’s micro-timing, ghost notes, and human push-pull while adding modern Ableton-driven crunch that works in darker bass music and contemporary rollers. ⚡
What You Will Build
By the end, you’ll have:
- A core amen edit rack built in Ableton Live 12 using slices, resampling, and layer control
- A crunchy texture layer derived from the same break, but processed into a dirtier, more compressed, more “hardware-ish” feel
- A set of variation states: clean, crunchy, filtered, chopped, and impact-heavy
- A drum edit that can function as:
- A workflow that keeps the sub bass pocket clear while the break evolves around it
- Over-crunching the whole break
- Letting the crunchy layer carry too much low end
- Flattening the break with too much grid correction
- Making every bar equally busy
- Ignoring arrangement phrasing
- Using distortion that smears transients
- Use a parallel Drum Buss chain and blend the dirt in quietly. Often 10–25% wet is enough to make the break feel nastier without losing punch.
- Try a short Echo throw on only the crunchy slice before a drop. Set it extremely short and filtered so it feels like a percussive smear, not a delay effect.
- Layer the crunchy amen texture with a subtle reese mid-bass hit on the same phrase boundary for stronger call-and-response.
- Use Reverse on a tiny chopped room-tone slice before a snare to create a sucked-in transition effect.
- On neuro-leaning rollers, automate Erosion or Redux only for one bar at a time. Short bursts of degradation feel more expensive than constant bitcrush.
- If the break gets too bright, use EQ Eight to gently notch harshness instead of lowering the whole texture volume.
- For a heavier underground feel, keep the crunch layer mono or narrow and let the width come from higher atmospheres or bass movement, not from the drums themselves.
- Combine break edit variation with bass note phrasing: a crunchy fill landing exactly when the bassline rests makes the arrangement feel engineered.
- Build the amen edit from a clean rhythmic core first.
- Create crunchy texture by resampling and degrading a separate layer, not by destroying the main break.
- Use stock Ableton devices like Saturator, Drum Buss, Redux, Auto Filter, EQ Eight, Utility, and Glue Compressor to shape the grit.
- Place variation at phrase boundaries so the edit supports DnB arrangement flow.
- Keep the crunchy layer tight, filtered, and low-end disciplined so the sub and kick stay powerful.
- Treat crunch as percussive punctuation — that’s what makes the edit sound intentional, heavy, and replay-worthy.
- a 2-bar main loop
- a 4-bar variation
- a fill into a drop
- a DJ-friendly intro/outro edit
Musically, the result should feel like a roller or jungle track where the amen keeps mutating every bar: a ghost note answers the snare, a crunch burst appears before the backbeat, a filtered slice opens the transition, and the final bar throws in a small stutter or reverse texture before the drop resets.
Step-by-Step Walkthrough
1. Choose a break with strong transient shape and obvious ghost-note detail
Start with an amen or amen-style loop that has:
- clear kick/snare anchors
- enough room-tone and tail detail for crunch to sound interesting
- not too much top-end wash already baked in
In Ableton Live 12, drag the break onto an audio track and listen in context with your bass and sub. For darker DnB, the break should support the bassline rather than fight it. If the bass is busy, pick a break with slightly more open midrange and less constant hi-hat clutter.
A good working tempo range is typically 170–174 BPM. If your track is rolling at 172, slice and test there first — the swing of the amen changes a lot with tempo.
Why this works in DnB: the amen is already rhythmically rich. DnB edits thrive when you preserve that original internal groove instead of flattening it into strict grid-hit drums.
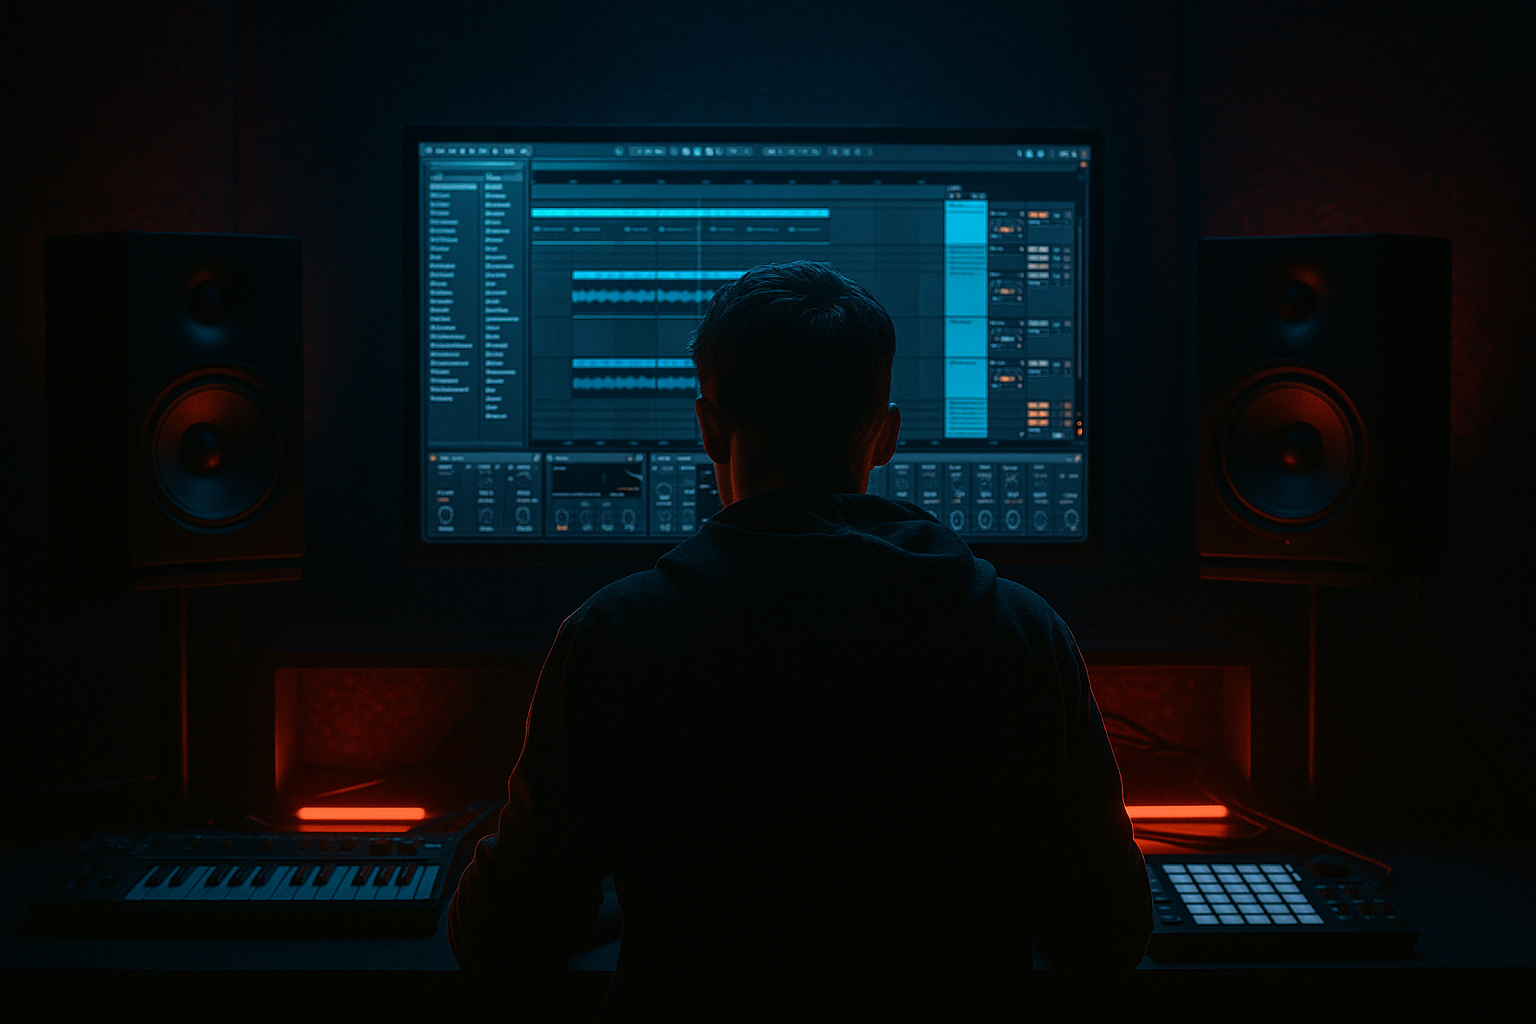
2. Warp lightly, then slice to a Drum Rack for edit control
Set Warp to preserve the break’s feel. For many amens, avoid aggressive warp correction unless the source is drifting. In Ableton Live 12, you can keep the break in Audio and use Slice to New MIDI Track to convert it into a Drum Rack.
Slicing suggestion:
- Slice by Transients for a more natural edit
- If the break is messy, use 1/8 or 1/16 slice markers only as a backup, then manually refine the important hits
Once sliced:
- Keep kick, snare, hats, and ghost hits mapped separately
- Rename key pads immediately: KICK, SNARE, GHOST 1, TOP LOOP, RIM, etc.
- Group the Drum Rack with a Drum Bus chain later for edit-wide processing
For advanced workflow, duplicate the Drum Rack track into:
- Break Core
- Crunch Layer
- Fill/FX Layer
This separation lets you automate variation without overcomplicating one chain.
3. Build a clean core pattern first, then design the variation around it
Program a simple 2-bar anchor edit first. Don’t start with chaos. The point is to create a version that can loop under a bassline and still feel confident.
Example 2-bar structure at 172 BPM:
- Bar 1: kick on 1, snare on 2 and 4, ghost notes leading into 2 and 4
- Bar 2: keep the same backbeat, but alter one hat or snare ghost to create a subtle answer
Use Ableton’s MIDI note velocity to shape the ghosts:
- Ghost hits around 20–50 velocity
- Main snare around 95–120 velocity
- Accent hats around 60–90 velocity
Keep the main snare transient stable. The variation should come from surrounding movement, not from weakening the backbone.
Add Groove if needed, but use it surgically. A light swing from a subtle MPC-style groove can help, but in darker DnB the break often works better with just a hint of late ghost placement rather than obvious shuffle.
4. Create the crunchy sampler texture layer by resampling the break through a deliberately degraded chain
This is the core of the lesson. Take your sliced break or core loop and route it to a new audio track for resampling. In Ableton, set the new track’s input to Resampling or the source track’s output.
Build a crunchy processing chain using stock devices only:
- Saturator: Drive around 3 to 8 dB, Soft Clip on
- Drum Buss: Drive around 10 to 25, Crunch low to moderate, Boom usually off or very subtle for this layer
- Redux: Reduce bit depth slightly, or sample rate to taste; don’t obliterate the transients unless it’s a fill
- Auto Filter: High-pass or band-pass to keep the texture out of the sub region
- Optional Erosion: very subtle for noisy edge and top-end bite
Record 1–2 bars of the processed break onto the resample track. Then chop the recorded audio into usable edit pieces:
- a snare tail crunch
- a hat burst
- a kick-to-snare transition
- a noisy offbeat texture slice
Keep the crunchy layer short and purposeful. It should feel like “the break being chewed up by the arrangement,” not a constant distortion bed.
Suggested settings for a controlled gritty layer:
- Saturator Drive: 4.5 dB
- Drum Buss Drive: 18
- Redux: 12-bit-ish character rather than full destruction
- Auto Filter cutoff: start around 180–350 Hz if you want only mid/high crunch
5. Map the crunchy texture to variation points, not the whole loop
This is where the edit becomes professional. Don’t just turn on crunch constantly. Place it where the arrangement needs a decision:
- before the snare in bar 2
- at the end of every 4th bar
- on the last half-beat before a drop
- under a call-and-response bassline phrase
In Arrangement View, use the crunchy slices as punctuation marks:
- a short burst before a snare hit
- a reverse-feeling tail into the next bar
- a one-shot chopped from the break’s room tone
- a filtered top-layer that opens only in the final 2 beats of a phrase
A strong DnB arrangement move: make bars 1–3 relatively stable, then use bar 4 to add one crunchy answer before the loop resets. This creates phrase logic that DJs and listeners both feel immediately.
Example musical context:
- Bars 1–4: rolling amen with sub bass moving in a simple two-note phrase
- Bar 4, beat 4: crunchy amen slice rises in density
- Bar 5: drop back to cleaner core break for impact
- This creates a tension-release cycle that feels like a classic roller arrangement with modern texture design.
6. Use an Audio Effect Rack to switch between clean, dirty, and filtered states
On your break bus or texture bus, build an Audio Effect Rack with 3 chains:
- Clean Core
- Crunch
- Filtered/FX
On the Clean Core chain:
- EQ Eight to clean low rumble if needed
- very light Glue Compressor if the raw loop is uneven
On the Crunch chain:
- Saturator
- Drum Buss
- Auto Filter
- optional Overdrive for midrange bite, but keep it controlled
On the Filtered/FX chain:
- Auto Filter with automation
- Echo or Reverb only if you want a stylized transition
- Utility to narrow stereo width when the texture gets too wide
Use Macro assignments to control:
- Crunch amount
- Filter cutoff
- Dry/Wet blend between clean and dirty
- Output trim
This lets you automate a single macro over 8 or 16 bars instead of drawing dozens of tiny clip edits. Great for speed, and it keeps the arrangement coherent.
7. Edit the crunch like percussion, not like ambience
Advanced DnB edit work is often about treating textures as drums. Once your crunch layer is recorded, slice it like a percussion lane:
- trim all dead air
- keep only the strongest attack or most interesting tail
- alternate slice lengths: 1/16, 1/8, and tiny stutters
- place one texture hit to answer a snare, another to answer a hat run
Use Clip Gain and fade handles so the slices are tight and click-free. In jungle and darker rollers, little gaps between chops can make the groove breathe harder than constant audio.
If you want a more neuro-adjacent feel, place the crunchy layer in a polyrhythmic answer against the kick/snare:
- main break on the grid
- crunchy slices slightly off-grid
- one short phrase every 2 bars with deliberate asymmetry
That off-balance motion is part of what makes the edit feel alive.
8. Control the low end so the edit stays heavy without becoming muddy
The crunchy layer should almost never carry sub information. Keep sub bass separate and mono. Use Utility on the texture bus with:
- Width reduced to 0–40% if the texture is getting cloudy
- Bass Mono discipline by removing low-end content from the crunch layer with EQ Eight
On the break bus, use EQ to carve:
- gentle high-pass around 80–140 Hz on the crunchy layer depending on density
- small cut around 250–500 Hz if the texture gets boxy
- tame harshness around 3–6 kHz if the distortion bites too hard
For the core drum bus, a little Glue Compressor can help:
- Attack: 3–10 ms
- Release: Auto or around 0.1–0.3 s
- Ratio: 2:1 or 4:1
Keep it light. You want glue, not flattened transients.
Why this works in DnB: the genre depends on a tight handshake between drums and sub. If the crunchy amen steals low-mid energy, the bassline loses authority and the track stops hitting.
9. Automate variation across 8, 16, and 32-bar phrasing
DnB edits come alive when the listener feels phrase progression. Plan variation by section:
- 8 bars: micro-variation in ghosts, hats, and one crunchy fill
- 16 bars: bigger switch-up, filter opening, or slice rearrangement
- 32 bars: full edit reset with new break fragment or new texture layer
Useful automation ideas:
- Saturator Drive rises by 1–3 dB in the last 2 bars before a drop
- Auto Filter cutoff opens from 300 Hz to 2–5 kHz on the crunch layer
- Drum Buss Crunch increases only for the last half of a phrase
- Utility width narrows just before a transition, then opens slightly on impact
A strong arrangement choice: let the first 8 bars of the drop feel relatively clean, then add the crunchy edit layer in bars 9–16. This creates escalation without needing a new bassline every time.
10. Print the best version and make it easy to revisit
Once the edit works, resample the final 4- or 8-bar result to audio. Keep the original Drum Rack project, but also create a printed “performance” version of the break edit.
Naming matters:
- AMEN_CORE_172
- AMEN_CRUNCH_A
- AMEN_FILL_4BAR
- AMEN_DROP_PRINT
This makes it faster to audition variations later and prevents you from losing the good version in a maze of clips. For advanced DnB workflows, speed is not just convenience — it’s part of how you finish tracks.
Common Mistakes
Fix: keep distortion mostly on a dedicated texture layer, not the core drum backbone.
Fix: high-pass it aggressively enough that the sub and kick stay dominant.
Fix: preserve the micro-timing of ghost notes and only tighten what actually feels off.
Fix: leave space. Use crunch as punctuation, not constant decoration.
Fix: plan where the edit changes every 4, 8, 16, or 32 bars so the energy moves intentionally.
Fix: try parallel layering, then blend the crunchy version underneath the cleaner one.
Pro Tips for Darker / Heavier DnB
Mini Practice Exercise
Spend 10–20 minutes making a 4-bar amen edit with one crunchy variation pass:
1. Load an amen or amen-style break at 172 BPM.
2. Slice it to a Drum Rack and program a simple 2-bar backbone.
3. Duplicate the track and create a crunch layer using Saturator, Drum Buss, and Redux.
4. Resample 1 bar of the processed break and slice out 3–5 usable texture hits.
5. Place one crunch hit before each snare in bar 4.
6. Automate the crunch layer filter so it opens slightly only in the last 2 beats.
7. Check the whole result with your bassline and sub, then make one final low-end cleanup with EQ Eight.
Goal: make bar 4 feel like a clear switch-up without changing the entire drum groove.

