Main tutorial
Naming & Color Coding for Fast DnB Sessions (Resampling-Only) in Ableton Live 🎛️🥁
1. Lesson overview
In fast drum & bass sessions, clarity beats chaos. When you’re working from scratch and committing everything via resampling only (printing audio early, minimal “live” synth/plugin dependence), your speed comes from two things:
1) A naming system you never think about
2) A color system you can read instantly
This lesson gives you a repeatable template-free workflow that starts on a blank set and ends with a session that feels like a pro mix engineer set—while still being creative and aggressive.
You’ll use Ableton stock tools (Audio tracks, Resampling, Drum Rack, Simpler, EQ Eight, Saturator, Glue Compressor, Utility, Auto Filter, Drum Buss, Limiter) and a DnB-first track layout.
---
2. What you will build
A clean, resampling-driven Ableton Live project where:
- Every track name tells you what it is + role + version + key info
- Every group/track has a consistent color language
- You can resample sound design into audio “assets” immediately (bass stabs, reese layers, drum loops, fills, FX)
- Arrangement is fast because you can see sections at a glance
- A color-coded track stack (Drums, Bass, Music, FX, Vox, Returns, Prints)
- A “Print Lane” system for resampling
- A DnB arrangement skeleton (Intro → Drop → Breakdown → Drop 2 → Outro) with locators and section colors
- Work at 170–174 BPM
- Warp mode defaults:
- Create a habit: If it’s good, print it. If it’s printed, name it properly.
- DRUMS = Red 🟥
- BASS = Purple 🟪
- MUSIC (pads, stabs, atmos) = Blue 🟦
- FX = Orange/Yellow 🟧🟨
- VOX = Green 🟩
- PRINTS = Grey ⬛️
- REF = White ⬜️
- `KICK_Punch_91Hz_v1`
- `SNARE_RimLayer_200Hz_v3`
- `BASS_ReeseMid_Gm_v5`
- `TOPS_AmenChops_16th_v2`
- `FX_RiserNoise_4bar_v1`
- `DR-Kick-Anchor-172-v2`
- `BA-Reese-Growl-Gm-v7`
- `MU-Stab-Wide-Chords-Gm-v3`
- Audio From: `Resampling`
- Monitor: `Off` (prevents feedback and keeps it clean)
- Arm only when you’re printing.
- Add Utility at the end of each PRINT track:
- Add Limiter last (only as protection while printing, not as “mixing”)
- `DR_Kick`
- `DR_Snare`
- `DR_Hats`
- `DR_TopsLoop`
- `DR_Perc`
- `DR_DrumBus` (optional aux track inside group)
- EQ Eight: cut mud (often 200–400 Hz), shape punch
- Saturator: Soft Clip on, Drive 1–3 dB
- Glue Compressor (light): 2:1, Attack 3–10 ms, Release Auto, 1–2 dB GR
- Drum Buss: Drive 5–15, Boom very subtle (or off), Crunch taste
- Glue Compressor: slow-ish attack for snap, 1–3 dB GR
- Utility: Width control (often keep drums mostly centered; tops can be wider)
- Arm `PRINT_Drums`
- Record 2 bars of:
- `BA_Sub`
- `BA_Mid`
- `BA_Top` (optional)
- `BA_Bus`
- Instrument: Operator
- EQ Eight: low-pass around 80–120 Hz depending on your midbass plan
- Utility: Width = 0% (mono sub)
- Instrument: Wavetable or Operator
- FX chain (classic DnB):
- `BA_Phrase_A_8bar_Gm_v1`
- `BA_Stab_1shot_Gm_v1`
- `BA_ReeseRoll_2bar_Gm_v2`
- `BA_SliceKit_Reese_A_v1`
- `MU_Pad`
- `MU_Stabs`
- `MU_Atmos`
- `MU_ResampleBits`
- Analog / Wavetable for pads
- Echo (dubby jungle space)
- Hybrid Reverb for dark rooms (short, dense settings)
- Auto Pan (slow movement, subtle)
- `MU_Atmos_Bed_16bar_v1`
- `MU_StabChords_8bar_Gm_v2`
- `FX_Risers`
- `FX_Impacts`
- `FX_Noise`
- `FX_Downsweeps`
- `FX_Riser_4bar_v1`
- `FX_Impact_Metal_v2`
- Intro: atmos + filtered drums (8–16 bars)
- Build: add tops, tension riser (8–16)
- Drop: full drums + bass phrases A/B (32)
- Breakdown: half-time or drum switch (16)
- Drop 2: variation + fills + new bass print (32)
- Mute or freeze (if allowed) → but you said resampling-only, so:
- Move printed assets into correct groups
- Delete unused takes
- Ensure every printed clip is:
- Printing without naming immediately → you end up with “Resampling 12” hell.
- Coloring randomly → your eyes stop trusting your session.
- Printing full songs instead of modular phrases → harder to arrange and iterate.
- No “PRINTS” lane → you waste time routing every time.
- Not committing bass layers separately → you lose mix control in heavy drops.
- Sub in stereo → ruins translation and headroom (keep it mono with Utility).
- Use “Print > Distort > Print again”:
- Keep a “Safety EQ” on PRINT tracks:
- Create “Drop Tools” prints:
- Dark space without washing the mix:
- Use groups first (DRUMS/BASS/MUSIC/FX/PRINTS/REF) so the set is readable from minute one.
- Adopt a strict naming format with versions, role, and key details.
- Build a PRINTS lane with `Audio From: Resampling`, monitor off, safety Utility/Limiter.
- Print modular phrases and loops, not giant timelines.
- Color coding + locators turn your project into a DnB production dashboard 🚀
Deliverables by the end:
---
3. Step-by-step walkthrough
Step 0 — Set the ground rules (Resampling-only mindset) ⚙️
Goal: Commit early, avoid decision paralysis, keep CPU low.
- Drums loops: Beats (Transient, Preserve Transients)
- Music/bass: Complex Pro only if needed; otherwise keep audio raw
---
Step 1 — Build the DnB track “skeleton” with groups (from scratch)
Create Group Tracks first (Cmd/Ctrl+G on selected tracks after creation). Don’t worry about sounds yet.
Recommended groups (top to bottom):
1. DRUMS
2. BASS
3. MUSIC
4. FX
5. VOX (optional)
6. PRINTS (your resampled audio assets lane)
7. REF (reference track, muted)
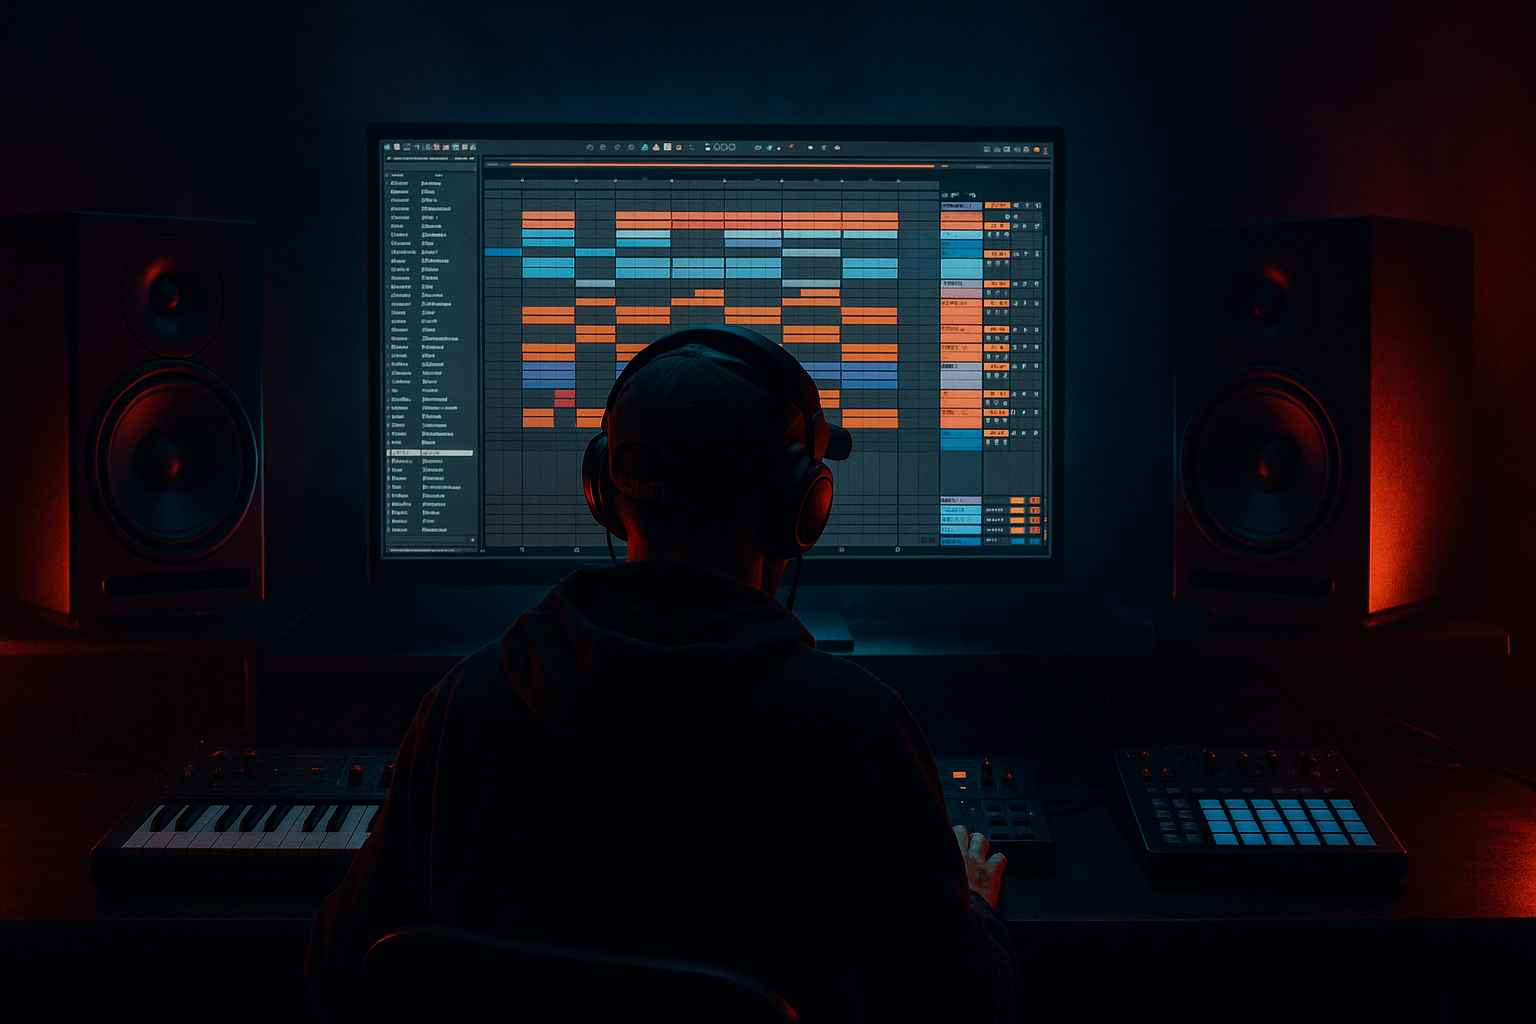
#### Color coding scheme (consistent = fast)
Pick a scheme and stick to it. Example (works well for DnB):
Ableton tip: Right-click track → Assign Track Color.
Do the group and all children inherit the vibe.
---
Step 2 — Naming rules that remove ambiguity 🧠
Use a structured name format. Here are two that work:
#### Option A (compact)
`[ROLE]_[SOURCE]_[DETAIL]_[VER]`
Examples:
#### Option B (mix-engineer readable)
`[GROUP]-[TYPE]-[FUNCTION]-[KEY/BPM]-[v#]`
Examples:
Rule: If you can’t understand it in 2 seconds, rename it.
When you resample: increment versions. No exceptions.
---
Step 3 — Create a dedicated “PRINTS” workflow lane (the heart of resampling) 🖨️
Inside the PRINTS (Grey) group, create these audio tracks:
1. `PRINT_Drums`
2. `PRINT_Bass`
3. `PRINT_Music`
4. `PRINT_FX`
5. `PRINT_Resample` (catch-all)
Set them up:
Optional but powerful:
- Set Gain to -6 dB as a safety ceiling
Now your printing is always one click away.
---
Step 4 — Drums: build quickly, then print loops in labeled chunks 🥁
Inside DRUMS (Red) create:
Device chain suggestions (stock):
Kick/Snare channels
Drum group (DRUMS group)
#### Resample drum loops with intent
Once you have a 2-bar loop rolling:
- `DR_Loop_MAIN_2bar_172_v1`
- Then record a variation:
- `DR_Loop_FILL_2bar_172_v1`
Drag the printed audio into the DRUMS group if you want, but keep originals muted for quick recall.
Naming detail that matters: include bar length and BPM if you share/export.
---
Step 5 — Bass: design in MIDI, commit to audio, then slice/arrange 🔥🟪
Inside BASS (Purple) create:
Sub approach (stock + clean):
- Osc A: Sine
- Add a tiny bit of drive using Saturator (0.5–2 dB)
Mid Reese (fast stock chain):
- Wavetable: Basic Shapes / saw-ish, add unison lightly
1. Auto Filter (for motion; map cutoff to macro)
2. Saturator (Soft Clip on)
3. Amp or Overdrive (for grit)
4. EQ Eight (remove harsh 3–6k if needed)
5. Compressor (sidechain from Kick if you want, but since resampling-only: do it before printing)
#### Print bass phrases, not “tracks”
Print musical units:
Workflow:
1. Jam in Session View or Arrangement
2. When it bangs → arm `PRINT_Bass` → record 4–8 bars
3. Consolidate (Cmd/Ctrl+J) and rename immediately
Pro move: After printing, slice to new MIDI track (right-click) for re-triggering. Name that:
---
Step 6 — Music + Atmos: keep it readable and layered 🟦
Inside MUSIC (Blue) create:
Device ideas (stock):
Print useful assets:
---
Step 7 — FX: build a library inside the project 🟧
Inside FX (Orange/Yellow):
Stock chain for dark DnB risers:
1. Operator (noise) or audio noise
2. Auto Filter (automate cutoff up)
3. Saturator
4. Reverb (short to medium)
5. Limiter (protect)
Print them as:
---
Step 8 — Arrangement: section colors + locators = instant navigation 🧭
In Arrangement View:
1. Add locators:
- `00 Intro`
- `16 Build`
- `33 Drop 1`
- `65 Breakdown`
- `81 Drop 2`
- `113 Outro`
2. Color code clips by section (optional but powerful):
- Intro clips = darker shades
- Drops = more saturated shades
This helps you “read” energy levels without listening.
DnB arrangement idea (rolling):
Resampling advantage: You’re arranging audio blocks, so it’s fast to cut, repeat, reverse, and stutter.
---
Step 9 — Final organization passes (the 3-minute cleanup) 🧼
Do this whenever the set starts feeling heavy:
- Mute original sound-design tracks after printing
- Consolidated
- Named with version
- Colored correctly
A clean set makes better creative decisions.
---
4. Common mistakes
---
5. Pro tips for darker/heavier DnB 🖤
Print your midbass → add Overdrive + Saturator + EQ Eight → resample again into `BA_Resample_Grime_v#`. This creates nasty, controlled texture.
EQ Eight high-pass at 20–30 Hz to prevent subsonic build-up from resamples.
- `DR_Fill_1bar_v1`
- `FX_Stop_1beat_v1`
- `BA_Stutter_1bar_v2`
These are the secret sauce for impact.
- Put Hybrid Reverb on a Return, short decay (0.6–1.2s), darker tone
- Print reverb throws as audio so you can place them surgically.
---
6. Mini practice exercise (15–25 minutes) ⏱️
Goal: Build a tiny DnB loop and print it into a clean, readable session.
1) Create groups + apply the color scheme (2 min)
2) Make a 2-bar drum loop:
- Kick on 1 and 3 (or a DnB pattern)
- Snare on 2 and 4
- Hats 16ths with slight velocity movement
3) Print:
- `DR_Loop_MAIN_2bar_172_v1`
4) Make a simple reese phrase (2–4 notes), sidechain if desired
5) Print:
- `BA_Phrase_A_4bar_Gm_v1`
6) Arrange 16 bars:
- 8 bars intro (filtered drums)
- 8 bars mini-drop (full loop + bass)
7) Cleanup pass:
- Rename anything unclear
- Ensure all prints are in the right color/group
Win condition: You can solo any group and instantly know what’s happening.
---
7. Recap
If you want, I can also provide a ready-to-type track list (exact track names in order) for a blank session, optimized for rolling DnB + neuro-style resampling.

