Main tutorial
1. Lesson overview
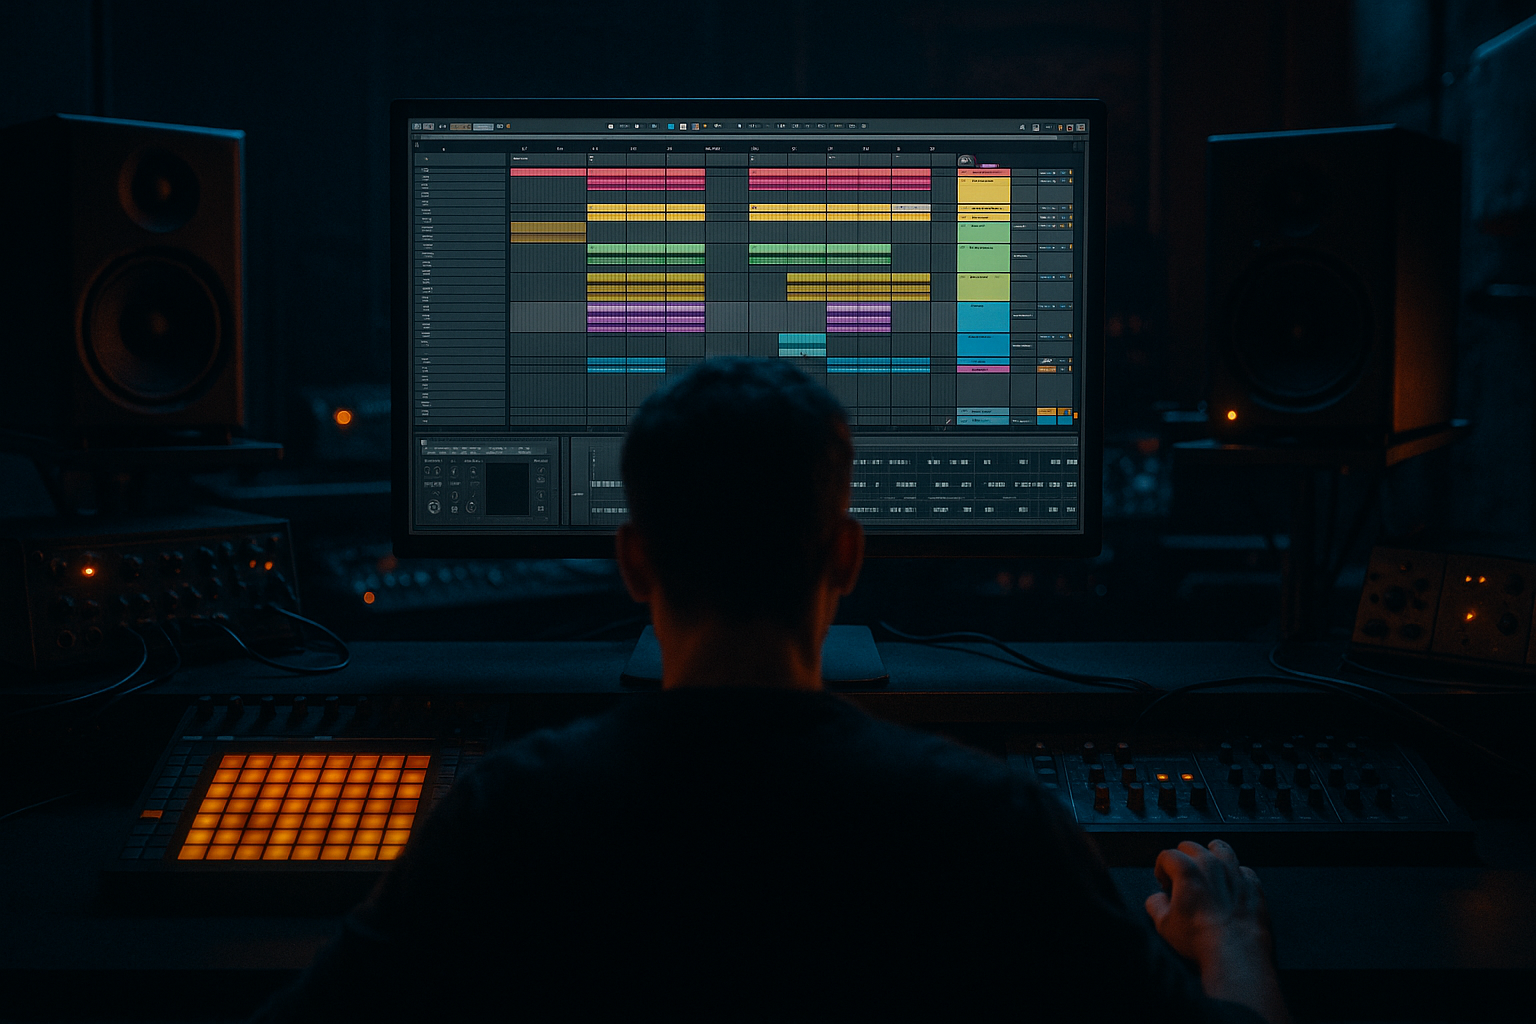
Welcome — today we’ll learn simple, powerful naming and colouring strategies in Ableton Live that speed up your jungle / drum & bass workflow. This is for beginners but focused on real DnB needs: fast drum chopping, rolling basslines, many break edits and heavy routing. By the end you’ll have a clean template, clear grouping, and a visual system that tells you what every track does at a glance. ⚡️🥁
Why this matters:
- Jungle sessions quickly become messy with many break clips, percs and FX. Clean names + colours = faster editing, mixing and arrangement decisions.
- Visual organisation reduces context-switching so you stay in a creative flow.
- A disciplined track naming convention (with prefixes, numbers and short descriptors).
- Colour-coded tracks and groups (kick/snare/hats/percs/breaks/bass/FX/returns).
- Two basic bus chains (Drum Bus, Bass Bus) using stock devices (Utility, EQ Eight, Glue Compressor, Saturator / Drum Buss).
- Returns (Reverb, Delay, Saturation) with names and colours.
- A saved default or template Live Set you can open for every track start.
- Inconsistent naming: using “Kick”, “Kk”, “KICK_B” will confuse you. Stick to one convention.
- Too many colours: if every track is a different colour you lose the system. Keep categories uniform.
- Forgetting returns: not naming/colouring returns makes reverb/delay sends hard to find.
- Not using numbers: adding tracks later will push order. Prefixing with 01/02 preserves order when sorting.
- Colouring only track headers but leaving clips unnamed: visual cues should complement clip names for faster editing.
- Colour semantics for heavy sessions: use very dark hues for low elements (deep navy/purple for SUB), and saturated colours for punch (burnt orange for kicks/snare). This mentally anchors “weight” vs “snap.” 🖤💙
- Name distortion layers explicitly: e.g., 08-BASS-GRIT_DIST or 08-BASS-GRIT_DRV. When you see “GRIT” you know it’s a saturated layer.
- Sub/Mono policy: name your sub track "BASS-SUB_MONO" and colour it the darkest. On this track put Utility → width = 0% and a simple EQ Eight low-pass (cut >200Hz). This saves you from accidental stereo low frequency phase issues.
- Mid/Side processing: name a track "BASS-MS-MID" or "BASS-MS-SIDE" when you use EQ Eight in M/S mode. Use colours to indicate M or S (mid = blue, side = cyan).
- Use Bus suffixes for chain clarity: e.g., "DRUMS-DBUS" (Drum Bus), "BASS-SBUS" (Sub Bus). When scanning your mixer you instantly know where compression/saturation lives.
- For heavy DnB arrangement sessions, create a "LIVE PERFORMANCE" colour group for clips used in DJ-style transitions (one-shots, loopable breaks). Name them with "PERF_" prefix.
- Use numbered prefixes and consistent category prefixes (DRUMS-, BASS-, FX-) so your tracks remain ordered and understandable.
- Colour with intent: dark colours for low weight, bright for transient/high elements, distinct colours for returns.
- Group and bus: create DRUMS and BASS groups and give them bus chains (Utility, EQ Eight, Glue Compressor, Saturator/Drum Buss).
- Name returns and track processing layers (e.g., BASS-GRIT_DIST) so you instantly know function.
- Save your setup as a template and save device chains as presets. This turns your organizational system into immediate productivity.
2. What you will build
A small, reusable Ableton Live template tailored for jungle / DnB, containing:
You’ll be able to drop in breaks, route to groups, and immediately know where to find your sub, bass, kick, snare and FX.
3. Step-by-step walkthrough
Note: these steps assume Live’s Arrangement view familiarity. Adjust names/colors to your taste — use these as a reliable starter system.
A. Create the basic track skeleton
1. Open Live, create a new Live Set.
2. Create tracks in this order (use Audio or MIDI as needed):
- 01 DRUMS-KICK (Audio)
- 02 DRUMS-SNARE (Audio)
- 03 DRUMS-BREAKS (Audio) — for full breaks you chop
- 04 DRUMS-HATS (Audio or MIDI/Drum Rack)
- 05 DRUMS-PERC (Audio)
- 06 DRUMS-DRUMBUS (Group) — group for processed drum buss
- 07 BASS-SUB (Audio) — purely sub
- 08 BASS-MAIN (MIDI) — wavetable/operator/sampler bass
- 09 BASS-GRIT (Audio) — distorted/top layer
- 10 SYNTHS/LEADS (MIDI)
- 11 ATMOS/PADS (MIDI/Audio)
- 12 FX-TX (Audio) — one-shot risers/impact hits
- 13 VOCALS (Audio) — if needed
- Returns: A-REVERB, B-DELAY, C-SATURATE
3. Prefix convention:
- Use numeric ordering (01, 02, …) to keep tracks in place.
- Use category prefixes: DRUMS-, BASS-, SYN-, FX-, VOCAL-, RET-.
- Keep names short and constant: e.g., "03-DRUMS-BREAKS".
B. Colour coding (practical suggestions)
1. Low / heavy = dark colours; high / transient = bright colours.
- Kick / Breaks low focus: deep red / maroon. 🎯
- Snare / top hits: orange.
- Hats / percs: yellow / lime.
- Bass / sub: deep purple / blue (sub = darker).
- Bass grit / mid bass: purple/magenta.
- Synths / atmos: cyan / teal.
- FX: grey / silver.
- Returns: distinct blue (Reverb), amber (Delay), burnt orange (Saturator).
2. Assign colours:
- Right-click track title → Assign Track Color. Do this consistently.
C. Grouping and routing
1. Group drums:
- Select 01–05 → right-click → Group Tracks → name it "DRUMS".
- Inside the DRUMS group create a subgroup called "DRUMS-TOP" (for processed snare/hats) or separate bus "DRUMS-DRUMBUS".
2. Send routing:
- Create return tracks (A/B/C) and name them "A-REVERB", "B-DELAY", "C-SAT".
- Colour returns with distinct hues.
- Use Send knobs on percs / snares to taste.
D. Create simple stock-device chains (useful as visual anchors so you know what each bus does)
1. Drum Bus (put this on the group channel "DRUMS-DRUMBUS"):
- Utility: set Width = 100% (if you want stereo). For heavy DnB, set stereo width >50% on top layers, but keep sub elements mono later.
- EQ Eight: High-pass below 30 Hz to take out rumble; gentle cut at 400–800 Hz if boxiness occurs.
- Glue Compressor (stock): Attack = 3–10 ms, Release = 0.2–0.6 s, Ratio = 2–4:1. Adjust threshold to glue transient energy.
- Saturator (optional): Drive = 2–6 dB, Soft Clip ON.
- Drum Buss (stock alternative): Distortion = 2–4, Boom = subtle for weight.
- Name this track "06-DRUMS-DRUMBUS" and colour it bright red/orange so it's easy to spot.
2. Bass Bus:
- On "BASS-MAIN" or the BASS group insert:
- Utility: set Width to 0% below 120 Hz (we’ll do this with an EQ automation; for quick set: use EQ Eight in M/S or an Auto Filter? — see pro tips).
- EQ Eight: High-pass nothing on BASS-MAIN but use a low-shelf on BASS-SUB for control. Cut 200–400 Hz if muddy.
- Compressor: Slow attack (~20–40 ms) to let transients through; short release for pump.
- Saturator: Drive 1–3 dB on grit layer (BASS-GRIT).
- Name the group "BASS" and colour dark purple/blue.
E. Clip naming and colour usage
1. Clips: when you drop a chopped break clip, rename it to something clear:
- "breaks_amen_A_808snap" or "amen_chop_01_fill".
2. Clip colours:
- Use clip colours to indicate variation: green = loop, yellow = variation, red = filler/fill/one-shot. This helps during arrangement to pick clip types quickly.
3. Warp settings for breaks (important for DnB):
- Double-click clip → Warp Mode: Beats or Complex Pro (for transient preservation use Beats; set 1/16 and loop if needed).
- Preserve transients: set transient envelope to keep the snap so you can layer snares.
F. Save template
1. Clean the set so the template opens quickly (remove audio files).
2. File → Save Live Set as Template (or save as "JUNGLE TEMPLATE") — now every new project can use it.
3. Optional: Save track presets of complicated chains (drag the device chain to User Library).
G. Quick arrangement tricks with colours
1. Use consistent colours for arrangement sections:
- Intro = green, Build = orange, Drop = red, Outro = grey.
- Create locators (Arrangement locators) and name them: "01 INTRO", "02 BUILD", "03 DROP".
2. Color the clips within each section accordingly so at a glance you can jump to drops.
4. Common mistakes
5. Pro tips for darker/heavier DnB
6. Mini practice exercise (15–30 minutes)
Goal: Build and save a minimal jungle template.
Step-by-step:
1. Create new Live Set.
2. Create tracks and name them exactly:
- 01-DRUMS-KICK
- 02-DRUMS-SNARE
- 03-DRUMS-BREAKS
- 04-DRUMS-HATS
- 06-DRUMS-DRUMBUS (group)
- 07-BASS-SUB
- 08-BASS-MAIN
- A-REVERB, B-DELAY (returns)
3. Colour them:
- KICK / DRUM BUS = dark red
- SNARE = orange
- BREAKS = maroon/dark red
- HATS = yellow
- BASS SUB = navy or very dark purple
- BASS MAIN = purple
- Returns: Reverb = blue, Delay = amber
4. Drop a short amen loop into 03-DRUMS-BREAKS. Rename clip to "amen_loop_A".
5. On 06-DRUMS-DRUMBUS add: Utility → EQ Eight (HP @ 30 Hz) → Glue Compressor (attack 5ms, release 0.4s, ratio 3:1) → Saturator (Drive 3 dB).
6. On 07-BASS-SUB add Utility → set Width 0% and label track "BASS-SUB_MONO".
7. Create a send to A-REVERB on SNARE and DRUMS-TOP (set send ~ -12 dB).
8. Save Set as "JungleStarterTemplate".
Time: about 20 minutes. Try it now and load template next time you start producing.
7. Recap
Go and make that amen hit heavy and mean — with a tidy template it’ll be faster to iterate and experiment. Need a downloadable preset/template layout or a screenshot walkthrough for your own Live Set? I can draft one tailored to your Live version. 👊🔥

