DNB COLLEGE

AI Drum & Bass Ableton Tutorials

LESSON DETAIL

Oldskool masterclass: vocal texture sequence in Ableton Live 12 (Advanced)

An AI-generated advanced Ableton lesson focused on Oldskool masterclass: vocal texture sequence in Ableton Live 12 in the Sound Design area of drum and bass production.

Free plan: 0 of 1 lesson views left today. Premium unlocks unlimited access.

Oldskool masterclass: vocal texture sequence in Ableton Live 12 (Advanced) cover image

Narrated lesson audio

The voice track includes the tutorial plus extra teacher commentary.

Open audio file

Main tutorial

Oldskool Masterclass: Vocal Texture Sequence in Ableton Live 12 (DnB Sound Design)

1. Lesson overview

In classic jungle/DnB, vocals aren’t always “a lead.” They’re often texture: chopped, time-stretched, filtered, pitched, and sequenced like percussion—gluing drums + bass and adding that rave DNA. In this lesson you’ll build a vocal texture sequence that sits in a rolling 170–174 BPM track: rhythmic, atmospheric, and aggressive when needed. 🔥

We’ll stay mostly stock Ableton Live 12 (with optional extras), focusing on:

  • Warping for oldskool stretch artifacts
  • Chop + re-sequence workflow
  • Formant/pitch movement
  • Resampling to commit and push character
  • DnB-friendly placement in an arrangement
  • ---

    2. What you will build

    A 16-bar vocal texture system consisting of:

  • A main chopped vocal sequence (percussive callouts / syllables)
  • A washed “ghost layer” (stereo ambience + tail)
  • A resampled “rave stab texture” (distorted, filtered, re-gated)
  • A macro-controlled rack for quick performance and arrangement changes 🎛️
  • Result: a vocal element that behaves like a musical FX loop—works in rollers, jungle, and heavier neuro-influenced DnB.

    ---

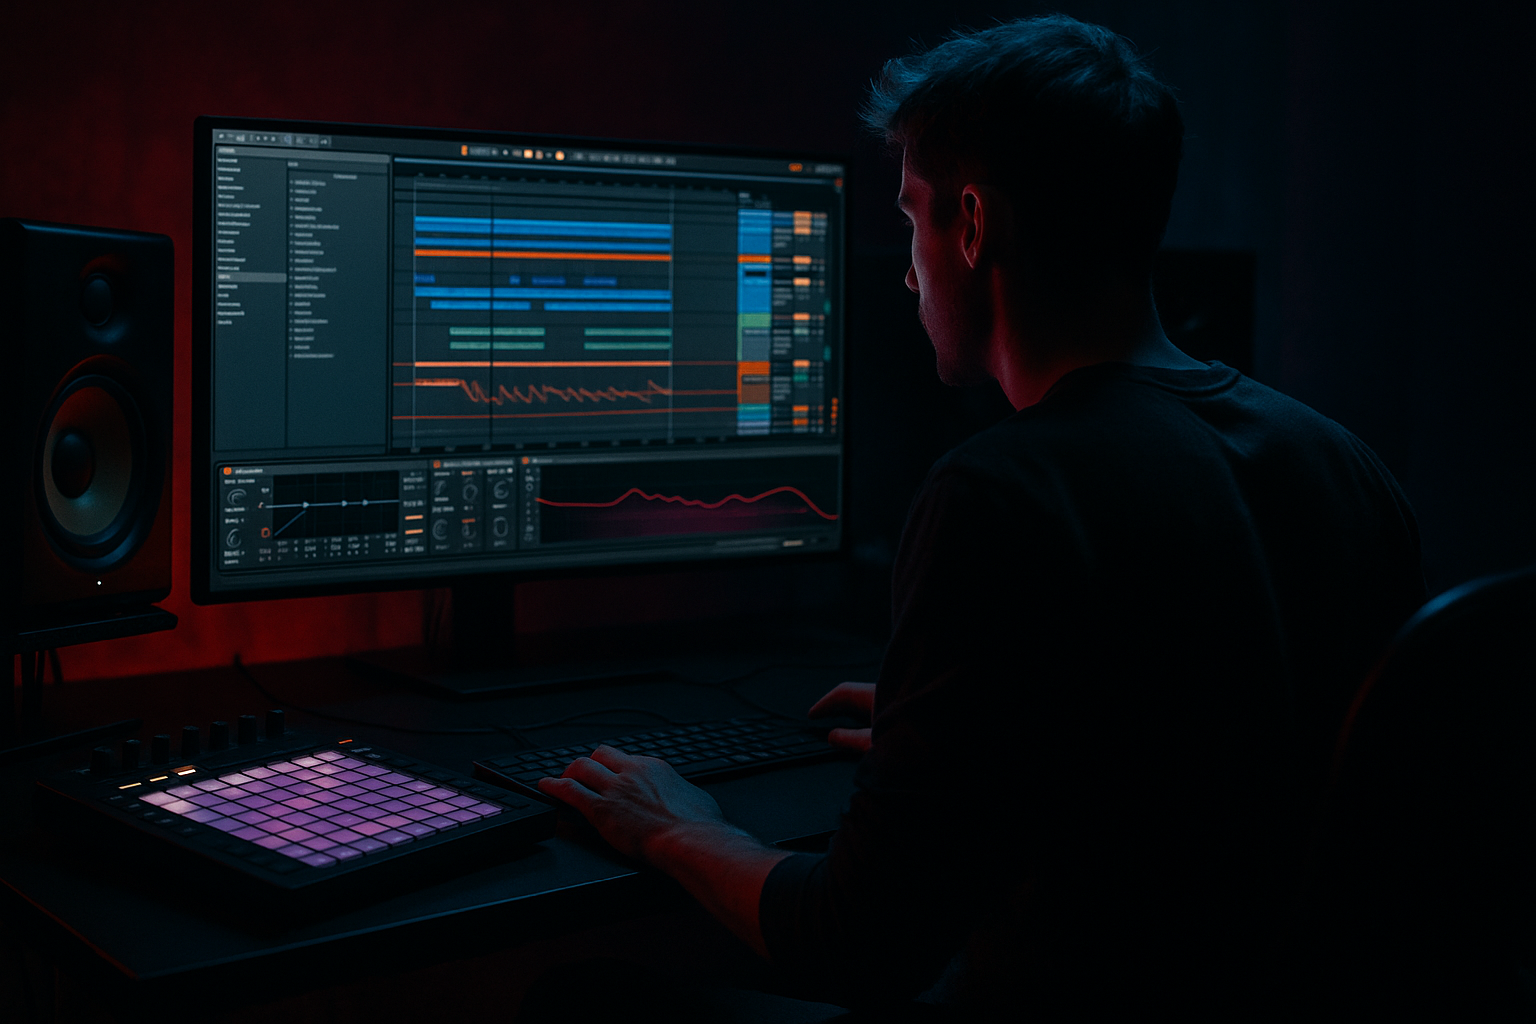
    3. Step-by-step walkthrough

    Step 0 — Project setup (DnB context)

    1. Set tempo to 172 BPM.

    2. Have a basic loop running:

    - Drums: kick + snare on 2 & 4, shuffled hats

    - Bass: rolling reese or sub + mid layer

    3. Create 3 audio tracks:

    - Vox Chops

    - Vox Ghost

    - Vox Resample

    Keeping drums and bass running while designing ensures you build something that actually sits in the mix. ✅

    ---

    Step 1 — Choose and prep a vocal (don’t overthink it)

    Pick a vocal with clear consonants and short phrases:

  • Ragga shouts, MC phrases, spoken word, old rave samples, even a single word works (“run”, “selecta”, “danger”, “pull up”).
  • Drag the vocal to “Vox Chops”.

    #### Warp settings (oldskool vibe)

    Open Clip View and set:

  • Warp: ON
  • Try these warp modes (each has a different “oldskool stretch” flavor):
  • - Tones (great for sustained vowels, smooth but still synthetic)

    - Grain Size: 10–25

    - Texture (grainy, classic timestretch shimmer)

    - Grain Size: 70–130

    - Flux: 10–25%

    - Beats (best for choppy rhythmic artifacts)

    - Preserve: 1/16 or 1/32

    - Transient Loop: ON (for nasty repeats)

    Oldskool tip: If it sounds too clean, you’re probably using Complex/Complex Pro too early. Save that for intelligibility—not texture.

    ---

    Step 2 — Chop it fast (the DnB-friendly way)

    You want rhythmic syllables, not perfect words.

    Method A (fastest): Slice to New MIDI Track

    1. Right-click the vocal clip → Slice to New MIDI Track.

    2. Choose:

    - Slicing Preset: Built-in (or “Slice” preset)

    - Slice By: Transient (good starting point)

    3. Live creates a Drum Rack with slices on pads.

    Now you can sequence vocal chops like drums.

    Method B (manual, surgical):

  • Duplicate the clip, then use Consolidate (Cmd/Ctrl+J) on small regions.
  • Great if you want specific syllables only (e.g., just “ah”, “oh”, “ka”, “tch”).
  • ---

    Step 3 — Program a classic 2-step / jungle-adjacent vocal rhythm

    In the MIDI clip for the Drum Rack:

  • Make a 2-bar loop first.
  • Place chops like you’d place ghost snares or percussion.
  • Try this rhythm (2-step feel at 172):

  • Bar 1: hits on 1.2, 1.4, 2.3
  • Bar 2: hits on 1.3, 2.2, 2.4
  • Add a couple 1/16 pickups before the snare hits (tastefully)
  • Velocity matters:

  • Accents: 100–127
  • Ghost chops: 25–60
  • Randomize slightly (you can do this manually or use Groove Pool lightly)
  • Goal: the vocal becomes part of the drum groove, not a top-line.

    ---

    Step 4 — Build the main “Vox Chops” device chain (stock)

    On the Vox Chops track (or on the Drum Rack chain), add:

    1. EQ Eight

    - HP filter: 120–200 Hz (24 dB slope)

    - Dip harshness: 2.5–4.5 kHz, -2 to -5 dB (Q ~1.5)

    - Optional air shelf: 10 kHz, +1 to +3 dB

    2. Auto Filter

    - Mode: LP

    - Frequency: 1.2–6 kHz (we’ll modulate)

    - Resonance: 10–25%

    - Drive: 2–6 dB

    - Envelope: 10–30% (makes each chop “speak”)

    3. Saturator

    - Mode: Analog Clip

    - Drive: 3–8 dB

    - Soft Clip: ON

    - Output: pull down to match level

    4. Utility

    - Width: 80–110% (keep it centered-ish so drums/bass stay dominant)

    This gives you “present, gritty, mix-ready” chops.

    ---

    Step 5 — Add movement: formants + pitch + filter automation

    Oldskool vocal textures feel alive because pitch/formant changes are constantly happening.

    #### Clip Envelope moves (simple + effective)

    On your MIDI clip (or audio clip), automate:

  • Auto Filter Frequency: small swings every 1/2 bar
  • Saturator Drive: push on fills (end of 4/8/16 bars)
  • #### Pitch trick (old rave vibe)

    If using slices in Drum Rack:

  • Pick 2–3 key slices and transpose them:
  • - One at 0 st

    - One at -5 st

    - One at +7 st

    Keep it musical, like a stab—this screams jungle heritage. 🎚️

    ---

    Step 6 — Create the “Vox Ghost” layer (stereo wash that follows the groove)

    Duplicate Vox Chops to Vox Ghost.

    On Vox Ghost, replace/adjust processing:

    1. EQ Eight

    - HP: 250–400 Hz

    - Low-pass around 6–10 kHz (remove fizz)

    2. Hybrid Reverb

    - Algorithm: Hall or Plate

    - Decay: 2.5–6.5 s

    - Pre-delay: 10–30 ms

    - Size: Large

    - Mix: 25–45% (or use as Send—see below)

    3. Delay

    - Time: 1/8 or 3/16 (classic DnB bounce)

    - Feedback: 15–35%

    - Filter: keep echoes mid/high only

    4. Auto Pan

    - Rate: 1/2 or 1 bar

    - Amount: 20–45%

    - Phase: 180° (wide movement)

    5. Compressor (sidechain from drums)

    - Sidechain input: your drum bus

    - Ratio: 3:1

    - Attack: 5–15 ms

    - Release: 80–180 ms

    - Threshold: set for 2–5 dB gain reduction on snare/kick

    This ghost layer creates width and vibe without stepping on the snare.

    Workflow suggestion: Put reverb/delay on Return tracks instead for consistency across the project, then send Vox Chops into them.

    ---

    Step 7 — Resample to commit character (this is where it becomes “oldskool”)

    Create a new audio track: Vox Resample.

    1. Set Audio FromResampling.

    2. Arm the track.

    3. Record 8–16 bars of your vocal sequence playing with drums/bass.

    Now you have a single audio loop you can treat like a break: chop, gate, reverse, stretch.

    #### Turn resample into a “texture stab loop”

    On the recorded audio:

  • Warp mode: Beats
  • - Preserve: 1/16

    - Transient Loop: ON

  • Then chop into 1/4 or 1/8 chunks and rearrange.
  • Add this chain:

    1. Redux (light but effective)

    - Downsample: 6–14 kHz

    - Bit reduction: 10–14 bits (subtle; don’t nuke it)

    2. Saturator (or Roar if you want extra aggression)

    - Drive: 5–12 dB

    3. Auto Filter

    - Make it band-pass for telephone/rave-radio vibes

    - Freq: 800 Hz – 3.2 kHz

    - Res: 20–35%

    4. Gate (rhythmic)

    - Threshold: set so tails pump in time

    - Return: fast

    - Use Sidechain input (optional) from a 16th-note hat to “trance-gate” the texture

    Now your vocal becomes a percussive texture loop—perfect behind a rolling bassline. 😤

    ---

    Step 8 — Build an Audio Effect Rack with performance Macros

    On Vox Chops (or the group), add an Audio Effect Rack and map these macros:

    1. Tone (Filter Freq) → Auto Filter Frequency

    2. Bite (Drive) → Saturator Drive

    3. Air (Shelf) → EQ Eight high shelf gain

    4. Space (Send) → Reverb send (or Hybrid Reverb mix)

    5. Pitch Scatter → Transpose on selected slices (if using Drum Rack)

    6. Width → Utility Width

    7. Gate Amount → Gate Threshold

    8. Duck → Sidechain Compressor threshold

    This turns the vocal texture into a playable instrument you can “perform” during arrangement.

    ---

    Step 9 — Arrangement ideas (DnB / jungle rooted)

    Use the vocal texture like seasoning and signposting:

  • Intro (16 bars): ghost layer only, filtered down (Auto Filter at ~1 kHz)
  • Build (8 bars): introduce chopped hits, increase Space macro slightly
  • Drop (16–32 bars): keep chops sparse; let drums/bass dominate
  • Mid-drop switch: swap to the resampled gated texture for 8 bars
  • Pre-break fill: reverse 1 chop + big reverb tail, then hard cut on the 1
  • Second drop: transpose some slices down (-5 or -12) for darker variation
  • Classic jungle move: mute vocals on the first 2 bars of the drop, then bring them in as a callout on bar 3/5. Tension + payoff.

    ---

    4. Common mistakes

  • Too much low-mid (200–500 Hz): vocal textures will fight bass warmth and snare body. High-pass and carve.
  • Over-widening the main chop layer: wide = impressive solo, messy in a DnB mix. Keep the main more mono, widen the ghost.
  • No sidechain/ducking: if vocals aren’t ducking to the snare, the groove feels smaller.
  • Over-quantized chops: DnB swing is subtle; nudge a few hits late by 5–15 ms.
  • Too intelligible: for texture, clarity is optional. If it sounds like a pop feature, you’re in the wrong lane.
  • ---

    5. Pro tips for darker/heavier DnB

  • Pitch down + formant feel: transpose some slices -7 to -12 st and then brighten with EQ instead of leaving them muddy.
  • Distortion in parallel: group Vox Chops → create a parallel chain with heavy Saturator/Redux, blend at 10–25% for menace.
  • Band-pass automation = aggression: automate a band-pass sweeping 600 Hz → 2.5 kHz during fills. Instant tension.
  • Reese relationship: carve a small dip around the vocal’s “bite” frequency (often 2–4 kHz) from your bass mid layer using EQ Eight.
  • DnB “radio” moment: hard band-pass + bit reduction + mono (Utility Width 0%) for 1 bar, then explode back to full width. 🎚️
  • ---

    6. Mini practice exercise (15–20 minutes)

    1. Pick a 1–2 second vocal (“hey”, “come”, “selecta”, anything).

    2. Slice to Drum Rack and program a 2-bar pattern with:

    - 6–10 hits total

    - at least 3 ghost hits (low velocity)

    3. Create Vox Ghost with:

    - Hybrid Reverb (Decay 4s), sidechained to drums

    4. Resample 8 bars and make a gated texture loop using Gate + Auto Filter.

    5. Arrange a quick 8-bar drop:

    - Bars 1–2: no vocals

    - Bars 3–8: bring in chops, then swap to resample on bar 7

    Bounce a quick rough and listen on low volume: if the groove feels better with the vocal texture barely audible, you nailed it.

    ---

    7. Recap

    You built an oldskool DnB vocal texture system by:

  • Warping for character (Texture/Beats > too-clean modes)
  • Slicing + sequencing vocals like percussion
  • Layering a ghost wash that ducks around drums
  • Resampling to commit grit and create new rhythmic textures
  • Using macros + arrangement swaps to keep it evolving across 16–32 bars

If you want, tell me what kind of DnB you’re writing (jungle/roller/dancefloor/neuro) and what vocal source you’re using, and I’ll suggest a tight macro map + exact EQ carve points for your drum/bass balance.

Ask GPT about this lesson

Chat with the lesson tutor, get follow-up help, or use quick actions.

Bigup 👽 Ask me anything about this lesson and I’ll answer in context.

Narration script

Show spoken script
Welcome to this oldskool masterclass. We’re going deep on a very specific jungle and drum and bass move: turning vocals into texture, not a lead. Think chopped syllables, crunchy time-stretch artifacts, band-limited “radio” midrange, and that sequenced, percussive feel that glues your drums and bass together like it’s part of the break.

This is advanced, so I’m going to assume you already know your way around Live’s Session and Arrangement, you’re comfortable with warping, slicing, and basic routing. The focus today is on decisions: where the vocal sits in the frequency lane, how it grooves against a 172 BPM pocket, and how you commit character by resampling.

Settle in. Get a loop running. And let’s build a 16-bar vocal texture system you can actually perform and arrange with.

First, set your tempo to 172 BPM. Anywhere in that 170 to 174 range is perfect, but 172 is a sweet spot for rollers and jungle-adjacent stuff.

Now, don’t design this vocal in a vacuum. Have a basic drum and bass loop playing while you work. Kick, snare on 2 and 4, some shuffled hats. And a bassline, even if it’s just a placeholder reese and sub. This matters because vocals that sound “huge” solo often collapse the groove once the snare and bass show up.

Create three audio tracks and name them: Vox Chops, Vox Ghost, and Vox Resample.

Before we even touch vibe effects, do a quick mental “frequency job.” In DnB, vocal texture lives in a narrow lane.
Your main chops will mostly live in that 1 k to 6 k zone.
Your ghost layer is more like 2 k to 10 k, but it must be ducked so it reads as space, not cymbal haze.
And your resampled texture? That usually works best as a band-limited midrange object, almost like a stab, not full-range.

Alright. Choose a vocal. Do not overthink this. One word can be enough. “Run,” “selecta,” “danger,” “pull up,” anything with clear consonants. Consonants are your heroes in busy drops. Vowels smear; consonants cut.

Drag the vocal onto Vox Chops.

Open the clip and turn Warp on. Now, here’s the oldskool mindset: if it sounds too clean, you’re probably in the wrong warp mode. Complex and Complex Pro can be great, but for texture they can be too polite.

Try Tones if you’ve got sustained vowel material and you want it smooth-but-synthetic. Set Grain Size around 10 to 25.
Try Texture if you want grain shimmer and that classic time-stretch sheen. Grain size around 70 to 130, and Flux around 10 to 25 percent.
Try Beats if you want hard choppy artifacts. Set Preserve to 1/16 or 1/32. Turn Transient Loop on if you want those nasty little repeats.

While it plays with your drums, listen for the point where it becomes an instrument rather than a sentence. That’s the target.

Now we chop.

Fast method: right-click the clip and choose Slice to New MIDI Track. Slice by Transient to start. Live will generate a Drum Rack full of slices, laid out like drum hits.

This is the big conceptual shift: you are about to program vocals like percussion. Not “singing.” Not “lyrics.” Groove.

Create a MIDI clip on that new slice track. Start with a 2-bar loop.

Here’s a classic 2-step feel to try at 172.

In bar 1, place hits on 1.2, 1.4, and 2.3.
In bar 2, place hits on 1.3, 2.2, and 2.4.

Then add a couple of tasteful 1/16 pickups right before the snare. Not everywhere. Just enough to make it feel like the vocal is teasing the backbeat.

Now, velocity is everything. If all your chops are the same velocity, it will sound like a MIDI exercise.
Accents up around 100 to 127.
Ghost chops down around 25 to 60.
And here’s a pro move: before you compress or distort anything, balance slice-to-slice level with Clip Gain. Clip Gain is your secret macro. Get the intention right first, so your saturator reacts predictably later. You’ll need less sidechain, and the groove stays bigger.

Once the pattern feels good, do a quick groove check.
If it feels too rigid, don’t immediately start dragging notes. Instead, go to Track Delay on the vocal chop track. Push it late by 5 to 15 milliseconds for a laid-back roll, or pull it early by about 5 milliseconds if you want it to bite like a rimshot.
This is one of those oldskool character decisions you should print later when you resample.

Now let’s build the main Vox Chops processing chain. Keep it stock.

First, EQ Eight.
High-pass around 120 to 200 Hz, 24 dB slope. You’re clearing space for sub and snare body.
Then find harshness around 2.5 to 4.5 kHz and dip it a couple dB if it’s poking. Q around 1.5 is a good start.
Optionally add a gentle shelf around 10 k for a little air, but keep it subtle.

Next, Auto Filter.
Set it to low-pass. Frequency anywhere between 1.2 k and 6 k depending on your sample, and we’re going to modulate it.
Resonance around 10 to 25 percent.
Drive 2 to 6 dB.
And set the envelope amount around 10 to 30 percent so each chop “speaks” a bit more on the transient.

Then Saturator.
Analog Clip mode is a great vibe choice for this.
Drive 3 to 8 dB.
Soft Clip on.
And pull the output down so you’re not fooling yourself with loudness.

Then Utility.
Width around 80 to 110 percent. The key idea: keep the main chops fairly centered. If you make the main layer super wide, your mix gets impressive and messy. Save width for the ghost.

At this point, you should have present, gritty, mix-ready chops that sit inside the drums instead of on top of them.

Now we add movement, because oldskool vocal texture is never static.

Automate Auto Filter frequency with small swings every half bar. Not huge EDM filter sweeps. Think subtle mouth movement.
Automate Saturator drive on fills, like at the end of 4, 8, or 16 bars, so energy lifts without needing more volume.

And for that old rave DNA: pick two or three slices and transpose them so they behave like a stab.
One slice at zero semitones.
One at minus five.
One at plus seven.
Now when you sequence between them, you’re getting musical call-and-response inside the percussion language.

If you want “formant-ish” movement without a dedicated formant plugin, fake it with EQ automation.
Take two EQ Eight bell bands. Put one around 700 to 1.2 k with a small boost, and another around 2.2 to 3.5 k with a small dip. Then slowly move them in opposite directions over 4 to 8 bars. Even on a single syllable, it reads like vowel change.

Next, the Vox Ghost layer. This is your stereo wash that follows the groove, but never steps on the snare.

Duplicate Vox Chops to Vox Ghost.

On Vox Ghost, start with EQ Eight.
High-pass higher, around 250 to 400 Hz.
And low-pass around 6 to 10 kHz to remove fizz, because this layer is supposed to be space, not cymbals.

Add Hybrid Reverb.
Choose Hall or Plate.
Decay 2.5 to 6.5 seconds.
Pre-delay 10 to 30 milliseconds.
Large size.
Mix around 25 to 45 percent if it’s inserted. Or, even better, put your reverb on a Return track and send to it, so you can treat reverb consistently across the whole track.

Add a delay for bounce.
Eighth-note or three-sixteenths time.
Feedback 15 to 35 percent.
Filter it so the echoes live mostly in the mids and highs.

Add Auto Pan.
Rate half-note or one bar.
Amount 20 to 45 percent.
Phase at 180 degrees so it feels wide.

Now compress it with sidechain from your drum bus.
Ratio 3 to 1.
Attack 5 to 15 milliseconds.
Release 80 to 180 milliseconds.
Set threshold for about 2 to 5 dB of gain reduction on kick and snare.

Teacher note: if you can, sidechain the reverb itself rather than crushing the whole ghost. Put Hybrid Reverb on a Return, then sidechain-compress that Return from the snare and kick. The vocal can stay present, but the space breathes around the drums. That’s how you get bigger without clutter.

Okay. Now we print character. This is where it really becomes oldskool.

Create a new audio track called Vox Resample.
Set Audio From to Resampling.
Arm it.
And record 8 to 16 bars of your vocal sequence playing with drums and bass.

Now you’ve got a single audio loop you can treat like a break. This is huge. You stop endlessly tweaking and you start doing real jungle science: chop, gate, reverse, stretch, rearrange.

On that resampled audio clip, set Warp mode to Beats.
Preserve 1/16.
Transient Loop on.

Then chop the resample into quarter-notes or eighth-notes and rearrange. You’ll instantly get that “sampled loop” energy, because it is one now.

Now build the resample texture chain.

First, Redux, lightly.
Downsample around 6 to 14 kHz.
Bit reduction around 10 to 14 bits. Don’t nuke it. You want “age,” not “broken.”

Then Saturator, or Roar if you want more aggression.
Drive around 5 to 12 dB, but keep output gain staged.

Then Auto Filter in band-pass mode for that telephone, rave-radio vibe.
Sweepable range from about 800 Hz to 3.2 kHz.
Resonance 20 to 35 percent.

Then a Gate.
Set threshold so tails pump in time.
Fast return.

Optional but deadly: sidechain the gate from a tight 16th-note hat pattern. That turns the resample into a trance-gated texture that still feels DnB because it’s locked to your drum grid.

One more advanced spice: noise-floor authenticity.
Create a super low-level noise bed, filter it band-limited, and gate it rhythmically with the vocal pattern or sidechain gate. It fills the cracks like old sampler playback and makes chopped edits feel less sterile.

Now we turn the whole thing into an instrument you can perform.

On Vox Chops, or better, group the vocal tracks and put this on the group, add an Audio Effect Rack and map macros.

Map a Tone macro to Auto Filter frequency.
Map Bite to Saturator drive.
Map Air to the EQ high shelf gain.
Map Space to your reverb send amount, or Hybrid Reverb mix if you inserted it.
Map Width to Utility width.
Map Gate Amount to the gate threshold on the resample chain if you’re controlling that texture.
Map Duck to the sidechain compressor threshold.
And if you’re in Drum Rack, map a Pitch Scatter control to transpose on selected slices, so you can shift the vibe without rewriting MIDI.

Here’s a really fun performance concept: build a single “Rinse” switch macro. When you turn it up for one bar, it does four things at once.
It pushes a band-pass up into telephone range.
It reduces width toward mono.
It adds a little drive.
And it increases send to a short slap delay.
Automate that for exactly one bar before a drop or before a mid-drop switch, and it becomes instant system-style signposting.

Now arrangement. This is where you stop thinking “loop” and start thinking “energy plan.”

Tier one, intro or early build: ghost layer only, filtered down around 1 k. Minimal rhythm. You’re implying the vocal, not stating it.
Tier two, main drop baseline: sparse chops, light ghost. Drums and bass are the headline.
Tier three, hype moments: the resampled gated texture appears only on key turnarounds, like every 8 or 16 bars, or the last bar before a switch. Short appearances hit harder than constant presence.

Classic jungle move: mute vocals for the first two bars of the drop, then bring them in as a callout on bar three or five. That tension and payoff is pure rave psychology.

And don’t forget negative space as a hook. Choose one signature syllable and remove it for the first half of a phrase, then bring it back. People latch onto the absence and return more than an always-on pattern.

Let’s cover common mistakes so you can dodge them fast.

Too much low-mid around 200 to 500 Hz will fight your bass warmth and snare body. High-pass and carve.
Over-widening the main chop layer sounds big solo and messy in context. Keep the main more mono, widen the ghost.
No sidechain means the groove feels smaller. Duck the ghost and any long tails around the snare.
Over-quantized chops kill the roll. Use Track Delay or nudge a couple hits late by 5 to 15 milliseconds.
And if it’s too intelligible, you might have accidentally made a pop feature. Remember: for texture, clarity is optional.

Now a quick mini practice, 15 to 20 minutes.
Pick a one to two second vocal, even just “hey.”
Slice it to Drum Rack.
Program a two-bar pattern with six to ten hits, including at least three ghost hits.
Make a Vox Ghost with about a four-second reverb, sidechained to drums.
Resample eight bars and make a gated texture loop using gate and band-pass.
Then arrange an eight-bar drop: bars one and two, no vocals. Bars three to eight, bring in chops, and on bar seven swap to the resampled gated texture.

Then bounce a rough and listen quietly. If the groove feels better even when the vocal texture is barely audible, you nailed it. That’s the whole point: the vocal is acting like musical FX, not stealing the spotlight.

Recap.
You warped for character, using Texture or Beats for artifacts instead of going too clean.
You sliced and sequenced vocals like percussion.
You built a ghost wash that creates width and vibe while ducking around drums.
You resampled to commit grit and create a new loopable texture, like a break.
And you built macro controls so the vocal evolves across 16 to 32 bars without needing endless new samples.

When you’re ready to push it further, try this advanced variation: make six to twelve one-bar or two-bar chop clips in Session View, set Follow Actions with different probabilities, record the performance into Arrangement, and edit the best bits. That unpredictability is the closest thing to a live MC cut-up without hand-programming every fill.

That’s the masterclass. Load a vocal, keep it in its frequency lane, make it groove, print it, and perform it.

Background music

Premium Unlimted Access £14.99

Any 1 Tutorial FREE Everyday
Tutorial Explain
Generating PDF preview…