Main tutorial
Pad Flip Session: Heavyweight Sub Impact (Ableton Live 12) — Jungle / Oldskool DnB DJ Tool 🎛️🔊
1. Lesson overview
This lesson is about building a pad-flip performance rack in Ableton Live 12 that lets you slam heavyweight sub impacts (think: dark jungle drops, rewind moments, bass stabs into silence, Amen fill + sub hit) while staying tight and musical.
You’ll create a DJ-tool style “impact instrument” that you can play like a drum kit:
- One pad = sub hit
- Another pad = sub fall / boom
- Another pad = reverse swell + sub
- Another pad = short “donk” for groove punctuation
- Another pad = sidechained sub hit under a break
- Plus macros to instantly change length, pitch, drive, stereo width, and punch
- Sub Impact Sampler chain (multi-velocity layers optional)
- Boom/Fall chain (pitch envelope + longer tail)
- Reverse whoosh into sub chain (classic jungle tension)
- Click/top transient chain (for translation on small systems)
- Break-ducked impact option (so it hits without masking your drums)
- Punch (transient emphasis + saturation)
- Sub Length (amp decay / release)
- Sub Tune (global pitch)
- Drive (saturation)
- Space (small verb + filtered tail)
- Mono Guard (utility + width management)
- Voices: 1 (mono, prevents overlaps)
- Volume Envelope (Amp):
- Filter: Off for now (we’ll shape with EQ)
- HP filter: 24 dB/oct at 20–25 Hz (remove rumble)
- Gentle bell at 55–70 Hz if you need more “chest”
- Small dip 150–250 Hz if it feels boxy
- Mode: Analog Clip (or Soft Sine)
- Drive: 2–6 dB
- Output: pull down to match level
- Turn on Soft Clip
- Width: 0% (keep sub mono)
- Gain: adjust so it’s strong but not clipping your master
- Simpler: very short Decay (30–80 ms)
- EQ Eight: HP at 200–400 Hz, emphasize 2–5 kHz if needed
- Drum Buss: Drive 2–5, Boom OFF (we don’t want low here)
- Initial pitch starts higher, falls quickly to the root. It reads as impact + sub in one.
- EQ Eight HP at 20–25 Hz still
- Saturator: slightly more drive than the short hit (e.g. 4–8 dB) if you want aggression
- Auto Filter: Band-pass sweeping up
- Echo:
- Utility: keep lows controlled; if the reverse has low content, HP it via EQ/Filter.
- Map to:
- C1 Decay: 80–250 ms
- C#1 Decay: 250–800 ms
- D1 Decay: 120–500 ms
- Map to Sampler Transpose on C1/C#1/D1
- Map to:
- Saturator Drive: 2–9 dB
- Add an EQ Eight or Auto Filter on sub pads:
- Map Hybrid Reverb Mix (C#1)
- Map Echo Wet (reverse pad)
- Map Utility Width on pads:
- Bar before drop: trigger D#1 (reverse) on beat 3
- Drop downbeat: trigger C#1 (boom) + break returns
- In a 2-bar phrase, fire C1 only on beat 1 every 2 bars
- Creates that rolling pressure without constant sub
- Kill drums for 1/2 bar (arrangement mute or DJ-style cut)
- Fire D1 (sub fall) then slam back into full break
- Sub not mono: any width below ~120 Hz = weak, phasey club translation.
- Too long decay: impacts become basslines and smear the groove; jungle likes space.
- No transient layer: pure sine can disappear on smaller playback; add click/knock lightly.
- Overdriving without gain staging: Saturator sounds great until your master limiter is doing 6–10 dB constantly.
- Pitch envelope too extreme/slow: if the fall takes too long, it sounds like a bad 808 glide instead of an impact.
- Tune to the track’s root: Impacts feel “bigger” when they agree with your bass note. Use Macro 2 (±3 semis) to lock it fast.
- Add controlled harmonics, not fuzz: Saturator with soft clip > heavy distortion for subs. Save gnarly distortion for mid-bass layers.
- Use a “ghost sub” layer for punch: Duplicate the sub pad and high-pass it at 90–120 Hz, saturate it more—blend quietly. It adds perceived weight without ruining mono sub.
- Resample your best hits: Once you nail a perfect impact, Freeze/Flatten or resample to audio. Oldskool workflow = commit and move on.
- Keep the break sacred: Jungle is break-led. Make impacts accent the break, not replace it.
- You built a Drum Rack DJ tool for pad-flipping heavyweight sub impacts in Ableton Live 12.
- Each pad serves a musical role: short hit, long boom, pitch fall, reverse tension, transient click.
- You added macro performance control for length, tune, punch, dirt, and space.
- You kept it jungle-correct: sub is mono, impacts are short and intentional, and the break stays in front.
We’re aiming for that 1994–1998 energy: simple, brutal, functional—but with modern control.
---
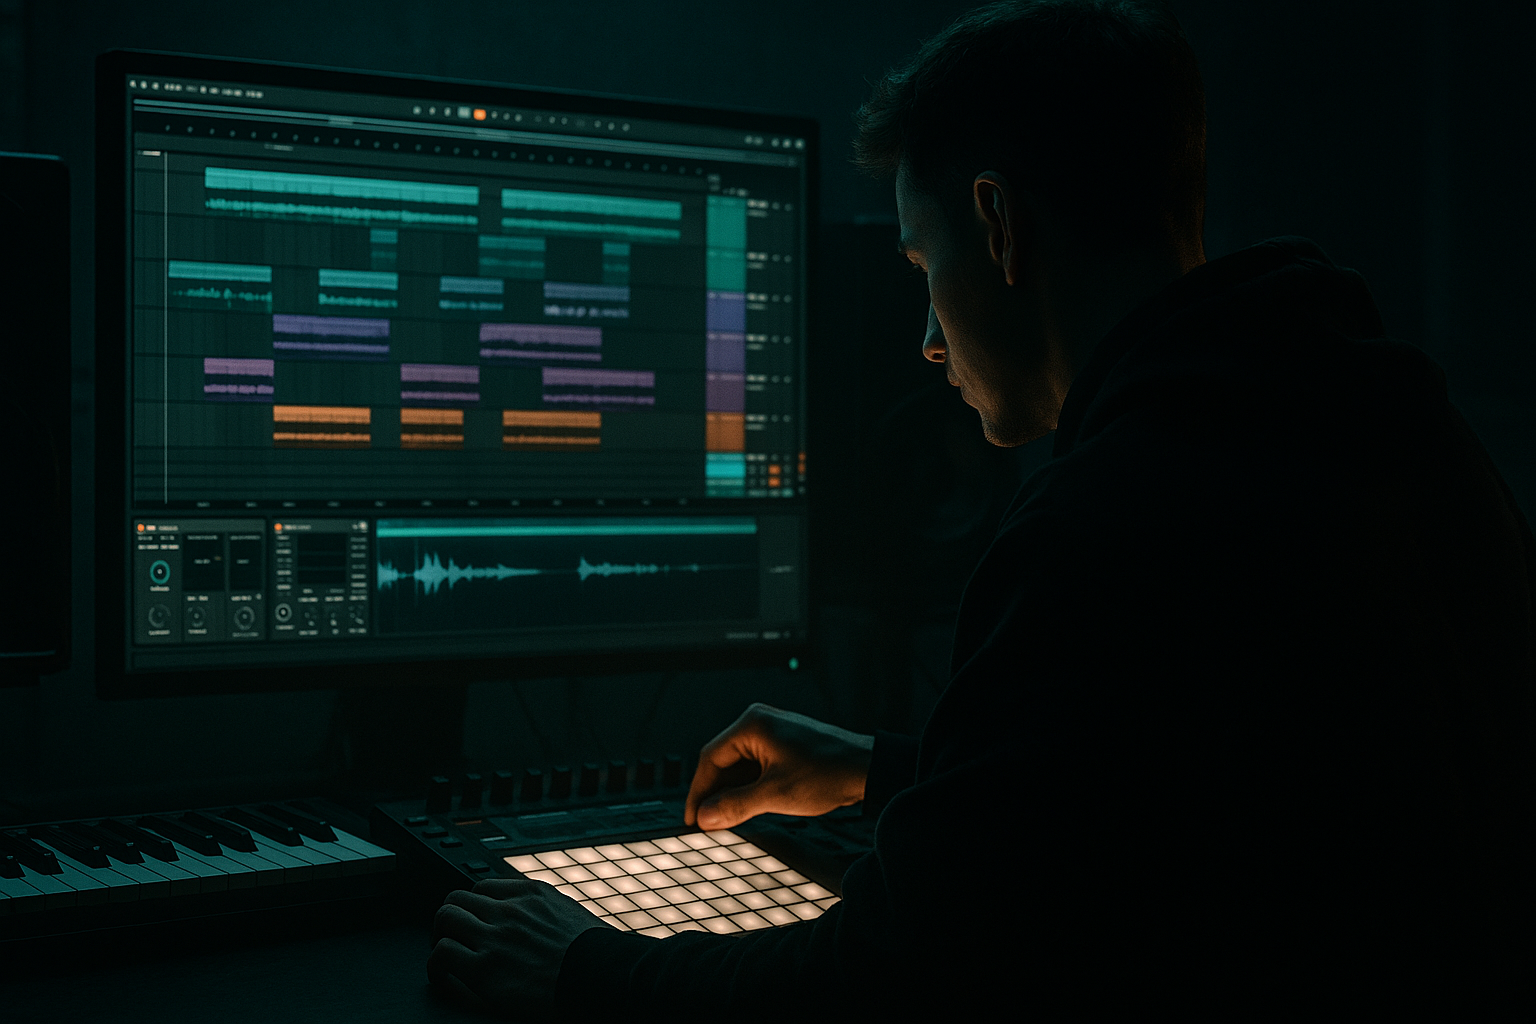
2. What you will build
A single Drum Rack (MIDI-controlled) containing:
Plus a Macro control layer for performance:
Result: a pad flip session tool you can record into arrangement for drops, switch-ups, and DJ-style edits.
---
3. Step-by-step walkthrough
Step 0 — Session setup (so it hits like DnB)
1. Set tempo: 165–172 BPM.
2. In Preferences > Audio, keep latency low enough to play pads (buffer ~128–256 samples).
3. Create a new MIDI track: Cmd/Ctrl+Shift+T
Name it: `SUB IMPACT RACK`.
DnB workflow tip: Keep this rack separate from your bassline track. It’s a moment tool, not your main low-end.
---
Step 1 — Build the Drum Rack skeleton
1. Drop Drum Rack on the MIDI track.
2. Pick pad mapping (example):
- C1 = Sub Hit (short)
- C#1 = Sub Boom (longer)
- D1 = Sub Fall (pitch down)
- D#1 = Reverse + Impact
- E1 = Click/Knock layer
You can trigger these from Push, MIDI controller, or computer keys.
---
Step 2 — Create the core “Sub Hit” pad (C1) 🧱
We’ll use Sampler for proper envelopes, pitch control, and consistent low-end.
1. Click pad C1.
2. Drag in a clean sub source:
- Option A: a one-shot sine/sub sample (best for consistency)
- Option B: a recorded reese low-passed (for dirt)
3. Ableton device chain on that pad:
- Sampler
- EQ Eight
- Saturator
- Utility
- Limiter (optional safety)
#### Sampler settings (tight jungle “thump”)
- Attack: 0.0–1.0 ms
- Decay: 120–250 ms (start at 160 ms)
- Sustain: -inf (so it’s a one-shot)
- Release: 50–120 ms
#### EQ Eight (clean the sub + add focus)
#### Saturator (weight without fuzz)
#### Utility (mono discipline)
Target vibe: short, authoritative “WOMF” that sits under an Amen without smearing.
---
Step 3 — Add a “Click/Knock” layer (E1) for translation 🎯
Oldskool subs often had a little top transient from hardware/sampling. This helps it cut on smaller systems.
1. Click pad E1, drop Simpler.
2. Load a tiny click: kick beater, vinyl tick, rim, short noise.
3. Device chain:
- Simpler
- EQ Eight
- Drum Buss (light)
- Utility
Settings:
Performance method: Trigger C1 + E1 together sometimes (or layer them later by putting click into the same pad chain; we’ll keep separate for flexibility).
---
Step 4 — Create a “Sub Boom” (C#1) for drop moments 💥
This is the longer tail version for rewinds, drop landings, and breakdown punctuation.
1. Click pad C#1 → add Sampler with same sub source (duplicate C1 chain for speed).
2. Increase Decay to 350–700 ms (start ~450 ms)
3. Add a tiny room tail:
- Add Hybrid Reverb AFTER Utility (but before Limiter if used)
- Mode: Room / Ambience
- Decay: 0.4–0.8s
- Low Cut: 150–250 Hz (important!)
- Mix: 5–12%
Why: You get “size” without washing the sub.
---
Step 5 — Create a “Sub Fall” (D1) with pitch envelope 📉
Classic jungle move: pitch drops fast into the hit = extra perceived weight.
1. Click pad D1 → add Sampler (duplicate again).
2. In Sampler, use the Pitch/Osc section:
- Enable Pitch Envelope
- Amount: -12 to -24 semitones
- Decay: 80–180 ms
- Attack: 0 ms
Envelope idea:
Then:
---
Step 6 — Create “Reverse + Impact” (D#1) for tension into drops 🔄
1. Click pad D#1
2. Add Simpler and load a reverse swell sample:
- Reverse a cymbal, noise, or even the sub itself (resample + reverse)
3. Chain:
- Simpler
- Auto Filter
- Echo
- Utility
- (Optional) Limiter
Suggested settings:
- Frequency start ~300 Hz → end ~6–10 kHz (map to Macro later)
- Resonance 0.7–1.2
- Time: 1/8 or 3/16
- Feedback: 10–25%
- Filter inside Echo: HP ~300 Hz, LP ~8 kHz
DnB arrangement use: Fire this 1/2 bar or 1 bar before a drop, then hit C#1 on the downbeat.
---
Step 7 — Make it a Pad Flip Session Tool with Macros 🎚️
Now we’ll macro-control key parameters across pads. This is where it becomes a performance instrument.
1. Click the Drum Rack → Show Macro Controls.
2. Map these (right-click parameter → Map to Macro):
Macro 1: SUB LENGTH
- C1 Sampler Amp Decay
- C#1 Sampler Amp Decay
- D1 Sampler Amp Decay
Suggested ranges:
Macro 2: SUB TUNE
Range: -3 to +3 semitones
(Enough to match key without ruining weight.)
Macro 3: PUNCH
- Saturator Drive (C1/C#1/D1)
- Drum Buss Drive (click pad)
- Optional: add Drum Buss on sub pads with Boom OFF, Drive low
Range idea:
Macro 4: CLEAN ↔ DIRTY
- Low-pass around 120–250 Hz for cleaner sub
- Or introduce slight upper harmonic with less low-pass
Map LP frequency to this macro.
Macro 5: SPACE
Keep ranges modest: 0–15%
Macro 6: MONO GUARD
- Sub pads locked to 0% (keep fixed if you prefer)
- Reverse/FX can widen: 80–140%
This macro is mainly to quickly rein in width when you’re overcooking it.
---
Step 8 — Add a “break-friendly” sidechain option (DJ tool behavior) 🥁⬇️
If your impact masks the Amen/snare, duck the impact slightly or duck the break slightly. For DJ-tool style, I like ducking the impact tail so the transient still hits.
On C#1 (Sub Boom) chain:
1. Add Compressor after Saturator.
2. Enable Sidechain and select your Break/Drums Bus as input.
3. Settings:
- Ratio: 2:1 to 4:1
- Attack: 10–30 ms (let the initial hit through)
- Release: 80–200 ms
- Threshold: set until tail tucks under the break
This keeps it massive without trampling your snare.
---
Step 9 — Performance + arrangement ideas (oldskool-aware) 🎚️
A) The “Drop Stamp”
B) The “Half-time smash”
C) The “Rewind marker”
Recording tip: Record your pad performance into Arrangement, then consolidate the best hits and treat them like arrangement punctuation.
---
4. Common mistakes
---
5. Pro tips for darker/heavier DnB 🕯️⚙️
---
6. Mini practice exercise 🎯
Goal: Build a 16-bar loop with 3 distinct impact moments that feel like a real jungle arrangement.
1. Create an 8-bar rolling break (Amen or similar).
2. Add your bassline (simple notes, leave space).
3. Use your rack:
- Bar 4 beat 4: D#1 reverse (short)
- Bar 5 beat 1: C#1 boom (drop stamp)
- Bar 12 beat 1: D1 fall (rewind marker vibe)
4. Automate:
- Macro 1 (Sub Length): shorter in verses, longer on bar 5 and 13
- Macro 3 (Punch): +15–25% on drops only
5. Export a quick bounce and check:
- headphones + small speaker/phone (does the click help?)
- mono check (Utility on Master: Width 0%)
---
7. Recap ✅
If you want, tell me what kind of break you’re using (Amen / Think / Hot Pants) and your track key, and I’ll suggest exact impact tuning + decay ranges to match the groove.

