Main tutorial
Lesson Overview
This lesson is about taking a ragga cut vocal in Drum & Bass and giving it a finish that feels modern, heavy, and club-ready, while still keeping the grit, swagger, and human soul of classic jungle and sound system culture. In practice, that means turning a raw vocal sample into a hooky, rhythmic FX weapon that can sit in a drop, carry a turnaround, or answer the bass in a call-and-response pattern.
In an advanced DnB context, a ragga cut is rarely just “a vocal.” It’s often the thing that gives the track identity: a chopped phrase in the intro, a chopped-and-pitched stab in the drop, a filtered phrase that opens the second 16 bars, or a transitional scream that lands just before the bass switch. The trick is to polish without sterilizing. You want the vocal to hit with modern punch, but still feel like it came from a crate of dubplates, tape, and warehouse pressure. 🔥
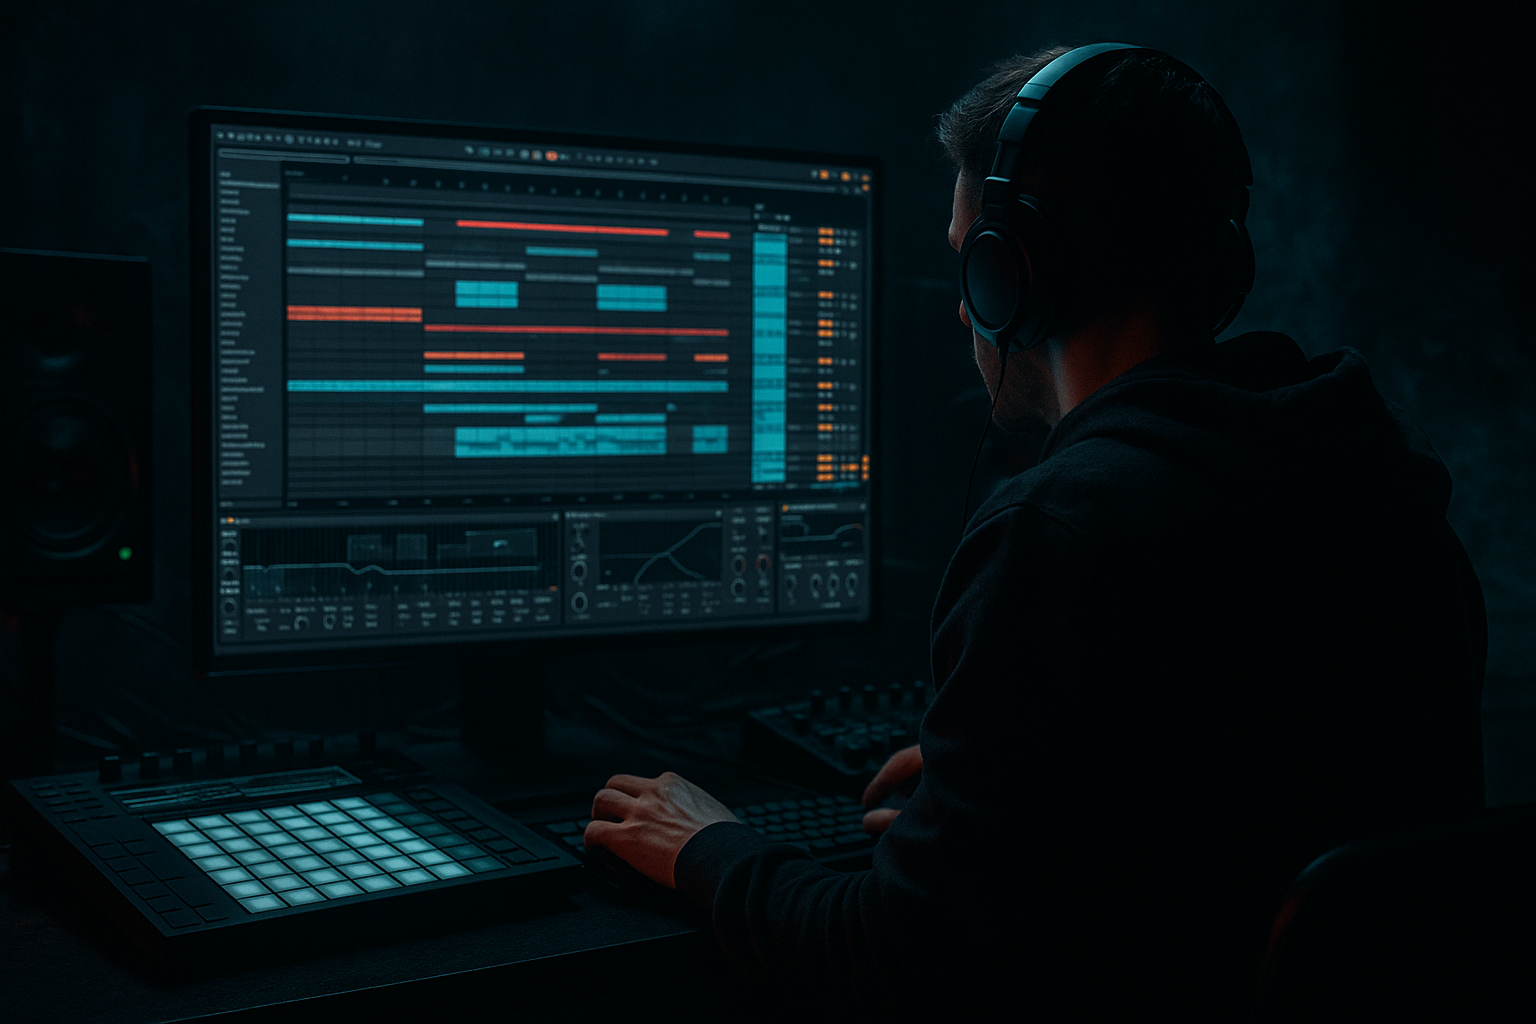
We’ll use Ableton Live 12 stock devices to shape a vocal that works in rollers, darker jump-up, jungle-influenced rollers, and neuro-adjacent DnB, with a workflow that covers:
- cleanup and resampling
- tight rhythm edits
- saturation and transient control
- delay/reverb spaces that don’t wash out the drop
- automation and arrangement moves that make the vocal function as an FX element, not just a top-line
- a short, aggressive vocal chop for drop accents
- a midrange-forward, gritty vocal layer that cuts over big drums
- a filtered dubby tail that can open 8-bar phrases
- a stereo-controlled, modern polished finish with vintage flavor
- a call-and-response utility that can answer the bass or reinforce snare hits
- a roller drop at 174 BPM with sparse phrasing
- a two-step jungle groove with chopped break energy
- a dark halftime switch where the vocal becomes a tension device
- a 16-bar intro or outro where it works like a dubby announcer tag
- Over-widening the dry vocal
- Too much low end in the vocal chain
- Over-compressing the attitude out of the ragga performance
- Long reverbs washing over the snare and bass
- Too many syllables in the drop
- No resampling step
- Print a dirty version and a clean version of the same vocal. Use the dirty one for builds and the cleaner one for the main drop so the arrangement has contrast.
- Automate Echo feedback upward only at phrase ends, then cut it hard before the next drum hit. That gives controlled chaos without smearing the groove.
- Use a band-passed duplicate of the vocal around 300 Hz–4 kHz for a grimy midrange layer. Blend it quietly under the main vocal for underground pressure.
- Sidechain vocal returns lightly to the snare or kick if the delay tails clutter the groove. A subtle Compressor on the return can keep the pocket clean.
- Resample through saturation, then reverse small fragments for tension fills before drop 2. Great for darker roller transitions.
- Layer a short vocal chop with a reese unison stab so the vocal becomes part of the bass call-and-response. Keep the bass mono and the vocal slightly more airy.
- Use automation on Auto Filter plus Echo together: when the filter closes, increase delay send a little. That creates classic dub tension with modern control.
- Clean the ragga vocal first, then shape it with EQ, saturation, and controlled compression.
- Use send-based Echo and Reverb to create dub space without losing punch.
- Treat the vocal like a rhythmic DnB instrument, not just a topline.
- Resample the processed chain so you can chop, layer, and arrange faster.
- Keep the dry core centered, the returns filtered, and the phrasing sparse enough for the drums and bass to breathe.
Why this matters: in DnB, the vocal often has to survive a crowded mix where the kick, snare, sub, reese, and break layers already own the center. The vocal needs its own lane. A polished ragga cut can be that lane if it’s edited with intent, processed in stages, and arranged to support the groove instead of fighting it.
What You Will Build
By the end, you’ll have a tight ragga vocal FX chain and arrangement-ready vocal rack that sounds like:
Musically, think of it as a vocal that can sit over:
The final result should feel like the vocal has been through a classic sound system chain, then reassembled for a modern Ableton Live 12 mix.
Step-by-Step Walkthrough
1. Choose the right source and commit to a working edit
Start with a ragga vocal that has strong consonants, attitude, and rhythmic naturalness. In DnB, the best cuts usually have:
- short phrases
- strong vowel movement
- clear transients in the delivery
- enough dryness to take processing
Import the vocal into a fresh audio track and immediately decide whether it should be treated as:
- a main hook chop
- a transition FX vocal
- a texture layer under a synth lead
In Arrangement View, trim out dead air and make a clean loop region. Use warp markers only where needed; don’t over-stretch the life out of the performance. For a ragga cut, a little timing looseness can be part of the feel. If the source is drifted, set Warp Mode to Complex Pro for full phrases or Beats for tighter chopped sections if the consonants matter more than tonal smoothness.
Advanced move: duplicate the vocal track immediately. Keep one track as a clean reference and one as the processed performance version. This gives you room to compare how far the FX chain is taking you.
2. Build a clean chop grid before adding effects
Use Slice to New MIDI Track if the vocal has usable phrases or syllables you want to re-sequence. For more performance-based editing, stay in audio and cut manually on the grid. In DnB, the rhythm of the chop matters as much as the timbre.
Create a 1-bar or 2-bar phrase that locks to the groove:
- place a vocal hit on the snare pickup
- answer it with a shorter phrase on the offbeat
- leave space where the kick and sub need to breathe
Useful workflow:
- consolidate the best chopped regions
- name clips by function, not source, e.g. “ragga_hook_top,” “ragga_fill_open,” “ragga_answer”
- color-code the main hook vs. transitions
If the vocal is meant to hit in a drop, keep the pattern sparse. A two- or four-hit motif often lands harder than a busy phrase because it creates anticipation and gives the bassline room.
3. Shape the tone with EQ before you dirty it up
Insert EQ Eight first. This is about making the vocal ready for heavy DnB processing.
Starting points:
- High-pass around 120–180 Hz to keep it out of the sub lane
- If the vocal is boxy, dip 250–450 Hz by 2–4 dB
- If it’s harsh, narrow-cut around 2.5–4.5 kHz
- If the vocal needs air, add a subtle shelf at 8–10 kHz, usually no more than 1–2 dB
Advanced tip: use EQ Eight in M/S mode if the vocal chain is already stereo-processed. Keep the center focused and let any width live more in the reverb/delay returns than in the dry core.
Why this works in DnB: your drums and bass are already fighting for low-mid authority. Cleaning the vocal here stops it from masking the snare crack or clouding the bass movement. A ragga cut needs presence, not weight in the wrong band.
4. Add saturation and transient attitude with a staged chain
This is where the polish starts to feel like pressure. Use Saturator first for controlled harmonic density.
Suggested settings:
- Drive: +3 to +8 dB
- Soft Clip: On
- Output: trim to match gain
- If needed, use the Analog Clip style for a thicker top edge
Then add Drum Buss for a more aggressive, modern snap:
- Drive: 5–20%
- Crunch: subtle, around 5–15%
- Transients: push slightly positive if the vocal has sharp consonants you want to emphasize
- Boom: usually off for vocals, unless you’re after a heavyweight one-shot effect and are filtering aggressively
For extra edge, try Glue Compressor after saturation:
- Ratio: 2:1 or 4:1
- Attack: 10–30 ms
- Release: Auto or 0.3–0.6 s
- Aim for only 1–3 dB of gain reduction
The goal is not to squash the phrase. It’s to make the vocal feel “finished” and able to punch through dense break programming and bass modulation.
5. Create a dub-style space using send returns, not just insert reverb
In DnB, reverbs and delays on vocals usually work best as shared spaces on return tracks. Create:
- Return A: Echo
- Return B: Hybrid Reverb
For Echo:
- Sync time: try 1/8D, 1/4, or 3/16
- Feedback: 20–45%
- Filter the return so the delay is darker than the dry vocal
- Use Ping Pong only if the vocal needs movement outside the center
For Hybrid Reverb:
- Choose a shorter room or plate-style space
- Decay: around 0.8–1.8 s
- Pre-delay: 15–35 ms
- Cut lows aggressively on the return, often below 200–300 Hz
Automate send amounts so the vocal stays dry and direct in the drop, but blooms at phrase ends, fills, or intro gaps. A ragga vocal that suddenly throws a delay trail on the last word can create exactly the kind of “classic meets modern” motion DnB loves.
6. Use modulation and filtering to turn the vocal into a living FX element
Add Auto Filter after saturation and before time-based returns if you want the vocal to sweep like an instrument.
Strong starting ranges:
- High-pass sweep from 150 Hz up to 1.2 kHz for build tension
- Low-pass down to 2–5 kHz for dubby drop contrast
- Resonance: keep it moderate, around 0.7–2.0, unless you want a nasal peak
For movement, try LFO modulation on Auto Filter:
- slow rate for intro tension
- faster rate for rhythmic pulsing in a breakdown
- shallow depth if the vocal needs to stay intelligible
You can also use Frequency Shifter very subtly for attitude:
- Fine tuning at a few Hz for chorusing-like instability
- Very small shifts for modern edge without obvious alien detuning
Advanced move: map Auto Filter cutoff and Echo feedback to a Macro in an Audio Effect Rack. This lets you “perform” the vocal during arrangement writes, which is especially useful in DnB where tiny changes before the drop make the section feel alive.
7. Resample the vocal chain and edit the best moments
Once the chain feels good, resample it. Create a new audio track and set its input to Resampling. Record a pass of the vocal performing through the chain, including automation moves and send throws.
Why resample:
- it commits the character
- makes editing faster
- allows you to chop the processed tone as a new sound source
- helps you build a one-shot library for the track
After recording, warp the resampled take and cut out:
- the hardest hits for drop accents
- the smeared tails for transitions
- the noisy consonants for texture layers
Then layer the resampled vocal under the dry vocal at a lower level, maybe -8 to -14 dB under the lead. This creates thickness while keeping articulation on top. If the vocal feels too forward, high-pass the resampled layer a little more aggressively than the main one.
8. Treat the vocal like a rhythmic instrument in the arrangement
Now place the vocal where it has the most arrangement value. In DnB, that usually means:
- 8-bar intro tease
- first 16-bar drop hook
- bar 9/10 variation
- breakdown call-and-response
- last 4 bars before a switch
Example context:
In a 174 BPM roller, place a chopped ragga phrase on bars 1, 5, 9, and 13 of a 16-bar drop, but only let one phrase fully repeat. On bar 9, filter it down and throw a delay; on bar 13, strip it to a single syllable so the bassline can dominate the last phrase.
Use Utility to automate width:
- keep the dry vocal near mono in the center
- widen only the delayed or reverbed return, not the main hit
If the track has a darker second drop, remove the full vocal and leave only a processed tail or one-shot shout. That contrast gives the drop 2 more impact without needing extra sound design.
9. Finish with drum-bass balance and mono discipline
Even though this is an FX lesson, the vocal still has to coexist with the drum and bass bus. Use Spectrum or your ears on a mono check to make sure the vocal isn’t fighting the snare crack around 2–5 kHz or the bass presence around 90–180 Hz.
Suggested finishing moves:
- Use EQ Eight on the vocal return to keep delays/reverbs darker than the dry signal
- Use Utility to mono-check the vocal chain
- If the vocal is too sharp, tame with a gentle dynamic-style move using Compressor or reduce the saturation drive
- If the vocal disappears in the drop, automate a small boost around 1–3 kHz or reduce the width of competing layers
In heavier DnB, the best vocals are often the ones that feel loud without being physically huge. That comes from placement, contrast, and rhythm more than raw volume.
Common Mistakes
Fix: keep the core vocal centered; use width mostly on delays and reverbs.
Fix: high-pass early with EQ Eight and check any return tracks for low buildup.
Fix: reduce gain reduction and let consonants breathe; use saturation for density before heavy compression.
Fix: shorten decay, raise pre-delay, and filter the return darker.
Fix: simplify to a motif. In DnB, fewer vocal hits often create more authority.
Fix: print the processed vocal. It speeds up decisions and makes variation easier.
Pro Tips for Darker / Heavier DnB
Mini Practice Exercise
Spend 10–20 minutes doing this:
1. Pick one ragga vocal phrase with at least 2–4 usable words or syllables.
2. Chop it into three versions:
- one dry lead
- one filtered/delayed return
- one resampled gritty layer
3. Build a 4-bar loop at 170–176 BPM with kick, snare, and a simple bass note pattern.
4. Place the vocal only on:
- bar 1 beat 4
- bar 2 beat 3
- bar 4 beat 1
5. Process the vocal with:
- EQ Eight
- Saturator
- Echo on a send
- Auto Filter automation
6. Make two variations:
- version A: more vintage, darker, dubby
- version B: tighter, brighter, more modern punch
7. Compare them in mono and choose the one that leaves the most room for the snare and sub.
Goal: create a vocal hook that feels like it belongs in a real DnB drop, not just a cool sample.

