DNB COLLEGE

Drum & Bass Ableton Live 12 Tutorials

LESSON DETAIL

Pull oldskool DnB chop using Session View to Arrangement View in Ableton Live 12 (Advanced)

An AI-generated advanced Ableton lesson focused on Pull oldskool DnB chop using Session View to Arrangement View in Ableton Live 12 in the Arrangement area of drum and bass production.

Back to lessons
Pull oldskool DnB chop using Session View to Arrangement View in Ableton Live 12 (Advanced) cover image

Narrated lesson audio

The voice track includes the tutorial plus extra teacher commentary.

Open audio file

Main tutorial

Pulling Oldskool DnB Chop from Session View into Arrangement View in Ableton Live 12

1. Lesson overview

Oldskool drum and bass chops are all about energy, variation, and controlled chaos. In Live 12, the fastest way to build that vibe is often:

1. Sketch loops in Session View

2. Jam and mutate them live

3. Record the best moments into Arrangement View

4. Refine the edit into a proper DnB tune structure

This workflow is perfect for jungle, oldskool rollers, break-led techstep, and anything that needs that cut-up, human, imperfect feel

In this lesson, you’ll learn how to:

  • Build a Session View performance from breaks, bass, and atmospheres
  • Trigger and mangle clips in a musically useful way
  • Record your performance into Arrangement View
  • Tighten the result into a structured DnB arrangement
  • Keep the groove aggressive without losing clarity
  • ---

    2. What you will build

    You’ll create a short oldskool-inspired DnB arrangement at 172–174 BPM with:

  • One main break loop chopped and reassembled
  • One ghost-layer break for texture and swing
  • A reese or sub-bass layer
  • Atmospheric pads / FX
  • Arrangement moments like:
  • - intro with tension

    - beat drop

    - break switch

    - bass variation

    - fill and turnaround

    The goal is not just to “copy a loop into Arrangement View” — it’s to perform the arrangement from Session View, then shape the best bits into a full track structure.

    ---

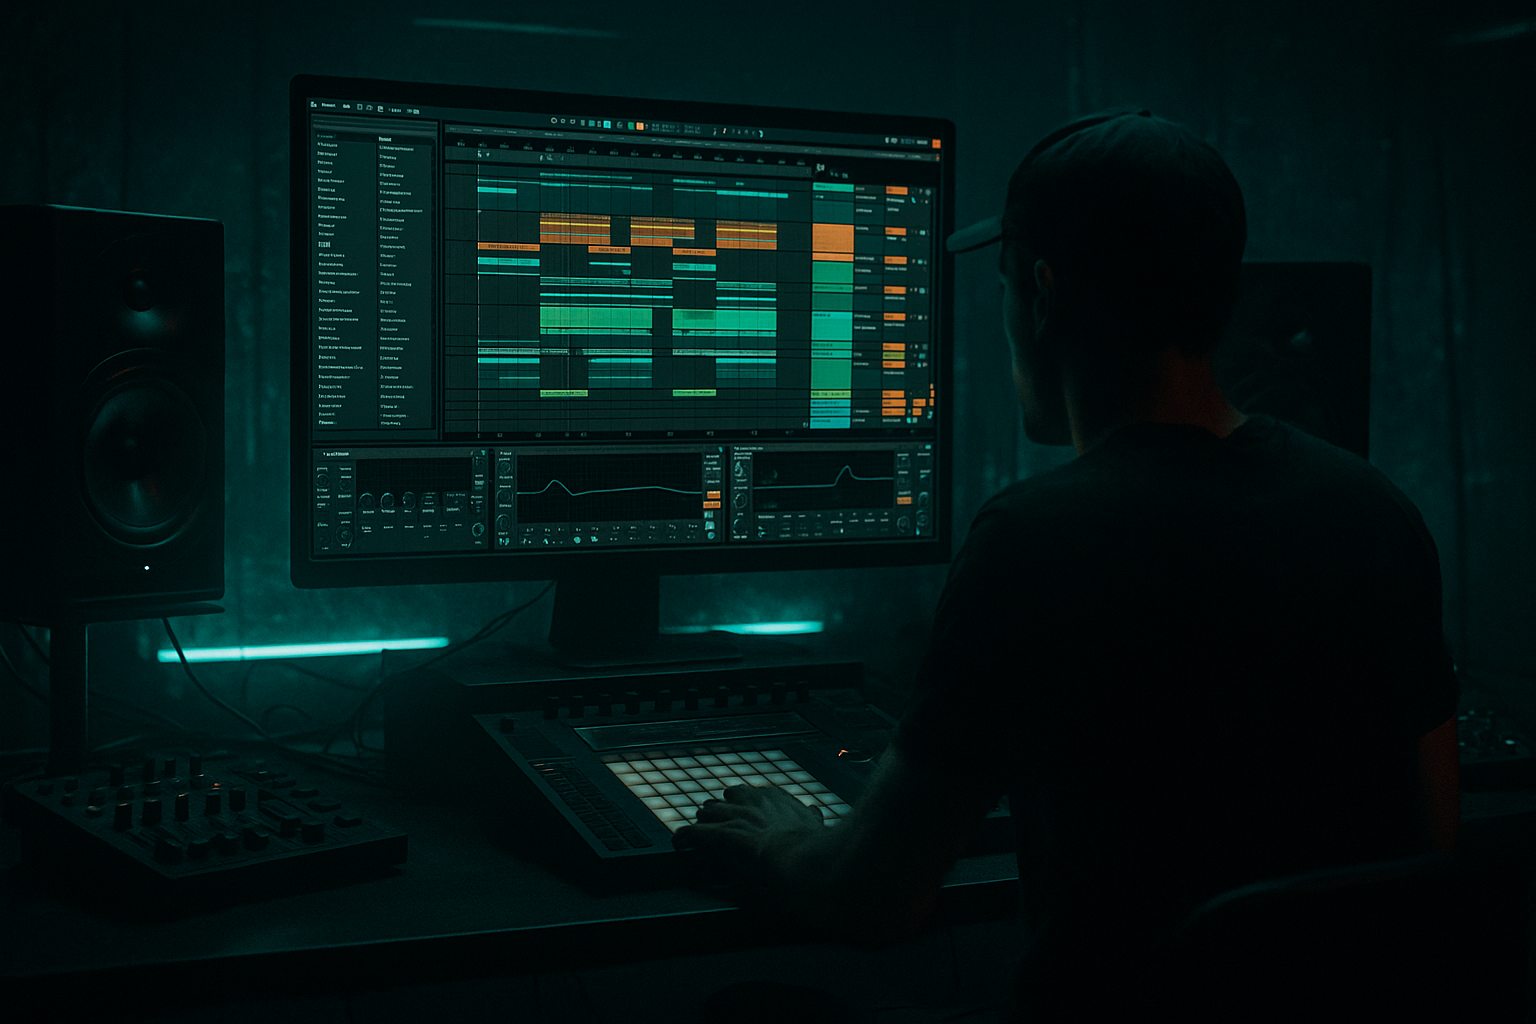
    3. Step-by-step walkthrough

    Step 1: Set up your project for DnB arrangement

    Start clean and deliberate.

    #### Project settings

  • Tempo: 172–174 BPM for classic oldskool / jungle energy
  • Time signature: 4/4
  • Warp: On for audio clips you want to stretch and slice
  • Global Quantization: set to 1 Bar to begin with
  • Metronome: on while building
  • Groove Pool: keep ready for later if you want MPC-style swing
  • #### Track layout suggestion

    Create these tracks in Session View:

    1. DRUMS MAIN – chopped break

    2. DRUMS TOPS – hats, rides, perc

    3. BASS – reese / sub / stab bass

    4. ATMOS – pads, vinyl noise, film textures

    5. FX – risers, impacts, reverses

    6. VOCAL/CHOP – optional vocal hits or ragga snippets

    This keeps your arrangement readable when you move to Arrangement View.

    ---

    Step 2: Build a strong oldskool break in Session View

    The heart of the lesson is the break chop.

    #### Choose your source

    Use one of:

  • Amen
  • Think
  • Apache
  • Funky Drummer
  • A raw break sample from a break pack
  • Drag the break into an audio clip slot.

    #### Warp settings

    For oldskool DnB, don’t over-process the break into sterility.

    Try:

  • Warp On
  • Warp mode: Beats
  • Preserve: 1/16 or 1/8
  • Transients: Transients
  • Envelope: keep it fairly tight
  • If the break feels too smudged, reduce warp markers and let some natural movement remain
  • #### Chop the break

    There are two main ways:

    ##### Option A: Simpler slicing

    1. Drag the break into a Simpler

    2. Set mode to Slice

    3. Slice by Transient

    4. Map to MIDI

    5. Play a chopped pattern from a drum rack or MIDI clip

    This is excellent for controlled oldskool edits.

    ##### Option B: Manual clip chopping

    1. Keep the break as audio

    2. Duplicate the clip into several slots

    3. Use clip start markers, warp markers, and clip envelopes to create:

    - snare-only slices

    - kick-snare patterns

    - fill fragments

    - reversed micro-chops

    This approach is more hands-on and good if you want a ragged jungle feel.

    #### Useful chain on the break track

    A practical stock device chain:

  • EQ Eight
  • - High-pass around 30–40 Hz if the break has rumble you don’t need

    - Slight cut around 250–400 Hz if boxy

    - Tiny boost around 6–10 kHz for snap if needed

  • Drum Buss
  • - Drive lightly for punch

    - Boom only if you want more low-end body

  • Saturator
  • - Soft Clip on

    - Drive very lightly to thicken the break

  • Glue Compressor
  • - Gentle glue, not smash

    - Aim for 1–2 dB gain reduction

    Don’t flatten the break too much. Oldskool DnB thrives on transients and grit.

    ---

    Step 3: Create variation clips for performance

    Session View shines when you create multiple versions of the same idea.

    On your DRUMS MAIN track, make at least 4 clips:

  • Clip A: straight main loop
  • Clip B: ghost-note variation
  • Clip C: fill with extra snare hits
  • Clip D: stripped-down loop for breakdowns
  • On your BASS track, create:

  • Bass A: main riff
  • Bass B: busier response pattern
  • Bass C: low-register stab variation
  • Bass D: muted or filtered version for intro/build
  • On your FX track:

  • Reverse hit
  • Downlifter
  • Impact
  • Noise rise
  • #### Why this matters

    When you record into Arrangement View, these clip changes become the basis of your structure. You’re not arranging after the fact — you’re performing the arrangement.

    ---

    Step 4: Use clip launch settings to get musical movement

    In Session View, set launch behavior so the switches feel intentional.

    #### Suggested launch settings

  • Quantization: 1 Bar for most clips
  • Legato: use for clips that should retain musical timing
  • Follow Actions: useful for evolving hats, fills, and atmospheres
  • Loop On: for main drum and bass loops
  • For DnB, the biggest mistake is letting clip transitions feel random. Keep the bar grid strong.

    #### Example clip strategy

  • Main break loop launches every 1 bar
  • Fill clip is triggered manually right before a turnaround
  • Bass variation is launched on bar 8 or 16
  • FX hit lands on the first beat of a new section
  • This keeps the groove tight and dancefloor-functional.

    ---

    Step 5: Build the performance in Session View first

    Now jam your section.

    #### A practical 16-bar performance map

  • Bars 1–4: atmosphere + filtered break intro
  • Bars 5–8: main break enters, bass filtered or absent
  • Bars 9–12: bass full weight, add top percussion
  • Bars 13–16: fill, stop, or drum switch for tension
  • Perform this by:

  • Launching clips manually
  • Triggering fills with one-shots
  • Using mute/unmute for strips
  • Automating filter movements in real time if needed
  • If you have a controller, map:

  • clip launch buttons
  • track mute
  • macro controls
  • scene launch
  • This is where the track starts to feel alive.

    ---

    Step 6: Record Session View into Arrangement View

    Now capture the performance.

    #### Recording method

    1. Switch to Arrangement View

    2. Enable Arrangement Record

    3. Hit play and perform your Session View clips

    4. Ableton writes your clip launches and mute actions into the timeline

    You can also:

  • Record on a fresh pass
  • Use Capture MIDI if you jammed a MIDI bassline and forgot to record
  • Re-record sections if the timing feels off
  • #### Important tip

    Don’t try to make the first take perfect.

    You want a good musical skeleton that you can clean up later.

    ---

    Step 7: Clean up the arrangement after recording

    After recording, the Arrangement View may look messy. That’s normal.

    #### First pass cleanup

  • Consolidate obvious sections
  • Trim silent gaps
  • Check clip boundaries
  • Make sure transitions land on bar lines
  • Remove accidental triggers
  • #### DnB arrangement structure suggestion

    A classic structure might look like:

  • Intro – 16 bars
  • Build – 8 bars
  • Drop 1 – 32 bars
  • Breakdown – 16 bars
  • Drop 2 – 32 bars
  • Outro – 16 bars
  • Or for more underground, DJ-friendly material:

  • 16 bar intro
  • 32 bar main body
  • 8 bar switch
  • 32 bar second body
  • 16 bar outro
  • #### Arrangement editing in DnB

    Use these techniques:

  • Duplicate sections for consistency
  • Remove kick or bass for 1–2 beats before a drop
  • Insert a snare fill on bar 8 or 16
  • Use a half-bar drop-out for tension
  • Add a ghost break under the main break in breakdowns
  • ---

    Step 8: Turn the recorded performance into a proper DnB structure

    This is where the “Session jam” becomes a “finished tune.”

    #### Use arrangement automation

    Common automation targets:

  • Auto Filter cutoff
  • Reverb send amount
  • Delay throw on snare or vocal chop
  • Bass distortion on drop sections
  • Drum Buss drive for lift in the second drop
  • #### Stock device suggestions

  • Auto Filter for build tension
  • Echo for dubby drum throws and tail-outs
  • Reverb on atmospheric elements
  • Utility for mono-ing sub and gain staging
  • Redux or Saturator for grit
  • Drum Buss for punch and density
  • #### Arrangement ideas rooted in DnB

  • Cut the drums for 1 bar before the drop, then slam back in
  • Bring in a filtered break and gradually open the top end
  • Use a bass call-and-response every 4 bars
  • Replace the main break with a fill variation every 8 or 16 bars
  • Automate the sub out in the breakdown so the drop feels huge
  • ---

    Step 9: Tighten the groove and low end

    Oldskool DnB lives or dies on pocket and low-end discipline.

    #### Drum timing

  • If the break is too rigid, nudge slices slightly for feel
  • Keep the snare confident and forward
  • Allow ghost hits to stay a touch loose
  • Don’t over-quantize every micro-hit
  • #### Bass discipline

    For bass:

  • Keep sub mono
  • Leave room for the kick and snare
  • Use sidechain subtly if needed
  • Avoid over-layering the low end with too many sources
  • #### Useful utility chain on bass

  • EQ Eight
  • - cut mud around 200–400 Hz if necessary

  • Saturator
  • - add harmonics for audibility on smaller systems

  • Utility
  • - mono below the crossover if using multiband processing elsewhere

  • Compressor
  • - sidechain from kick/snare if the groove needs breathing room

    ---

    Step 10: Final pass — make it feel like a tune, not a loop

    Ask yourself:

  • Does the track evolve every 8 or 16 bars?
  • Do the drums breathe?
  • Is there a clear drop impact?
  • Are the bass changes musical, not random?
  • Does the arrangement give a DJ something useful to mix?
  • A strong oldskool DnB arrangement often feels like one loop that keeps mutating just enough to stay dangerous 😈

    ---

    4. Common mistakes

    1. Over-quantizing the break

    Oldskool breaks need movement. If every hit is locked perfectly, the groove can lose its swagger.

    2. Making the Session View performance too busy

    Too many clips = confusion.

    Keep the number of performance choices manageable.

    3. Forgetting to record automation

    A lot of the vibe comes from filter sweeps, mutes, and FX moves. If you don’t record them, the arrangement may feel flat.

    4. Using too much low-end in multiple layers

    If your break, bass, and FX all compete in the sub region, the drop will feel muddy.

    5. Copying the same 4-bar loop for the whole tune

    DnB needs variation. Even a simple roller should evolve every 8 or 16 bars.

    6. Making fills too obvious

    A fill should feel like part of the groove, not a separate drum solo.

    ---

    5. Pro tips for darker/heavier DnB

    Use contrast, not just aggression

    Dark DnB hits harder when the arrangement gives the drop room to breathe.

    Try:

  • 1-bar silence before impact
  • filtered drums in the intro
  • sparse atmospheres before full-weight sections
  • Process breaks in parallel

    Duplicate the break:

  • one track clean-ish
  • one track saturated and crushed
  • blend to taste
  • Stock chain example:

  • EQ Eight
  • Drum Buss
  • Saturator
  • Glue Compressor
  • Create “push-pull” in the bassline

    Instead of constant movement, alternate:

  • dense 2-bar phrase
  • sparse answer phrase
  • This is especially effective in dark rolling DnB and techstep-inspired material.

    Use Automation Lanes aggressively

    Automate:

  • filter cutoff
  • reverb send
  • distortion amount
  • clip gain
  • return sends
  • A heavy track often feels heavy because it moves in and out of density.

    Use short FX throws

    A snare delay throw or reverse tail into a drop can make the arrangement feel expensive without cluttering it.

    ---

    6. Mini practice exercise

    Exercise: build a 32-bar oldskool DnB performance and arrange it

    #### Step 1

    Set tempo to 173 BPM.

    #### Step 2

    Create:

  • one chopped break track
  • one bass track
  • one atmosphere track
  • one FX track
  • #### Step 3

    Make 3 clips per track:

  • main
  • variation
  • breakdown version
  • #### Step 4

    Perform a 32-bar jam in Session View:

  • bars 1–8: intro
  • bars 9–16: first drop
  • bars 17–24: variation
  • bars 25–32: breakdown / turnaround
  • #### Step 5

    Record the performance into Arrangement View.

    #### Step 6

    Edit the result:

  • tighten clip boundaries
  • add one fill
  • mute bass for 1 bar before the switch
  • automate a filter opening into the drop
  • #### Step 7

    Export a rough bounce and listen for:

  • groove
  • impact
  • variation
  • low-end clarity
  • If it still feels too loop-like, add one more drum edit every 8 bars.

    ---

    7. Recap

    Pulling oldskool DnB from Session View into Arrangement View is about turning a live chop performance into a controlled, dancefloor-ready structure.

    The key workflow:

  • Build strong loops and variations in Session View
  • Perform the arrangement musically
  • Record the clip launches into Arrangement View
  • Edit the timeline into clear DnB sections
  • Use automation and contrast to create energy
  • Best stock tools in Ableton Live 12:

  • Simpler
  • Drum Rack
  • Auto Filter
  • EQ Eight
  • Drum Buss
  • Saturator
  • Glue Compressor
  • Echo
  • Utility
  • Reverb

If you want oldskool chop with real momentum, think like a drummer, a DJ, and an editor all at once. Build the loop, perform the tune, then sculpt the arrangement until it hits like a proper jungle weapon 💥

Ask GPT about this lesson

Chat with the lesson tutor, get follow-up help, or use quick actions.

Bigup 👽 Ask me anything about this lesson and I’ll answer in context.

Narration script

Show spoken script
Welcome back. In this lesson we’re doing something very oldskool, very effective, and honestly very fun: pulling a chopped drum and bass performance from Session View into Arrangement View in Ableton Live 12, then shaping it into a proper track.

If you make jungle, rollers, break-led techstep, or anything that needs that rough, human, controlled-chaos energy, this workflow is gold. The whole idea is simple. First you sketch and jam in Session View. Then you record the best bits into Arrangement View. Then you tighten the timeline into a tune that actually moves like a record, not just a loop.

And for this style, that matters. Oldskool DnB is all about energy, variation, and a little bit of dirt. Not sloppy dirt, but intentional imperfection. That’s the vibe.

So let’s build this properly.

Start by setting your project up for drum and bass. Get your tempo around 172 to 174 BPM. 173 is a really nice middle ground if you want that classic pace. Keep it in 4/4, turn Warp on for audio clips, and set your Global Quantization to 1 Bar so your launches stay musically locked in. That one-bar grid is going to help your performance feel solid while still giving you room to get expressive.

Now lay out your tracks in a way that makes sense when you move into Arrangement View later. I’d suggest a main chopped break track, a tops or percussion track, a bass track, an atmospherics track, an FX track, and maybe a vocal chop or ragga snippet track if you want that extra movement. The reason we organize this early is simple: when you record the jam, you want the arrangement to stay readable.

Now for the heart of the lesson: the break.

Choose a source break with character. Amen, Think, Apache, Funky Drummer, something raw from a good break pack, anything that already has attitude. Drag it into an audio clip slot and make sure it’s warped, but don’t over-polish it. A classic mistake is making the break too clean. Oldskool DnB doesn’t need sterile perfection. It needs punch, grit, and swing.

If the break feels too stiff or too smudged, switch the warp mode to Beats, try preserve values like one sixteenth or one eighth, and keep the transient handling sensible. If you’re hearing too much mush, reduce the number of warp markers and let the break breathe a bit more naturally.

At this point you’ve got two good ways to chop it.

One way is to use Simpler in Slice mode. Drag the break into Simpler, set it to Slice, slice by transient, and map it to MIDI. That gives you a very playable oldskool chop instrument, and it’s excellent if you want to perform the rhythm like a drummer.

The other way is to stay in audio land and manually chop the clip across multiple slots. Duplicate the break, create snare-only fragments, kick-snare patterns, little fill pieces, and even reverse micro-chops. This approach can feel a little more ragged and jungle-ish, which is exactly what you want if you’re chasing that classic chopped-up energy.

Now give the break a useful processing chain. Nothing crazy. Just enough to make it hit harder and sit right. EQ Eight first. High-pass a little if there’s low rumble you don’t need, maybe around 30 to 40 Hz. If it feels boxy, notch a bit around 250 to 400 Hz. If it needs more snap, you can add a tiny lift in the top end around 6 to 10 kHz. Then maybe Drum Buss for a bit of drive and punch. Then Saturator with Soft Clip on, just a touch, to thicken it up. And if you want glue, a gentle Glue Compressor can help, but don’t smash the life out of it. You want transients. You want movement. You want the break to breathe.

Next, create variation. This is where Session View becomes more than just a place to loop. It becomes your performance pad.

On the main break track, make a few different clips. One can be the straight loop. One can have ghost notes or extra little hits. One can be a fill with more snare activity. One can be stripped back for intros or breakdowns. Do the same on the bass track. Make a main riff, a busier answer pattern, a stabby variation, and maybe a filtered or muted version for tension. On your FX track, load up some reverse hits, impacts, downlifters, and noise rises.

The important mindset here is that each clip should have a role. Think of Session View like a scoring pad, not a playlist. One clip is tension, one is weight, one is release. If every clip is “the main idea,” the arrangement gets crowded fast.

Now let the clips actually behave like music. Set your launch quantization to 1 Bar for most things, and use Legato when you want clips to keep their musical timing. Main loops should loop cleanly, but fills and atmospheres can be a little more flexible. Follow Actions can be useful too, especially on top layers, textures, and evolving FX, but keep it subtle. The goal is movement, not chaos for its own sake.

Here’s a good rule in drum and bass: don’t let clip transitions feel random. The bar grid is your friend. Main break loop on every bar. Fill clip right before a turnaround. Bass variation on bar eight or sixteen. FX hit on the first beat of a new section. That’s how you keep it dancefloor-functional.

Now build a performance in Session View.

A simple 16-bar map works really well. Bars 1 to 4 can be atmospheres and a filtered break intro. Bars 5 to 8 bring in the main break, maybe with the bass still filtered or absent. Bars 9 to 12 let the bass hit full weight and bring in top percussion. Bars 13 to 16 can be a fill, a stop, or a drum switch to build tension.

Perform it. Launch clips manually. Mute and unmute layers. Trigger one-shot fills. Move filters in real time if you’ve mapped them. If you have a controller, even better. Map clip launch, track mutes, macro knobs, and scene launch so you can play the arrangement like an instrument.

And here’s a really important coach note: record with imperfect intention. A slightly late clip launch, a chopped fill that lands a hair behind the grid, a texture that slips in just before the bar line. That can all sound alive. The trick is knowing the difference between musical imperfection and actual sloppiness. We want attitude, not mistakes that distract from the groove.

Once your performance feels good, switch over to Arrangement View and record it. Arm Arrangement Record, hit play, and let Ableton capture the clip launches and mute moves onto the timeline. Don’t chase perfection on the first pass. What you want is a strong musical skeleton you can edit into shape afterward.

And yes, after recording, the arrangement may look messy. That’s completely normal. In fact, it’s a good sign. It means you captured a real performance instead of a pre-planned loop.

Now do a cleanup pass. Trim any dead space. Check clip boundaries. Make sure your transitions land on bar lines. Remove accidental triggers. Then start thinking in DnB structure.

A classic shape might be an intro for 16 bars, a build for 8, a 32-bar drop, a breakdown for 16, another 32-bar drop, and a 16-bar outro. If you want something more DJ-friendly and underground, you can do a 16-bar intro, 32-bar main body, 8-bar switch, 32-bar second body, and a 16-bar outro.

The big thing is this: the arrangement should evolve every eight or sixteen bars. That doesn’t mean you need huge changes all the time. It could be a snare fill. It could be a bass dropout. It could be a new hat pattern. It could be a reversed break tail. Small changes matter a lot in this genre.

Also, don’t be afraid to commit to a section before you edit it. A lot of people keep relaunching the same clip chain forever, trying to make it perfect in Session View. But eventually you have to stop performing and start listening like an audience member. Make your pass, commit it, and then shape the track.

Now we get into the arrangement itself.

Use automation to make the tune come alive. Auto Filter cutoff is a classic. Reverb send on atmospheres, delay throws on snares or vocal chops, distortion movement on the bass during drop sections, and a bit more Drum Buss drive when you want extra lift in a second drop. Utility is also very handy for keeping sub mono and handling gain staging. Echo can give you those dubby tail-outs and drum throws. Reverb can open up breakdowns without drowning the drums. Saturator and Redux are great if you want extra grime.

A really effective oldskool move is to cut the drums for a beat or a bar before the drop and then slam them back in. Another one is to bring in a filtered break and gradually open the top end. You can also do a bass call-and-response every four bars so the track keeps talking to itself. And if you want a drop to feel huge, automate the sub out during the breakdown so the return hits harder.

One thing to watch is low-end discipline. Oldskool DnB can get muddy fast if the break, bass, and FX all fight in the sub region. Keep the sub mono. Leave space for the kick and snare. If the groove needs breathing room, use subtle sidechain compression. On the bass, EQ out mud if needed, add harmonics so it translates on smaller speakers, and don’t stack too many low layers unless you really know why they’re there.

That’s another important arrangement principle: keep the drop readable. If the groove is complex, the arrangement should be simpler. If the arrangement gets busy, the drums should be more direct. Don’t fight for attention on every lane. Let one element stay unstable, like the top break layer or a texture that shifts every few bars, and keep the rest clear.

A nice advanced technique is to build phrase families instead of random variations. So instead of making a dozen unrelated clips, create a base phrase, a response phrase, a fill phrase, and an empty phrase. Launch them in a predictable cycle, then break the pattern at the end of every eight or sixteen bars. That gives you tension without sounding messy.

You can also use density swaps. Instead of always adding more parts, swap what kind of density the track has. Remove the kick but keep the break energy. Remove the hats but keep the ghost notes. Remove the bass weight but keep the upper harmonics. Sometimes a change in spectral density feels bigger than adding another instrument.

Another really useful move is call and answer between the break and the bass. Let the bass make a statement, then let the drums answer with a fill or punctuation. Then flip it. That push-pull is a big part of classic drum and bass movement.

If you want the arrangement to feel engineered rather than looped, add small structural events. A one-beat mute before a snare impact. A two-beat bass drop-out before the second half of a phrase. A one-bar drum subtraction before a new section. A one-shot FX sting on the first beat of a new block. These tiny gestures make the tune feel composed.

Now for the final pass. Listen like a DJ and like a dancer. Does each eight-bar block have a purpose? Does the groove evolve? Is there a clear drop impact? Are the bass changes musical instead of random? Could a DJ actually mix into or out of this? If the answer is yes, you’re close.

If it still feels too loop-like, don’t add more parts first. Change where the existing parts appear. That’s often the smarter move.

So let’s recap the workflow.

Build strong loops and variations in Session View. Perform the arrangement with intention. Record the clip launches into Arrangement View. Edit the timeline into clear DnB sections. Use automation, contrast, and space to make the track feel alive. And remember, oldskool DnB often feels like one loop that keeps mutating just enough to stay dangerous.

If you want, here’s a solid practice challenge: set the tempo to 173 BPM, build one chopped break track, one bass track, one atmosphere track, and one FX track. Make at least three clips per track: main, variation, and breakdown. Perform a 32-bar jam in Session View, record it into Arrangement View, then tighten it up by adding one fill, muting the bass for a bar before a switch, and automating a filter opening into the drop. Export a rough bounce and check whether the groove, impact, variation, and low-end clarity are all working together.

That’s the whole game right there.

Build the loop, perform the tune, then sculpt the arrangement until it hits like a proper jungle weapon.

mickeybeam

Go to drumbasscd.com for +100 drum and bass YouTube channels all in one place - tune in!

Generating PDF preview…