Main tutorial
Lesson Overview
This lesson is about building a pushy Amen-style ride groove in Ableton Live 12 that feels alive, drives the drop forward, and stays light on CPU. In Drum & Bass, rides are not just “extra hats” — they’re motion, pressure, and forward momentum. A good ride groove can make a roller feel hypnotic, make a darker half-time section feel bigger, or add urgency to a jungle drop without cluttering the break.
The challenge is balancing three things at once:
- Authenticity: it needs that broken, sampled, jungle-informed pulse
- Control: it must lock with the Amen break and bassline without turning messy
- Efficiency: it should be easy to edit, automate, and duplicate without loading up the session with heavy chains
- sits above the Amen break
- adds forward momentum in 16th and offbeat phrasing
- has controlled decay so it doesn’t wash over the snare
- can be varied with velocity, filter movement, and occasional reverses
- uses very little CPU, because it relies on one Simpler instance and a few stock effects
- a main drop ride layer in a roller
- a build-up energy layer before the drop
- a syncopated top rhythm for jungle or darkstep sections
- a switch-up texture for 8- or 16-bar arrangement changes
- Using a ride sample that’s too long
- Making the groove too busy
- Letting the ride fight the snare
- Overprocessing the top end
- Ignoring stereo discipline
- Too much swing on top of a broken drum loop
- Not resampling
- Use a slightly detuned or worn ride source for a grittier jungle edge. A little imperfection helps it feel less polished and more underground.
- Layer a quiet ghost hit under the main ride every 2 or 4 bars using the same Simpler patch but a lower velocity. This adds movement without clutter.
- Sidechain the ride very lightly to the kick or drum bus if the top end feels too constant. Keep it subtle — just enough to make room.
- Automate a narrow bandpass sweep on breaks or transition bars to create tension before the drop.
- Use Drum Buss transient shaping to make the ride pop in a dense neuro or dark roller mix.
- Print two versions: one clean and one dirtier. Use the clean version in the main drop and the dirtier one in intros, switch-ups, or breakdowns.
- Check the ride against the bassline in mono. If your bass is wide or animated, the ride should still stay clear and stable.
- Try a call-and-response idea: ride answers the snare fill, then drops out for one bar so the bassline can speak. That’s classic DnB arrangement discipline.
- Build the ride from a short sampled source in Simpler for speed and low CPU.
- Use tight decay, smart velocity, and subtle swing to make it feel like DnB.
- Keep processing minimal: EQ Eight, Saturator, Drum Buss, Auto Filter are usually enough.
- Use the ride as an arrangement tool for drop energy, switch-ups, and tension.
- Resample when it works so you can edit faster and stay focused on the track.
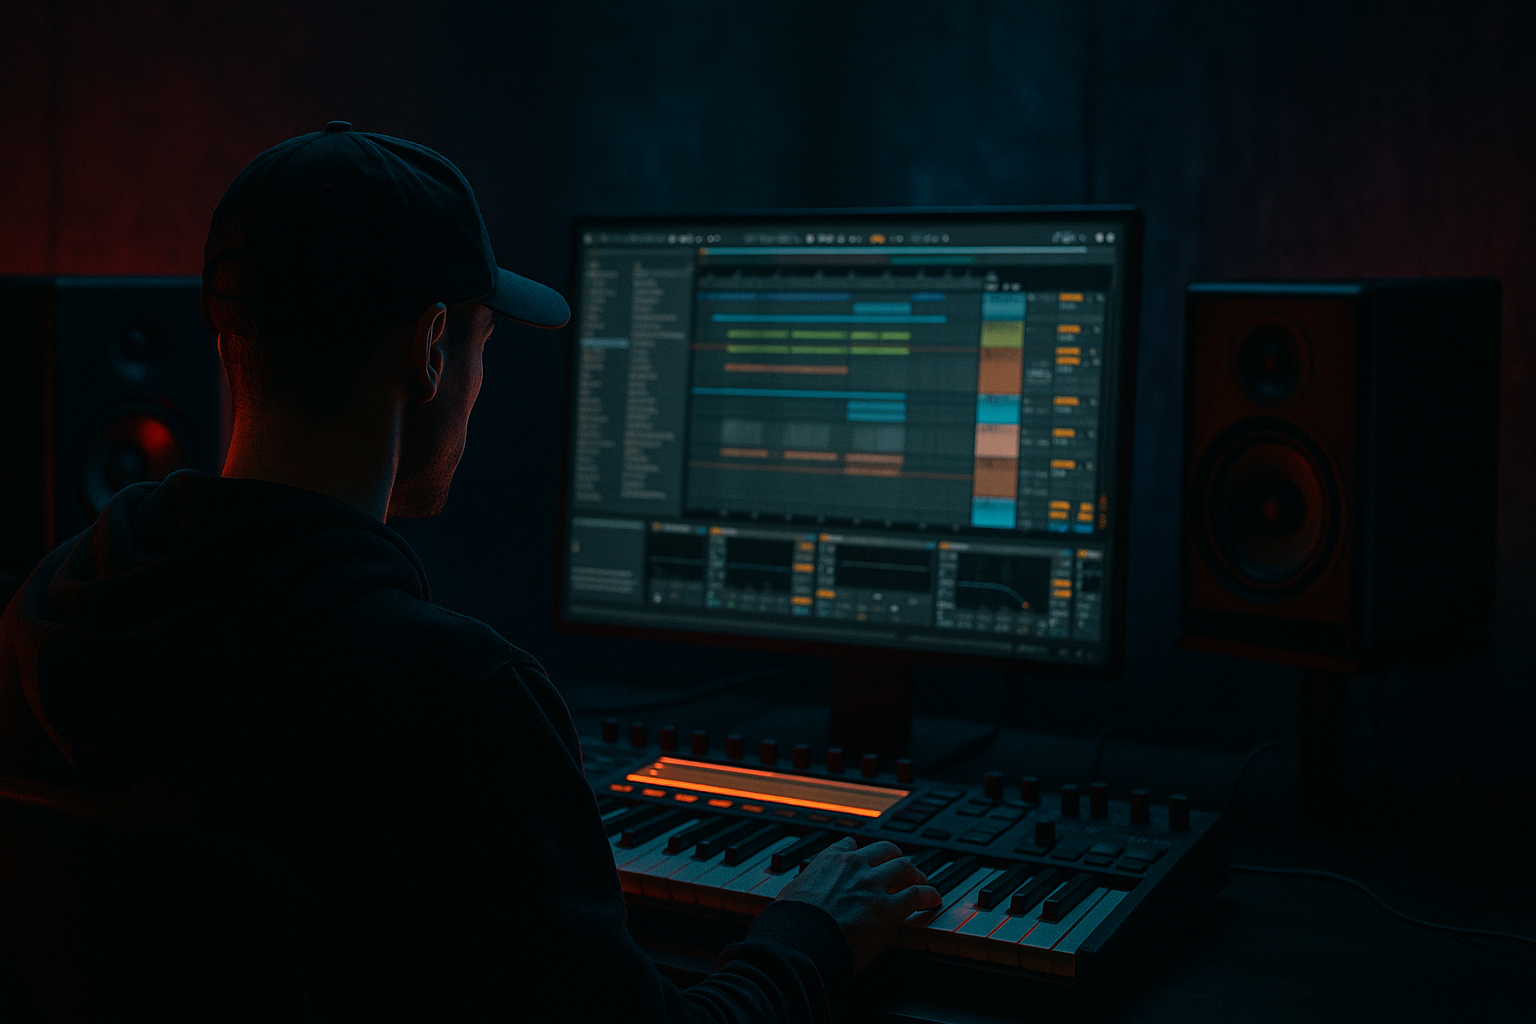
You’ll build a compact workflow using Sampling, Simpler, Warp, Envelope shaping, and a few stock Ableton tools to create a ride groove that feels like it belongs in a proper DnB arrangement. This is especially useful in rolling or darker tracks where you want constant energy but don’t want to overcrowd the break.
Why it matters: in DnB, the ride often fills the mid-high rhythmic lane between the snare and the bass. If it’s too static, the track feels flat. If it’s too busy, the groove loses impact. The goal is a ride pattern that pushes forward like a DJ tool, but still leaves room for the break, sub, and reese to breathe.
What You Will Build
You’ll build a sampled ride groove from a short cymbal/ride hit or a chopped fragment of an Amen break’s top end, then shape it into a tight, repeating pattern that:
Musically, the result will work as:
You’ll end with a groove that feels like a cross between a chopped jungle top loop and a modern, clean DnB ride lane — punchy, useful, and easy to resample later.
Step-by-Step Walkthrough
1. Choose the right source sample
Start with something simple and musical:
- a clean ride cymbal hit
- a short crash/ride tail
- a top slice from an Amen break
- a metallic percussion hit with a bright transient
In DnB, the best ride layers usually come from short, bright, slightly dirty samples rather than huge polished cymbals. You want enough tone to cut through dense drums and bass, but not a long shimmering tail that eats headroom.
In Ableton:
- Drag the sample into a new MIDI track with Simpler
- Set Mode to Classic
- Set Trigger to One-Shot
- Turn Warp off if the sample is already usable and you want a raw, sample-driven feel
- If the sample has timing drift or is a chop from a loop, use Warp only if needed, and choose Beats or Complex Pro sparingly
Good starting range:
- Start: trim to the transient
- Decay: around 150–400 ms for a ride layer
- Voices: 1
- Filter: HP or bandpass if the sample is too wide or harsh
Why this works in DnB: sampled top layers often sit better with broken drum programming than synthesized hats because they bring irregular transient shape and a slightly imperfect texture — exactly what keeps jungle-inspired grooves feeling human and “alive”.
2. Shape the sample so it punches, not clouds
Open Simpler and tighten the hit before you program the rhythm.
Useful settings:
- Volume Envelope: shorten the release so the tail doesn’t overlap too much
- If using a ride with a long decay, reduce Decay until the tail supports the groove without smearing the snare
- If the sample is too spiky, soften the attack slightly with a tiny Attack of 1–5 ms
- If it’s too dull, use a bit of Filter opening or pick a brighter source rather than over-EQing later
Add stock devices after Simpler:
- EQ Eight: high-pass around 180–300 Hz to keep it out of the kick/sub zone
- If needed, dip harshness around 6–10 kHz by 2–4 dB
- Saturator: Drive around 1–4 dB, Soft Clip on, for density without needing a bigger sample
Keep it minimal. One or two devices is enough here. The point is to make the ride work inside a busy DnB drum bus, not to turn it into a giant effect chain.
3. Program a pushing rhythm with Amen logic
Now build the groove in MIDI. Start with a 1-bar or 2-bar clip at your track tempo, usually somewhere around 170–174 BPM for modern DnB or 160–170 BPM for a more breakbeat/jungle feel.
Try this concept:
- Place hits on the offbeats to create forward motion
- Add a few 16th-note pushes before important snare hits
- Leave small gaps so the groove breathes
- Avoid perfect machine repetition by varying note placement slightly
Example rhythmic approach:
- Main hits on the “ands” between the kicks and snares
- A quick double tap into the 2 and 4 snare
- One slightly earlier hit before the next bar to make the loop roll
In Live, open the MIDI clip and use:
- Quantize as a starting point, but don’t hard-lock everything
- Velocity lane to vary hit strength
- Small nudge adjustments of a few milliseconds for human feel
This is where the Amen influence matters: the original break feels like it’s constantly leaning forward. Your ride should do the same, especially in roller-style arrangements where momentum is the whole point.
4. Use velocity to create groove, not just loudness
A ride pattern becomes much more musical when the velocity pattern follows the phrase. In Drum & Bass, velocity isn’t only about dynamics — it shapes perceived swing and aggression.
Suggested velocity ranges:
- Strong accent hits: 100–127
- Normal driving hits: 75–95
- Ghost-like support taps: 40–65
Try this pattern logic:
- Make the first hit of each bar slightly stronger
- Accent the lead-in to a snare or fill
- Drop a few velocities on repeated hits to prevent “white noise constant”
If you want a more broken jungle feel, alternate stronger and weaker accents in a way that mirrors the kick-snare push of the Amen. That gives the ride a “chasing the drum” energy instead of sounding pasted on top.
Practical Ableton move:
- Select the notes
- Use Velocity MIDI effect if you want a controlled range
- Or draw velocities manually for more intentional phrasing
Why this works in DnB: the groove in a dense drum track is often more about accent pattern than note density. A simple pattern with smart velocity can feel bigger than a busy but flat loop.
5. Add groove with swing, but keep it tight
If your ride is too rigid, add a little swing. If it’s too loose, tighten it up. In DnB, the sweet spot is usually subtle.
Options in Ableton:
- Use a Groove Pool groove from a break or swing template
- Apply a small amount of groove to the MIDI clip
- Keep Timing Amount moderate, often around 10–30%
- Keep Random low unless you want a looser jungle feel
For darker rollers, keep the ride mostly tight and use swing only as a hint.
For jungle or broken-tech style sections, push it a bit more so it feels like it’s dancing around the snare.
A useful trick:
- Duplicate the clip
- Apply a slightly different groove amount to the duplicate
- Automate between them every 8 bars for subtle variation
Don’t overdo swing on top of an already syncopated break. The Amen already has enough motion. Your ride should sit on top of it, not fight it.
6. Layer a tiny amount of texture without increasing CPU much
If the ride is clean but too polite, add character with stock tools instead of stacking more samples.
Good low-CPU options:
- Drum Buss: Drive around 5–15%, Crunch low, Boom usually off for rides
- Erosion: Use a very subtle noise mode for gritty edge, then mix low
- Redux: Tiny bit of downsampling for early-2000s bite, but keep it subtle
- Auto Filter: gentle movement or static tone shaping
A strong stock chain could be:
- Simpler
- EQ Eight
- Saturator
- Drum Buss
Suggested settings:
- Drum Buss Drive: light to moderate
- Transient: slightly up if the ride needs more attack
- Damp: lower if the top is too fizzy
- Saturator Soft Clip: on
Keep the processing focused on presence and density, not size. A ride in DnB should cut through bass and breaks without dominating the full top end.
7. Create motion with automation and arrangement
Once the loop works, turn it into an arrangement tool.
Practical automation ideas:
- Automate Filter cutoff to open over 8 bars before a drop
- Automate Reverb send very lightly in breakdowns, then pull it back hard on the drop
- Automate Volume or Device On/Off for switch-ups
- Automate Pitch slightly for riser-style tension in transitions
Arrangement example:
- Intro: filtered ride fragment, low volume, sparse hits
- Build: add more note density and open the filter
- Drop: full ride groove locked to the Amen
- 8-bar switch-up: mute every second bar or remove the tail for a half-time feel
- Outro: strip it back to a DJ-friendly top layer
In a classic DnB structure, a ride groove is especially useful in:
- the last 8 bars before the drop
- the first 16 bars of the drop to increase urgency
- a post-drop variation where you need energy without introducing a new lead
Think of it like a pressure valve: the ride can increase tension without requiring a new melodic hook.
8. Resample the groove for faster editing later
Once the ride pattern is working, bounce it to audio. This is one of the best CPU-saving habits in Ableton Live 12.
Why resample:
- less CPU
- easier chopping
- quick reverse edits
- simpler arrangement decisions
- more control over transient shaping with clips
Do this:
- Solo the ride track and render or resample to a new audio track
- Chop the resampled audio into 1-bar or 2-bar sections
- Reverse one hit or one bar for transitions
- Apply Fade Handles to avoid clicks
- Use Warp Markers only if you need timing correction
This gives you a flexible audio object you can use for:
- fills
- intro textures
- drop alternates
- riser-like repeats
In darker DnB, resampled top loops are gold because they let you create variation quickly while keeping the groove consistent.
Common Mistakes
- Fix: shorten decay in Simpler, high-pass it, or choose a tighter source
- Fix: remove some notes and let velocity and syncopation do the work
- Fix: leave space around the 2 and 4 hits, and cut tail length
- Fix: use small EQ cuts and subtle saturation instead of huge bright boosts
- Fix: keep the ride mostly centered or only lightly wide; check mono compatibility
- Fix: reduce Groove Pool amount and tighten the MIDI timing
- Fix: bounce once the groove works so you can edit faster and save CPU
Pro Tips for Darker / Heavier DnB
Mini Practice Exercise
Spend 15 minutes building two versions of the same ride groove.
1. Pick one short ride or top slice sample and load it into Simpler.
2. Create a 2-bar MIDI pattern at 174 BPM.
3. Make Version A: tight, clean, mostly offbeat, with velocity variation.
4. Make Version B: slightly dirtier, with one extra pickup note and a bit more Drive from Saturator or Drum Buss.
5. Use EQ Eight to keep both versions clean in the low end.
6. Resample each version to audio.
7. Arrange them across 16 bars:
- A for the main drop
- B for the last 8 bars or a switch-up
8. Listen in context with a kick, snare, and sub only.
Goal: by the end, you should be able to hear which ride pushes the track harder and why.

