Main tutorial
Soul Pride Break Roll + Swing Approach (Oldskool Rave Pressure) in Ableton Live 12 🥁⚡
Skill level: Beginner
Category: Arrangement (with practical drum programming + editing)
---
1) Lesson overview
In this lesson you’ll learn a very “oldskool rave” way to make a breakbeat roll and swing like classic jungle/DnB—using the Soul Pride-style break as the vibe reference (tight funk ghosts, little rolls, and shuffled urgency).
We’ll do it the Ableton Live way:
- Slice a break to MIDI (or manually chop)
- Build a roll section (fills + pressure)
- Add swing without losing punch
- Arrange it into a DnB-ready 16/32-bar structure with variation and energy ramps
- A main break groove (Soul Pride vibe)
- A “roll” variation every 4/8 bars
- Tasteful swing and micro-timing
- A simple top layer (hat/ride) for modern DnB drive
- A clean drum bus chain using stock Ableton devices
- Snare: strong on beat 2 and beat 4 (in each bar)
- Kick: place one on 1, and another before/after 3 for movement
- Ghosts: low-velocity snare slices around the main snare to get the funk
- End of bar 4 (classic)
- End of bar 8 (bigger)
- Before drops (bar 15/16, etc.)
- First ghost: ~30–45
- Middle ghosts: ~45–70
- Final hit (lead-in): ~85–110
- Shorten some ghost notes slightly (note length) to avoid machine-gun tails, especially if slices include room/verb.
- Break only (or break + filtered tops)
- Add Auto Filter on Drum Group:
- Add tops fully
- Add a small roll at end of bar 12
- Add a bigger roll at end of bar 16
- Optional: send a snare hit to Return B Dub Delay (1/8 or 1/4)
- Full drums, cleanest groove
- Roll every 4 bars but keep them short (don’t overfill)
- Switch one slice: swap a kick or snare ghost
- Add a “stutter” moment (1 beat):
- Final bar (bar 32): biggest roll into the next section
- Drum Buss Drive up slightly (e.g., +2–4%) into drops
- Reverb send on the last snare before bar 17
- Filter open during builds
- Over-swinging everything: If the main snare gets lazy, your drop loses impact. Swing ghosts/tops more than core hits.
- Rolls too loud: Rolls should lead into the bar, not become the main event. Use velocity shaping.
- Too many slices firing: A real break has air. Leave gaps.
- Warp artifacts: If warping sounds crunchy, try different Warp modes or re-check your warp markers.
- Ignoring arrangement variation: A perfect 2-bar loop can still feel boring. Add changes every 4/8 bars.
- Parallel distortion return:
- “Tight punch” trick:
- Make it more evil with tuning:
- Controlled chaos:
- Space like early rave:
- Slice your break to MIDI so you can program rolls and control swing precisely.
- Build roll pressure with short bursts, velocity ramps, and tasteful placement (every 4/8 bars).
- Use Groove Pool gently—DnB swing is tight and functional.
- Arrange the energy with small variations, automation, and a clean drum bus chain using EQ Eight → Drum Buss → Glue Compressor.
- Layer a simple top pattern to keep the roll modern and driving, while the break provides the soul.
You’ll end with a loop that feels rolling, “pushed,” and rave-ready—not stiff and grid-locked. 🎛️
---
2) What you will build
A 32-bar drum arrangement at 170–174 BPM that includes:
---
3) Step-by-step walkthrough
Step 0 — Session setup (fast + correct)
1. Set tempo to 172 BPM (good DnB middle ground).
2. Time signature: 4/4.
3. Create tracks:
- Audio Track: `Break Raw`
- MIDI Track: `Break Slices`
- Audio Track: `Top Loop` (optional hats/ride)
- Return A: `Short Verb`
- Return B: `Dub Delay`
Workflow tip: Keep the raw break untouched on its own track. You’ll always want a “truth” reference to return to.
---
Step 1 — Get the break behaving (warp + loop cleanly)
1. Drop your Soul Pride-style break sample into `Break Raw`.
2. In Clip View:
- Turn Warp = ON
- Set Seg. BPM if needed (don’t worry if it’s off at first)
- Warp Mode:
- Try Beats for tight punch
- Or Complex Pro if the break is messy (less punchy though)
3. Find a clean 1-bar or 2-bar loop:
- Start at a solid transient (usually kick)
- Loop 1 bar first (easier), then go 2 bars later
Goal: It should loop without flamming or drifting.
---
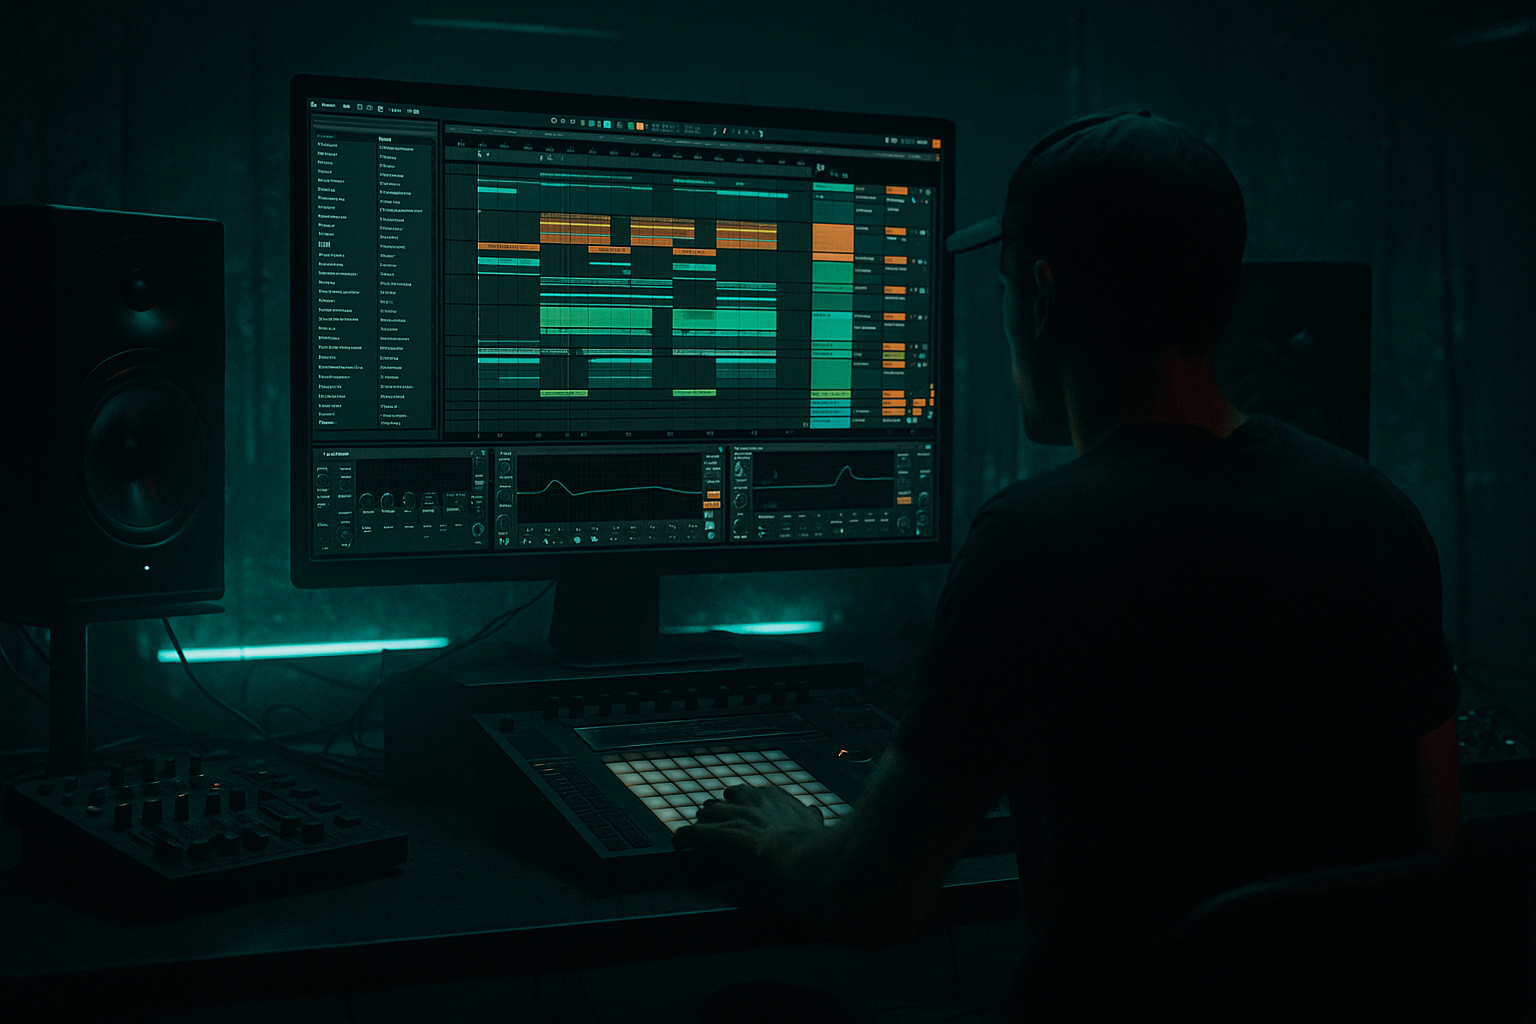
Step 2 — Slice to MIDI (your “break kit” in a Drum Rack) 🔪
1. Right-click the audio clip → Slice to New MIDI Track
2. Settings:
- Slice by: Transients
- Create one slice per: Transient
- Preserve: Warp Settings (if available)
- This creates a Drum Rack on `Break Slices`
3. Open the MIDI clip that gets created.
- You’ll see break hits laid out as MIDI notes.
Why this matters: Now you can rearrange the break like LEGO—rolls, swing, ghost edits—without messy audio cutting.
---
Step 3 — Build the main “rolling” DnB pattern (keep it break-real)
Start with a 2-bar loop. If your sliced MIDI is messy, simplify:
1. Duplicate the cleanest 1 bar to 2 bars.
2. Find:
- The main snare hit slice (usually on beats 2 and 4 in funk, but DnB often emphasizes beat 2 + 4 at high tempo)
- The kick slices
- A few ghost snare slices
Basic DnB skeleton (2 bars):
Practical tip: Don’t over-program. The roll pressure comes from small repeated motifs, not constant chaos.
---
Step 4 — Add “break roll” pressure (the key move) 🔥
A “roll” is basically a short, accelerating-feel fill—often using snare ghosts + tiny kick bits.
Where to place rolls:
How to create a roll (beginner-friendly method):
1. In bar 4 (last half-beat), add 3–6 quick notes using snare/ghost snare slices.
2. Use 16th notes first. If it’s too straight, use 16th-triplet feel sparingly (DnB loves tension from triplets, but too much gets messy).
Velocity shaping (this is crucial):
This makes the roll sound like it’s pulling you into the next bar.
Micro-length variation:
---
Step 5 — Add swing without ruining the break (Groove Pool + subtle quantize) 🕺
Swing in DnB isn’t “house swing.” It’s subtle, tight, and often applied more to hats/ghosts than main snare hits.
#### Option A: Groove Pool (recommended for beginners)
1. Open Groove Pool (left panel).
2. Load a groove:
- Start with MPC 16 Swing 55 or MPC 16 Swing 57
- Or try Ableton’s Swing grooves at 54–58
3. Drag the groove onto your MIDI clip in `Break Slices`.
4. Set groove parameters (Clip Groove settings):
- Timing: 10–25% (keep it subtle)
- Velocity: 0–15% (optional)
- Random: 0–5% (tiny humanization)
5. Hit Commit only when you’re sure.
Important: If your main snare starts feeling late/weak, reduce Timing or exclude key hits (see Option B).
#### Option B: Swing only the “tops/ghosts” (more controlled)
1. Duplicate the MIDI clip.
2. In the duplicate, delete kick + main snare hits, keeping only hats/ghosts.
3. Apply groove to this “tops/ghosts” clip only.
4. Layer it with the “straight backbone” clip (no groove).
This gives rave shuffle while keeping the drop punchy.
---
Step 6 — Layer a tight top loop for modern roll (optional but huge) 🎚️
Oldskool breaks can lack consistent high-end at 172 BPM. Layer a simple hat/ride pattern.
1. Create `Top Loop` MIDI track with a Drum Rack (use a closed hat + ride).
2. Program:
- Closed hat: 16ths, but remove a few hits to breathe
- Ride: 8ths (classic rolling drive)
3. Add groove (same as before) but slightly stronger:
- Timing 20–35%
Mixing tip: High-pass tops with EQ Eight around 250–400 Hz so it doesn’t muddy the break.
---
Step 7 — Clean, punchy drum bus chain (stock devices) 🧼💥
Group `Break Raw` (if used) + `Break Slices` + `Top Loop` into a Drum Group.
On the Drum Group add:
1. EQ Eight
- HP filter: 25–35 Hz (remove rumble)
- Small dip: 250–400 Hz if boxy
- Gentle shelf: 8–10 kHz +1 to +3 dB if dull (optional)
2. Drum Buss
- Drive: 5–15%
- Crunch: 0–10 (watch harshness)
- Boom: 0–10%, Frequency around 50–60 Hz (careful if you’ll add sub bass later)
- Transients: +5 to +15 if you want more snap
3. Glue Compressor
- Attack: 3 ms
- Release: Auto
- Ratio: 2:1
- Aim for 1–3 dB of gain reduction on peaks
- Soft Clip: ON (helps rave punch)
Rule: Don’t “master” your drums here—just make them coherent.
---
Step 8 — Arrangement: turn the loop into oldskool rave pressure (32 bars) 🧱
Here’s a beginner-friendly structure that feels DnB/jungle:
Bars 1–8: Intro groove (DJ-friendly)
- Low-pass starting around 6–10 kHz, slowly opening
Bars 9–16: Build pressure
Bars 17–24: Drop / main section
Bars 25–32: Variation / second phrase
- Duplicate a slice and repeat it 2–4 times quickly
Automation ideas (simple but effective):
---
4) Common mistakes ❌
---
5) Pro tips for darker/heavier DnB 🌑🔩
- Return C with Saturator (Drive 6–12 dB, Soft Clip ON) + EQ Eight (HP at 200 Hz, slight boost at 2–5 kHz)
- Send only snare/ghosts for gritty jungle bite.
- Add Transient Shaper style with Drum Buss Transients or Roar (subtle) to make breaks cut through heavy bass.
- Pitch the entire break down -1 to -3 semitones (Clip Transpose) and compensate with a little high-shelf EQ. Darker instantly.
- Add Random 2–5% in Groove Pool, but keep the main snare un-randomized (or on the straight clip).
- Use short, bright reverb on snare only: Return A with Hybrid Reverb (Short Plate / 0.6–1.0s, HP at 400–800 Hz).
---
6) Mini practice exercise 🎯
Do this in 15–20 minutes:
1. Make a 2-bar break slice groove that feels good without swing.
2. Create two roll fills:
- One small at end of bar 2
- One bigger at end of bar 4
3. Apply MPC 16 Swing 55:
- First on the whole clip (Timing 15%)
- Then try the split method (swing only tops/ghosts)
4. Arrange 8 bars:
- Bars 1–4: no rolls
- Bar 4: big roll into bar 5
- Bars 5–8: add hats layer + one small roll
Export an 8-bar audio and listen away from the DAW: does it feel like it’s “leaning forward” without dragging? That’s the sweet spot.
---
7) Recap ✅
If you want, tell me your break tempo/original BPM and whether you’re aiming for jungle (rawer) or modern rollers (cleaner)—and I’ll suggest a specific groove % and roll template.

