Main tutorial
Lesson Overview
The Soul Pride method is a classic jungle / oldskool DnB transition move where you pull a riser backward into the drop so it feels like the energy is being sucked into a void before the impact lands. In Ableton Live 12, this is especially powerful when you build it from a resampled texture rather than a clean synth riser. That gives you the dusty, strained, tape-like character that sits naturally in jungle, rollers, darker jump-up, and neuro-influenced DnB.
This lesson focuses on using resampling inside Ableton to create a riser pull that sounds like it belongs on an authentic 90s-inspired breakbeat tune, but still hits hard in a modern mix. The goal is not just “make a riser,” but make a tension device that helps your drop feel deeper, faster, and more intentional.
Why this technique matters in DnB:
- DnB drops move fast, so transitions need to be clear and exaggerated
- Oldskool jungle vibes often depend on sampled movement, tape-style pitch shifts, and filtering
- A pulled riser creates a negative-energy gesture that makes the drop feel bigger without overcrowding the arrangement
- Resampling lets you capture drum breaks, noise, reese fragments, FX tails, or atmospheres and turn them into a custom transition element
- chopped breakbeats
- sub-heavy bass
- a rolling groove
- a DJ-friendly 16- or 32-bar structure
- space for tension before the drop
- rises in pitch and intensity
- gets increasingly filtered and compressed
- feels like it is being dragged backward into the downbeat
- uses jungle-style grit and break texture rather than glossy trance-style uplift
- lands cleanly into a DnB drop, with room for the kick, snare, and sub to hit hard
- a 2-step drop
- a halftime breakdown returning to full pace
- a jungle switch-up
- a Reese-led drop with a snare fill
- a darker atmospheric intro into the first main section
- Using a glossy EDM-style riser
- Letting the riser collide with the sub
- Making the pull too smooth
- Overdoing resonance
- Not printing the result
- Having no phrase context
- Letting the riser be too loud
- Use reese fragments as source material
- Try saturation before and after resampling
- Add controlled aliasing for grit
- Automate stereo narrowing toward the drop
- Use reverse ambience under the pull
- Shape the last beat like a vacuum
- Pair the pull with a snare ghost pattern
- Keep the bass movement intentional
- one jungle / dusty
- one cleaner rolling
- one darker and more distorted
- resample from your own drum, bass, or atmosphere material
- use pitch, filter, gain, and width automation to create a pulled feel
- print the result back to audio for speed and character
- keep the sub clear so the drop hits hard
- place the effect inside real DnB phrase structure, not as a random FX moment
- use grit, break texture, and controlled distortion to keep it authentic for jungle and oldskool vibes
This is especially useful when your track already has:
The Soul Pride method is all about making the transition feel inevitable rather than decorative. ⚡
What You Will Build
By the end of this lesson, you will create a pulled riser transition built from resampled audio that:
Musically, the result will sound like a dusty, nervous, stretched-in-time swell that works before:
You’ll also end up with a reusable Ableton workflow for making transition samples from your own track elements, which is a huge advantage for consistency and speed.
Step-by-Step Walkthrough
1. Choose a source that already belongs in the track
Start with something from your own session, not a random generic riser. The best sources for this method are:
- a chopped break loop
- a reese bass stab
- a noise burst from Operator, Wavetable, or Analog
- a vocal fragment or atmospheric hit
- a reverse cymbal or crash tail
For oldskool jungle vibes, a break loop or noisy drum layer usually works best because the texture already has rhythmic identity. For darker rollers, a filtered reese or rumble tail can be more effective.
Best practice:
- pick a sound with midrange detail
- avoid using only pure white noise unless you plan to dirty it up later
- keep the source short, around 1 to 4 bars
If you want the riser to feel “Soul Pride”-style, think sampled and manipulated, not pristine.
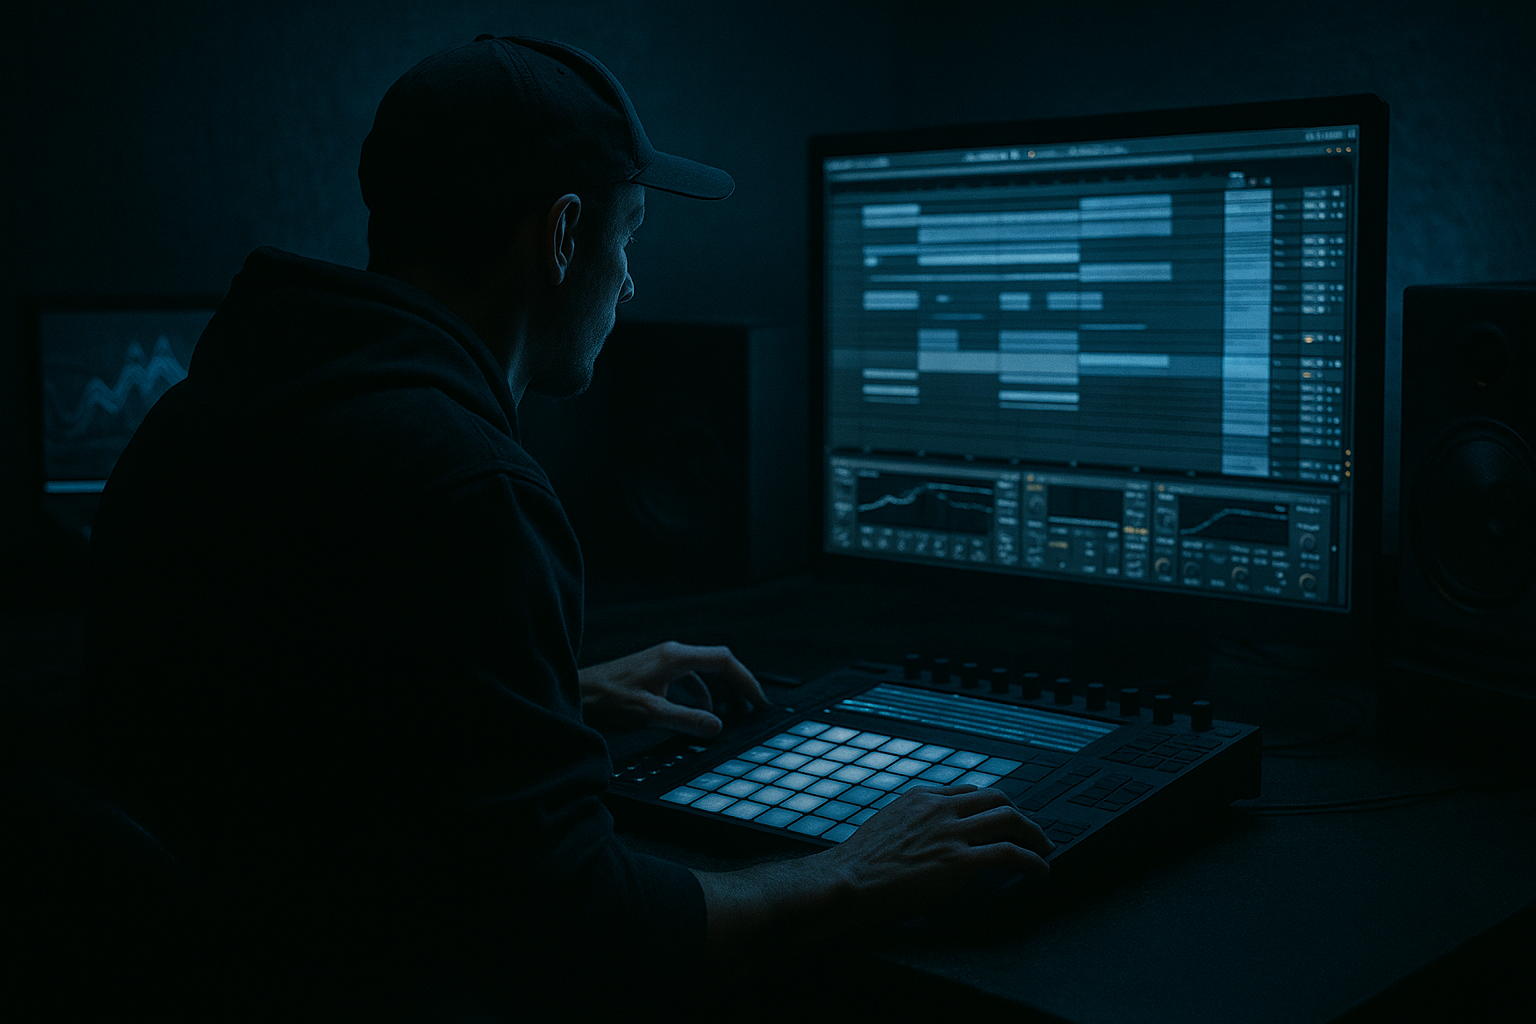
2. Set up a resampling track in Ableton Live
Create a new audio track and set its input to Resampling. Arm it so it records the master output.
Now play back the section of your arrangement where the source material is running, and record 1 to 4 bars of it. Capture a section that has:
- drums and bass interaction
- movement in the groove
- some ambience or FX tail if possible
Why resample here:
- you freeze the vibe of the full mix, not just one isolated sound
- the new file contains glue, room tone, and interaction
- the pulled riser will sound more like it came from the actual tune
If your source is too clean, try printing it after passing through a light chain first:
- Saturator with Drive around 2–6 dB
- EQ Eight with a slight mid push or low cut as needed
- Drum Buss with Drive around 10–20% if you want a more aggressive bite
Record the resample and immediately consolidate the best section so you can work quickly.
3. Warp and shape the audio into a controlled rise
Open the recorded clip and switch Warp on. For a riser pull, you usually want to preserve timing but emphasize movement.
Try these warp approaches:
- Beats mode for break-based or percussive material
- Complex Pro for atmospheric or bass-heavy resamples
- Tones if the source is tonal and you want cleaner pitch movement
For the Soul Pride method, use a clip envelope or warp movement to create the sense of being pulled backward:
- shorten the clip so it ends exactly on the drop
- stretch the beginning slightly if needed
- use warp markers to exaggerate motion toward the final beat
- if the source has a rhythmic pulse, let that pulse accelerate subtly into the drop
A practical approach:
- make the riser 1 or 2 bars long
- place the loudest/brightest point right before the drop
- keep the last 1/4 bar open so the impact has space
This is where the tension starts feeling “drawn in.”
4. Build the pull with pitch, filter, and gain automation
Now add automation lanes to shape the movement. The classic riser pull effect comes from combination, not just pitch.
Use these main controls:
- Clip Transpose: automate upward by about +3 to +12 semitones across the riser
- Auto Filter: automate resonance and cutoff to create a narrowing, escalating tunnel
- Utility: automate gain slightly down toward the drop if you want a sucking sensation
- Sample Offset or start position: if using a sampled break or bass fragment, nudging the start can create a pulling feel
Example automation shape:
- first half: modest pitch rise, open filter slowly
- second half: more aggressive pitch acceleration, cutoff narrows or sweeps depending on the effect
- final beat: quick dip in gain or sudden filter change before the drop
Two useful parameter ranges:
- Auto Filter cutoff: move from roughly 300 Hz to 8–12 kHz for a bright jungle rise, or 120 Hz to 4–6 kHz for a darker, more claustrophobic transition
- Resonance: keep around 10–35% unless you want a strong whistling tone
If the riser feels too “trancey,” reduce the smoothness. DnB transitions usually benefit from more grain, tension, and impact rather than big polished sweeps.
5. Add character with stock Ableton effects
Put a small device chain on the resampled clip or track to make the transition sound custom.
A strong stock chain could be:
- Auto Filter
- Saturator
- Echo or Delay
- Drum Buss
- Utility
Practical settings:
- Saturator: Drive 3–8 dB, Soft Clip on if needed
- Drum Buss: Drive 5–25%, Crunch low-to-moderate, Boom usually off or very low for this task
- Echo: short feedback, around 10–25%, with low-cut/high-cut shaped so it doesn’t clutter the sub region
- Utility: reduce width toward mono for the last part of the riser if the source is too wide
For jungle/oldskool flavor, you can intentionally let some roughness remain. The point is not perfection — it’s energy transfer.
If you want a more brittle, chopped feel, use Redux lightly before saturation. Small amounts of downsampling can add that worn sampler edge without killing clarity.
6. Resample the shaped riser again
This is the key “Soul Pride” move: print the processed riser back into audio.
Route the already-processed riser to another audio track set to Resampling, then record it in real time. This gives you a finished transition sample that:
- is easier to arrange
- reduces CPU
- lets you edit the exact end behavior
- sounds more like a committed production decision
After resampling, trim the clip tightly and inspect the waveform. You want the final spike or surge to hit just before the drop, not linger over it.
Why this works in DnB:
- printed audio locks in the groove and tension
- it avoids over-automation clutter
- it makes your arrangement more decisive
- it creates a “sample culture” workflow that fits jungle and oldskool aesthetics
If the new resample feels too long, fade the tail manually. If it feels too empty, layer a short crash or reversed break hit underneath.
7. Layer the riser pull with a drum or bass transition
A good DnB transition is rarely just one sound. Layer the pulled riser with a supporting element:
- a snare fill
- a break edit
- a reverse kick
- a vocal stab
- a sub drop
- a reese swell
In an oldskool jungle context, this could be:
- 2 bars of break chops
- a snare roll in the final bar
- the pulled riser printed over the top
- a crash and sub hit on the drop
In a darker modern roller context, you might instead:
- keep drums sparse
- use the riser pull plus a filtered bass tail
- add one final snare ghost note before the impact
Use Group Tracks to manage the transition as a unit. For example:
- Drum FX Group
- Bass FX Group
- Atmosphere Group
This makes it easier to automate the whole transition section and keep the arrangement clean.
8. Place it correctly in the arrangement
The riser pull is strongest when it supports a clear phrase. In DnB, that usually means:
- every 8 bars for smaller change-ups
- every 16 bars for main section movement
- every 32 bars for major drop entries or breakdown returns
A solid arrangement example:
- 16-bar intro with break edits
- 16-bar pre-drop where the bass thins out
- 1- or 2-bar Soul Pride riser pull
- hard drop on bar 33 with full drums and sub
For DJ-friendly writing, leave room for:
- intro beat matching
- clean outro
- uncluttered downbeats
- readable phrase lengths
If the transition is too busy, reduce the number of elements before the drop. In DnB, the ear needs a split second of emptiness so the impact feels massive.
9. Mix the transition so it supports the low end, not fights it
The riser pull should live mainly in the mid and high frequencies, leaving the sub region clear for the drop.
Use EQ Eight:
- high-pass the riser around 120–250 Hz depending on the source
- cut harshness around 2.5–5 kHz if the resample gets sharp
- tame unwanted fizz above 10–12 kHz if it distracts from the snare
Use Utility or your width controls to keep the final section stable:
- if the riser becomes too wide, narrow it slightly near the drop
- keep true low-end elements mono
- check the transition in mono to make sure the tension still reads
If the drop bass arrives with a reese, make sure the riser doesn’t mask the bass attack. The riser should feel like it’s opening the door, not standing in it.
Common Mistakes
Fix: resample a break, bass texture, or noisy fragment instead. That immediately makes it feel more like jungle or DnB.
Fix: high-pass the transition aggressively enough that the drop low end stays clean.
Fix: add warpy, grainy, or distorted movement. Oldskool DnB usually benefits from some rough edges.
Fix: keep Auto Filter resonance controlled. If it whistles too much, it can sound cheap or distract from the snare.
Fix: resample the processed audio. A committed audio file is faster to arrange and often sounds more intentional.
Fix: place the pull at the end of an 8-, 16-, or 32-bar section so it supports the track’s structure.
Fix: keep it below the snare impact in level. The drop should feel bigger because of the transition, not because the transition is louder.
Pro Tips for Darker / Heavier DnB
A few seconds of a detuned reese resampled and filtered can create a nasty inward-pulling transition that feels perfect for darker rollers or neuro-leaning sections.
A little Saturator before print, then a little after, can create denser harmonics without needing external tools.
Light Redux on the source can give you that aged sampler tension. Keep it subtle so the top end doesn’t become harsh.
Slight width reduction in the last half-bar can make the drop feel more focused and powerful when it opens back up.
A reversed crash, cymbal tail, or atmospheric hit tucked under the riser gives the transition a haunted, subterranean feel.
A tiny volume dip or filter dip immediately before the drop can make the impact feel like it slams into silence first. That works extremely well in darker DnB.
For jungle and oldskool vibes, a short snare fill or ghosted break chop can make the transition feel more human and more sampled.
If the drop bass is a reese, let the riser hint at the same harmonic family. That makes the transition feel connected rather than pasted on.
Mini Practice Exercise
Spend 15 minutes making one Soul Pride riser pull for a 174 BPM DnB loop.
1. Pick a 1-bar break chop, a bass stab, or a short atmosphere from your track.
2. Resample 2 bars of it in Ableton.
3. Warp it and make a 1-bar or 2-bar transition.
4. Add Auto Filter, Saturator, and Utility.
5. Automate pitch upward by +5 to +9 semitones and open or reshape the filter across the clip.
6. Resample the processed result again.
7. Place it before a drop with a snare fill or break edit.
8. Test it with the bass muted, then with the full drop running.
Goal: make the transition feel like it is pulling energy into the downbeat, not simply rising upward.
If you want an extra challenge, create three versions:
Compare which one creates the strongest drop impact.
Recap
The Soul Pride riser pull is a resampling-based DnB transition technique that creates tension by dragging a processed sound into the drop.
Key takeaways:
If you do it right, the listener should feel the drop being sucked into place. That’s the magic.

