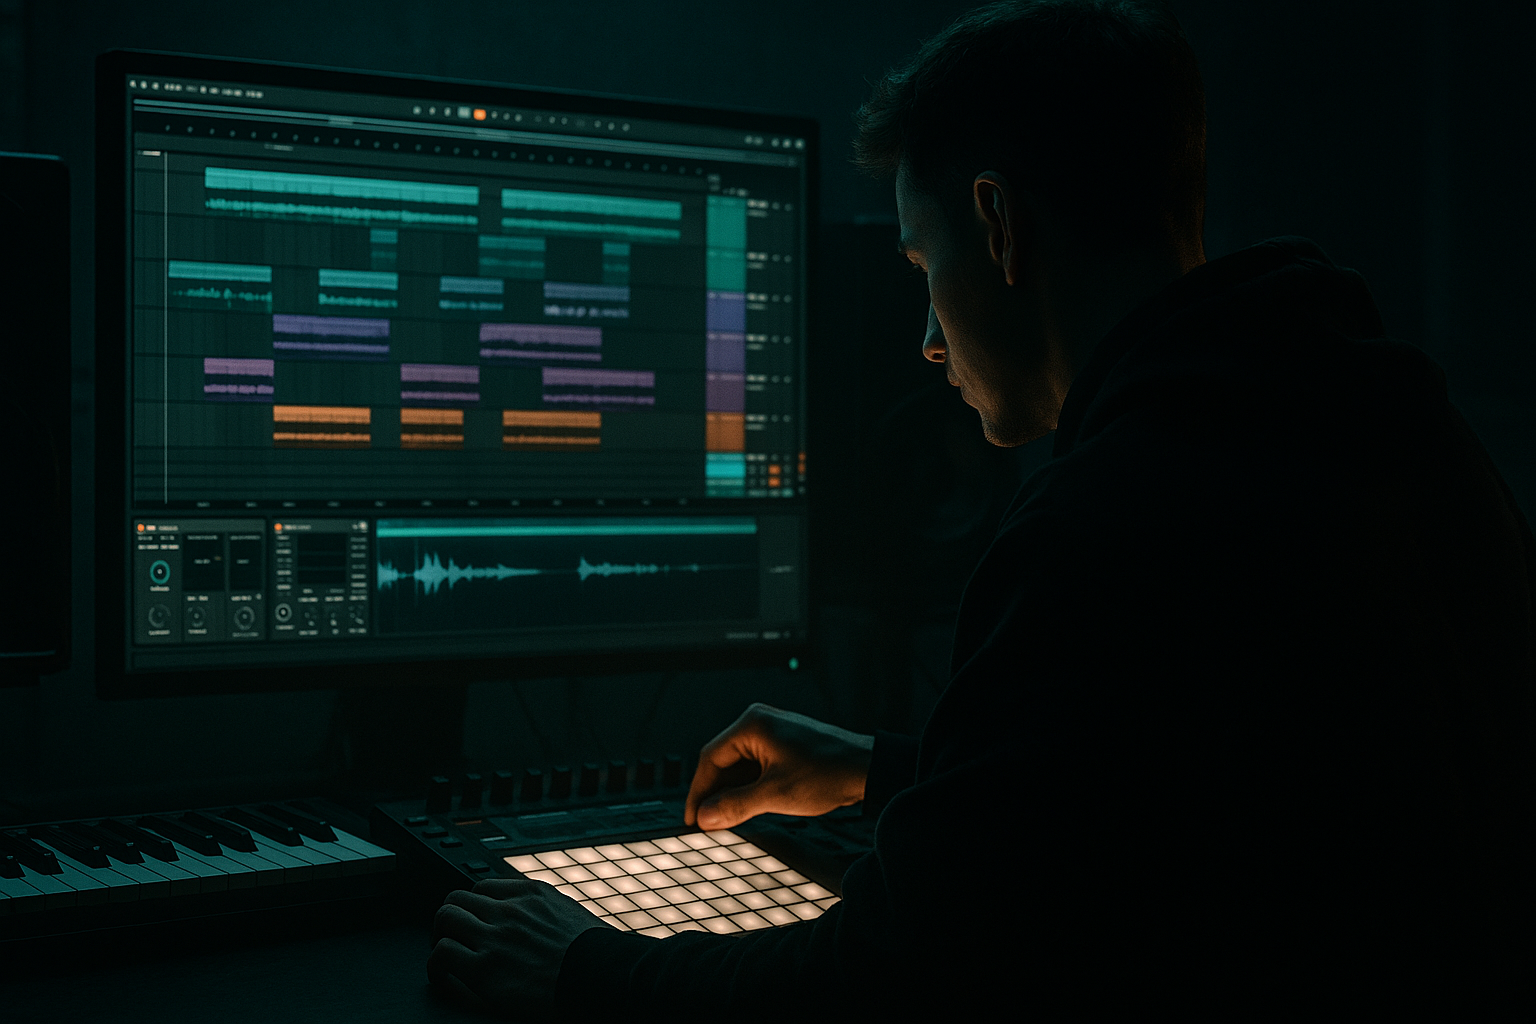
Main tutorial
Vocal Texture Layer Deep Dive (Minimal CPU) — Ableton Live 12 🧪🎤
For jungle / oldskool DnB vibes | Skill: Intermediate | Category: Edits
---
1. Lesson overview
You’re going to build classic jungle-style vocal textures—think rave snippets, time-stretched ghosts, airy pads, filtered chants, distant “radio” phrases—but with a workflow that stays light on CPU in Ableton Live 12.
Key ideas:
- One vocal sample → many layers using resampling, smart warping, and efficient stock devices
- Freeze/Flatten & resample early to keep sessions snappy
- Use Return tracks for reverb/delay instead of stacking heavy reverbs on every layer
- Make textures that sit behind breaks and bass, adding vibe without stealing headroom
- A Vocal Texture Group with macro-style control (using rack mapping)
- CPU-friendly returns (one reverb + one delay)
- A 16-bar arrangement concept that fits rolling/oldskool vibes
- Set tempo: 165–170 BPM (oldskool/jungle sweet spot)
- Turn on Reduced Latency When Monitoring (Options menu) if recording
- Create these tracks:
- Device: Hybrid Reverb (use algorithmic mode to save CPU)
- After it: EQ Eight
- Device: Echo
- After it: Limiter (gentle safety)
- short rave line (“come on”, “rewind”, “listen”, “feel it”)
- spoken word snippet
- soulful one-liner
- Warp: ON
- Mode (choose based on material):
- Formants (Complex Pro): try 0 to +20 (subtle lift), or -10 for darker
- If you need CPU savings: do edits in Complex Pro, then Resample/Flatten later.
- Consolidate a clean phrase: select region → Cmd/Ctrl + J (Consolidate)
- Now you’ve got a tidy clip to duplicate into layers.
- Add Utility → Width 0% just for that moment (automate Utility On/Off).
- EQ Eight
- Auto Filter
- Utility
- Optional Redux (tiny amount for old hardware grit)
- Macro 1: Texture Level → map group Utility Gain
- Macro 2: Darkness → map Auto Filter cutoff (on group)
- Macro 3: Width → map Utility Width (on group)
- Macro 4: Bite → map Saturator Drive (lightly)
- Macro 5: Throw → map Send B amount on HOOK (if you prefer, automate directly)
- `VOCAL_ATMOS` only (filtered dark, wide)
- Automate filter opening slightly
- Add a single `HOOK` stab at the end of bar 4 with a delay throw
- Bring in `VOCAL_GHOST` slowly (volume automation)
- Chop `HOOK` into call-and-response with the snare
- Keep `HOOK` minimal: 1–2 signature stabs per 2 bars (don’t clutter breaks)
- `GHOST` tucked low for vibe
- Kill `ATMOS` or high-pass it harder so it doesn’t wash the drums
- Too much reverb in the drop: washes snares and kills break punch. Print reverb for intros; keep drop verb short or minimal.
- Not high-passing vocal textures: mud fights your Reese/sub instantly. HP aggressively on ghost/atmos layers.
- Over-warping in Complex Pro forever: do it to design, then Freeze/Flatten to recover CPU.
- Wide low end: if your atmos has low frequencies and width, it’ll smear the mono bass. HP first, then widen.
- Too many layers doing the same job: if HOOK is rhythmic, GHOST should be sustained; keep roles separate.
- Pitch down + formant down (subtle):
- Gate the reverb for aggressive oldskool edge:
- Make the vocal “duck” under snares/kicks (tight mix):
- Use Roar carefully (print it):
- Micro-stutters without CPU:
- You built three distinct vocal texture layers (hook/ghost/atmos) designed for jungle/DnB.
- You used returns for efficient space, and printed reverb to audio for huge vibe with tiny CPU load.
- You shaped the layers with EQ, saturation, filtering, modulation, and arranged them to support breaks and bass—never compete with them.
- You wrapped it in a group with macro-style controls for fast decision-making in a real DnB session.
---
2. What you will build
A 3-layer vocal texture system that works in jungle/DnB drops and breakdowns:
1. Top “Hook” Chop (short phrase hits, rhythmic edits)
2. Mid “Ghost” Layer (stretched/warped whisper bed, subtle motion)
3. Wide “Atmos” Layer (reverb-print pad + noise movement)
You’ll end with:
---
3. Step-by-step walkthrough
Step 0 — Session + routing setup (fast + clean) ⚙️
Project prep (recommended):
- Audio Track: `VOCAL_SOURCE`
- Audio Track: `VOCAL_HOOK`
- Audio Track: `VOCAL_GHOST`
- Audio Track: `VOCAL_ATMOS`
- Return A: `VERB`
- Return B: `DLY`
Return A – VERB (CPU-efficient, jungle-friendly)
- Mode: Algorithm
- Algorithm: Hall or Plate
- Decay: 2.5–4.5s (breakdowns), 1.2–2.2s (drops)
- Pre-delay: 15–30ms
- Low Cut: 250–450 Hz
- High Cut: 6–10 kHz
- Cut more low end if needed (steeper HP around 300–500 Hz)
Return B – DLY (classic dubby movement)
- Sync: ON
- Time: 1/8 or 1/4
- Feedback: 25–45%
- Filter: HP 250 Hz, LP 6–8 kHz
- Mod: small (5–10%) for width
Why returns? One good reverb/delay shared across layers = way less CPU than 3–6 separate reverbs.
---
Step 1 — Pick the right vocal & prep it (the “sample hygiene” move) 🧼
Drop a vocal phrase into `VOCAL_SOURCE`. Oldskool-friendly sources:
Clip View settings (Warping):
- Complex Pro for full phrases (best intelligibility, more CPU)
- Complex if you’ll mangle anyway (less CPU)
- Tones if it’s more sung/steady note
Crop it:
---
Step 2 — Layer 1: VOCAL_HOOK (rhythmic chop that rides the break) ✂️🥁
Goal: punchy stabs that respond like a jungle “voxx hit”.
1. Duplicate clip to `VOCAL_HOOK`
2. Enter Warp Markers and chop timing:
- Put hits on offbeats and pickups (classic DnB swing)
- Try a pattern over 1 bar:
- Hit on “& of 2”, 4, and a quick pickup before 1
3. Use Clip Envelopes (super CPU-light):
- Envelopes → Volume
- Draw quick fades to avoid clicks (2–10ms ramps)
Device chain (lightweight, effective):
1. EQ Eight
- HP: 120–200 Hz
- Dip harshness: 2–4 kHz (if needed)
2. Saturator
- Drive: 2–6 dB
- Soft Clip: ON
3. Auto Filter
- Mode: LP12
- Freq: automate between 800 Hz–6 kHz for “rave DJ” vibe
4. Sends:
- Send A (VERB): 5–15%
- Send B (DLY): 8–20% (try higher on the last hit of a phrase)
Oldskool trick: make one hit mono + center so it punches through breaks.
---
Step 3 — Layer 2: VOCAL_GHOST (stretched bed behind the drums) 👻
Goal: a moving “presence” that feels like a memory in the mix.
1. Duplicate clip to `VOCAL_GHOST`
2. Warp it into a texture:
- Set Warp Mode to Texture
- Grain Size: 20–60 ms (smaller = fizzier)
- Flux: 10–25% (adds gentle instability)
3. Stretch the clip length 2x–8x (grab clip edge and extend with warp)
Device chain:
1. EQ Eight
- HP: 250–450 Hz
- LP: 6–10 kHz
2. Chorus-Ensemble (widen without going crazy)
- Amount: 10–25%
- Rate: slow (0.15–0.40 Hz vibe)
3. Auto Pan (subtle motion)
- Amount: 15–30%
- Rate: 1/2 or 1 bar
- Phase: 180° (wide movement)
4. Sends:
- VERB: 15–30%
- DLY: 5–15%
CPU saver move: Once it sounds right, Freeze `VOCAL_GHOST`. If you need it as audio, Flatten. This locks warping/devices into a file.
---
Step 4 — Layer 3: VOCAL_ATMOS (print the reverb into a pad) 🌫️
Goal: that huge, smeared atmosphere you hear in intros and breakdowns—without running huge reverb in real time.
Method: Resample the return like a jungle engineer.
1. Create a new audio track: `PRINT_VERB`
2. Set its input to:
- Audio From: `Return A (VERB)` (or “Resampling” if you prefer printing the full mix)
3. Solo the vocal layers you want feeding VERB (often `VOCAL_GHOST` + a little `HOOK`)
4. Arm `PRINT_VERB` and record 4–16 bars of wet reverb tail
5. Consolidate the recording (Cmd/Ctrl+J) and move it to `VOCAL_ATMOS`
6. Now disable heavy stuff:
- Lower sends / disable reverb if you want even more CPU back
Shape the printed atmos:
- HP: 300–700 Hz (you want it floating above bass/break)
- Notch any ringing
- LP12 around 3–8 kHz, automate opening in builds
- Width: 120–160% (keep lows mono via EQ HP first)
- Downsample: 2–6
- Dry/Wet: 5–15%
This “print and sculpt” approach is one of the best CPU-to-vibe ratios in Live.
---
Step 5 — Grouping + macro control (fast mix decisions) 🎛️
Select `VOCAL_HOOK`, `VOCAL_GHOST`, `VOCAL_ATMOS` → Cmd/Ctrl + G → name it `VOCAL_TEXTURES`.
Add an Audio Effect Rack on the group with macros mapped to:
Group chain suggestion (light):
1. EQ Eight (final cleanup)
2. Glue Compressor
- Attack: 3 ms
- Release: Auto
- Ratio: 2:1
- GR: just 1–2 dB on peaks
3. Utility (width + gain)
---
Step 6 — Arrangement ideas (rooted in jungle/DnB) 🧱
Try this 16-bar loop plan:
Bars 1–4 (Intro / tease):
Bars 5–8 (Build):
Bars 9–16 (Drop):
Classic jungle placement:
Put a vocal stab right before a break fill or restart—bar 8→9 and bar 16 restart are money.
---
4. Common mistakes 🚫
---
5. Pro tips for darker/heavier DnB 🖤
- Clip transpose: -2 to -7 st
- If using Complex Pro, formants -10 to -30 for menace
- Put Gate after Hybrid Reverb on Return A
- Fast release (try 120–250 ms) for that “snatched” tail
- Add Compressor on `VOCAL_TEXTURES`
- Sidechain from Drum Bus / Break track
- Ratio 2:1–4:1, fast attack, adjust threshold until it breathes
- Roar is amazing but can cost CPU. Use it on one layer, resample, then disable.
- Try mild drive + tone shaping for brutal “tape-radio” character.
- Duplicate a hook hit and manually slice it into 1/32–1/16 repeats, consolidate, done.
---
6. Mini practice exercise 🎯
Goal: Build a 16-bar vocal texture that evolves into a drop without CPU spikes.
1. Choose a 1–2 second vocal phrase.
2. Make:
- HOOK: 3 stabs per bar max
- GHOST: Texture warp, stretched to 8 bars
- ATMOS: print reverb to audio and sculpt
3. Freeze/Flatten at least one layer.
4. Automate:
- ATMOS filter opening in bars 1–8
- One delay throw on the last HOOK hit before the drop
5. Bounce a quick demo (File → Export) and listen on low volume:
- If vocals distract from the break, reduce HOOK level or low-pass it.
---
7. Recap ✅
If you want, tell me the type of vocal you’re using (spoken, sung, ragga, rave shouts) and your BPM, and I’ll suggest a specific HOOK rhythm + warp mode choices for that style.

